Jazzmaster Build with a Home Finish

Rick said:
It's not a dominant effect like in a Flake finish.  It adds subtle dimension, giving the eye something to notice, just a hint of being metalic, and you can see through it.  Just makes the surface slightly more interesting.
I know exactly what you mean. My Tele has a light pearl top coat on it. Like you said, it makes it more interesting.
 
3rd coat tru-oil.  Getting a nice gloss.  Getting very mirror like.
 

Attachments

  • JM 3rd coat tru-oil.jpg
    JM 3rd coat tru-oil.jpg
    355.9 KB · Views: 37
  • jm coat 3 tru-oil.jpg
    jm coat 3 tru-oil.jpg
    204.6 KB · Views: 27
No Pics.  Put on 5th coat.  2 to go.  Then I gotta get serious about the fret board.  The neck shaft will be either wenge or bird's eye maple.  fret board will be either rosewood or maple.  Fret board will dictate which pickguard, red pearl or cream.
 
6th Coat.  First time I really looked at this in the daytime.  The color is different than at night.  At night, cream or red pearl work.  During the day, red pearl wins.  Amazing how the quality of light changes appearance.

So now I'm learning towards the red pearl pickguard, rosewood fret board.  So I go with either a plain roasted maple shaft, or bird's eye with a vintage amber tint.

I can see two more coats and then done.
 

Attachments

  • JM 5 coat tru-oil.jpg
    JM 5 coat tru-oil.jpg
    436.7 KB · Views: 60
  • JM close up 5.jpg
    JM close up 5.jpg
    216.5 KB · Views: 49
Put on 7 and 8th coats. No pics. Building up a nice wet gloss. Each coat using less steel wool. By coat 8 just 10% steel wool.  The rest got a good rub with paper towel. When I can get three coats without steel wool it'll be done.
Edit 9 coats. Sunday.  Used steel wool on a very small  patch.
Edit 10 coats.  Monday. I see people stopping at 15 coats, that's on top of the 9 of the Wudtone top coat.
Edit 11 coats. Tuesday.
Edit 12. Coats. Wednesday
Edit 13 coats Thursday
Edit 14 coats Saturday
Edit 15 coats.  Monday.  I can see my reflection in the mirror, I mean finish.  the tru-oil started to form a skin, so I added some naptha.  The end may be in sight.  What I've been doing is between finishes buffing with 0000 steel wool, blowing off the dust, wiping with a tack cloth, then wiping with a paper towel dampened with naptha.
Edit 16 coats.  The oil is getting thick so will have to start thinning more.  Looks like 20 coats and then done.  For the next 4 coats will put it on real thin.
 
With that pearl coat, it should really have some depth to it when you're done.
 
Rick said:
Most of the processes seem to be put on the base coat of whatever, in my case it would be the dye / white base mixture.  If I want it metallic, then put a little glitter in the base coat.  Let that dry good.  Then put on the glitter.  Let that dry good.  Then put on nice clear top coat of whatever.  Let that dry good then buff.  Damn, I'm getting excited!
Rick, Nice Jazzmaster body. Have you considered crushed mother of pearl for your finish? This stuff is very workable and gives off serious pearlescent shine. I used a $10 coffee grinder to reduce the size for my project. When some of the material fell on my drop cloth (paper) it looked just like glitter...only cooler.
 
Oh yeah, it's looking good.  The highlights are a nice touch.  I'll put pics when I'm done.  For the next 4 coats the key will be no over runs or splotches or excess.  It's a pain in the butt, going back and sanding it down.

I really like the idea of the highlights, and the crushed pearl sounds like a great idea.  Up here the auto guys use ground up herkimer diamond dust.  It's really a very clear quartz.  I don't know how they pulverize it, and I'm not going to make it myself, but if I can't get any of the diamond dust, the ground up MOP will be a good alternative.

I can say that anytime I'll do a transparent dye, or translucent finish, I'm going to do some sort of highlighting.  It looks so nice.

Edit.  Coat 17.  3 more to go.  Thinned the tru-oil with naptha.

The Tru-oil was $9.
The tack cloth was $2.

 
Bought the case.  $72 plus shipping, on sale at GuitarFetish.  Coupon code 2019MEM10.

Edit 1 week later.  Case arrived.  One latch was broken.  Ugh.  Not a heck of alot of cushioning but that can be remedied with some foam.  They only communicate with email.  Sent  them pics.  Will report what they say.

As I've said before, if I smash into a cymbal and dent something, it's character.  If it's dented on arrival it's a defect.

Edit, cost now $54.  I have to say the case looks great. Frankly awesome, But it doesn’t have that skb quality.  Padding on the bottom will need to be supplemented.  Fits perfectly in my closet.    Including current build that’s 6.  I have room for two more gits .... then what
 

Attachments

  • GFS case normal latch.jpg
    GFS case normal latch.jpg
    576 KB · Views: 5
  • GFS case broken latch.jpg
    GFS case broken latch.jpg
    577.4 KB · Views: 6
  • jm case closed.JPG
    jm case closed.JPG
    108.4 KB · Views: 16
  • jm guitarfetish offset case open.JPG
    jm guitarfetish offset case open.JPG
    90.6 KB · Views: 14
For $72, you can't go too far wrong. The lighter interior is a plus. It'll be nice to see how the JM fits in it.
 
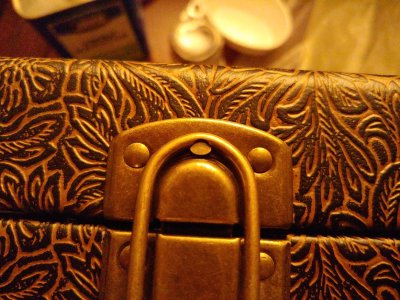
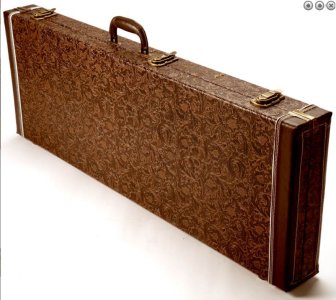
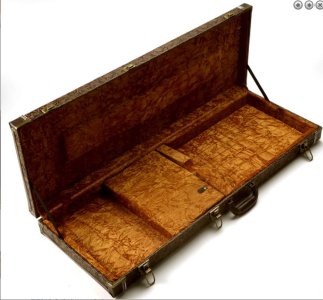
I hope the case works out,too, it looks like it has some character.  All my cases are plain black, except for one plain tolex brown.  It'll be nice to have some variety.  Plus I've got a guitar strap that'll match it!

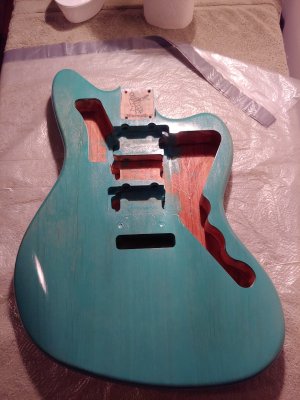
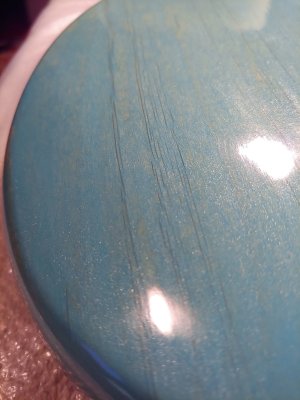
18 coats of tru-oil.  That's on top of 9 coats of dye and 6 coats of the wudtone top coat.  2 to go.  This is not a saga, it's an epic!  That'll be about 35 hours of work (if you include each time going to the basement and retreiving the body, prepping the area, prepping the body, applying the coat of whatever, hanging it back in the basement, cleaning up, posting the progress) by the time I' m done.  I have to say i'm glad I posted because I was having problems remembering exactly how many coats I had left to go. :headbang4:

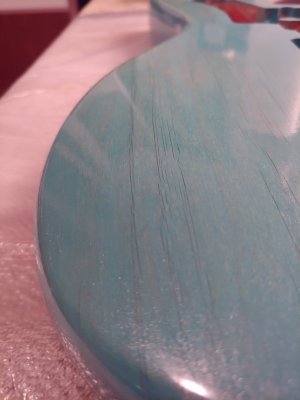
Edit 19th coat applied.  Looking like glass.  One more to go, then it's just a matter of touch ups.  Probably done in a week.

Edit got notification that case arrived at home.

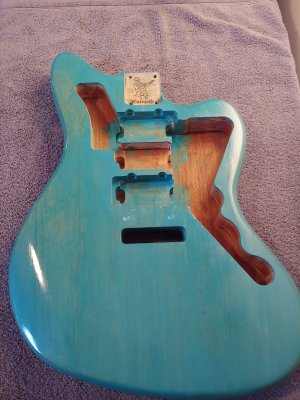
Edit, put on 20th coat.

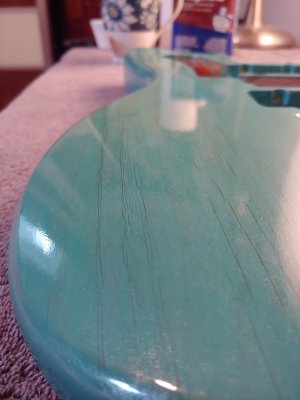
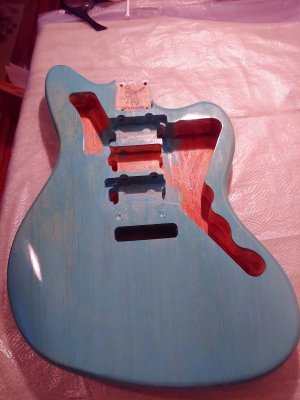
Edit, did over run touch up, 7 places fixed.

Edit, did over run touch up, 3 places fixed.

Edit, did over run touch up, 2 places fixed.  Could I be done?
 
Rick said:
It's [pearlescence] not a dominant effect like in a Flake finish.  It adds subtle dimension, giving the eye something to notice, just a hint of being metalic, and you can see through it.  Just makes the surface slightly more interesting.

Right. I have a pearled surf green Jazzmaster body waiting for attention here. When you first see it, you just think "surf green", but then you do a double-take. The pearl has an interesting effect on what's otherwise just a pastel color.
 
Rick said:
Here are some pics out of the box.  It's soooooo Light!  Now that I've seen the mineral lines (is that what they are?) I want to highlight them, they look really cool and the top has chatoyance ...  I'll hit the sanding mark with 220 grit to make it uniform then I'll finish it.  Also, put in the the 2 1/16th spread trem and it fit perfectly (thanks Logrinn)

Also, note how much deeper the humbucker rout is compared to the jm rout.

I got a GFS body for my build.  I went with a similar bridge and I had to drill the post holes myself...my first time and I have to say it was agony due to the anxiety.  It came out perfect, but my anxiety about it was through the roof.  Next time, I'll get a warmoth body and order it pre-drilled. Your build looks great, love the options
 
Nice Alder Body!! Is that Eastern Pennsylvania Alder or did you get from a supplier. Sorry for all the wood questions.
Looks to be a beautiful piece when she's done!!
 
I sourced the body from warmoth.  I’m pretty sure it comes the great northwest.  I’d like The Aaron to do a video on how a piece of alder goes from the forest to warmoth...

It’s a nice piece of wood, interesting though not overwhelming figure, with black alder beauty marks.  That's why I went with a dye, I wanted some of that goodness to shine thru, but still have some color.

Also, finishing it yourself gives you time to accumulate money for the next step.

If you haven’t bought a body from warmoth I highly recommend it.  There are 0 worries about fitment.
 
$90 neck pup railhammer chisel
 

Attachments

  • Chrome-Cover-RAILHAMMER-CHISEL-NECK-PICKUP-75K.jpg
    Chrome-Cover-RAILHAMMER-CHISEL-NECK-PICKUP-75K.jpg
    328.2 KB · Views: 22
I had to fix about 6 over runs and blemishes on the front.  After it cures, and I hit it with some scratch x, it'll be smooth as glass.  I did the final over run on the back, might be done ... we'll see.
 

Attachments

  • JM Final Coat Front close up.jpg
    JM Final Coat Front close up.jpg
    282 KB · Views: 30
  • jm final coat front.jpg
    jm final coat front.jpg
    119.8 KB · Views: 49
Back
Top