

You are using an out of date browser. It may not display this or other websites correctly.
You should upgrade or use an alternative browser.
You should upgrade or use an alternative browser.
Jazzmaster Build with a Home Finish
- Thread starter Rick
- Start date
Rick
Epic Member
- Messages
- 7,203
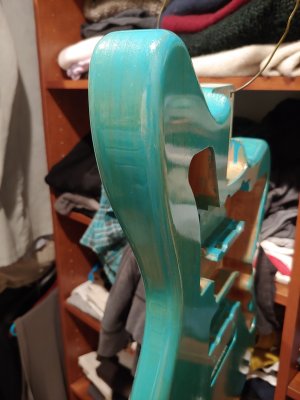
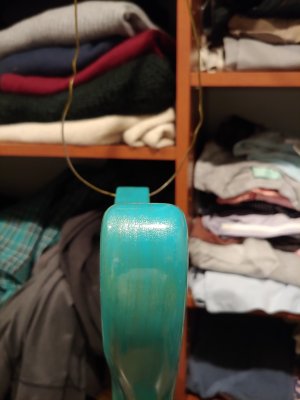
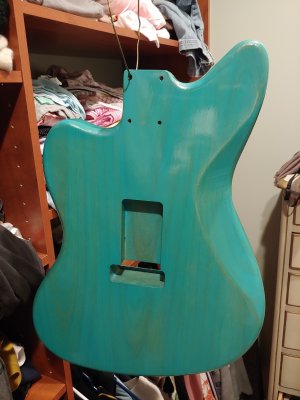
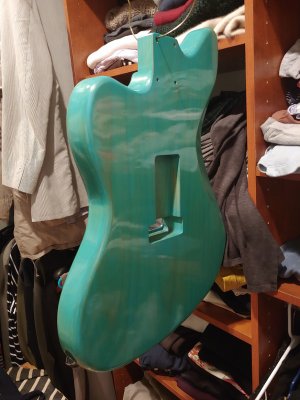
In person, there's so much more depth to the finish. Anyway, looked at the back this morning. Looks good, but tonight I'll get out the magnifying glass. I hope it's done, I want to start building the rest, and I finally have all the money (I think) to order the rest.
Attachments
Rick
Epic Member
- Messages
- 7,203
Ordered the next batch of parts ...
NECK Superwide Strat, Right Handed Reverse, Birdseye Maple, Indian Rosewood, Wolfgang, (Stainless), 21, Arizona, Turquoise Stone Dots, GraphTech White TUSQ XL - Standard Nut, $308.00
PICKGUARD Jazzmaster, Right Handed, Red Pearl, 2 Humbucker, Control 1: Volume; Control 2: Tone; Control 3: None, No Upper Switch, Lower 5 Way Blade Switch, Bridge Cut Non-Jazzmaster® Tremolo $40.00
PICKGUARD TREM Cover Red Pearl, 1 Rectangular Hole $15.80
CTS500 500K Pot, By CTS 2 $10.00
MJ1 Mono Jack, By Switchcraft 1 $3.00
SJP1C Square Side Jack Plate, Chrome 1 $5.00
S1 Pickguard Screw, Dozen, Chrome 2 $4.50
S4 Neck Screw, Set of 4, Chrome 1 $2.60
Total $388.90
Edit (7/15/19: Engraved Neck Plate $20.00
Edit (7/17/19): Keda 5 dye powder kit (No tax if ordered direct) $17.99
Edit (7/26/19): ordered from sporthitech, no tax and minimal shipping cost if ordered direct from them.
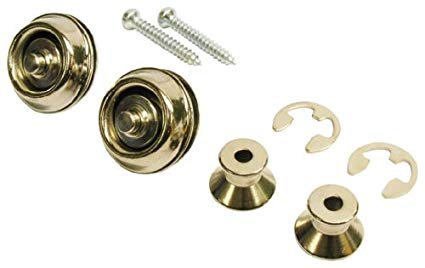
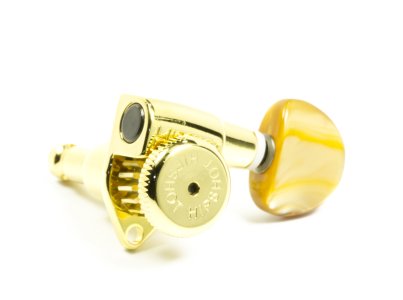
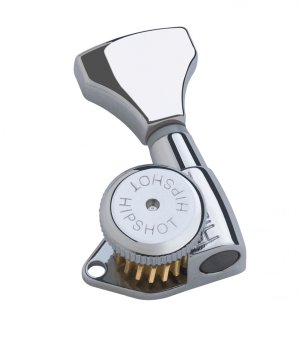
1 x Hipshot Grip-Lock 6 in line Left Hand staggered post Chrome locking tuner $51.45
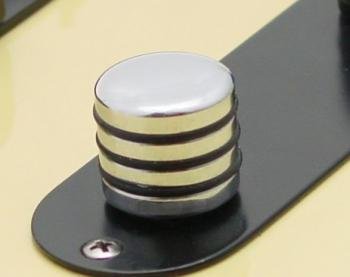
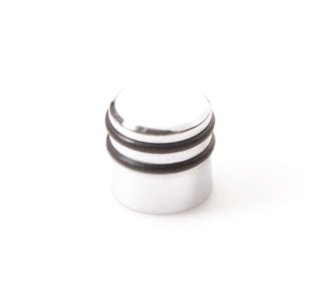
1 x Hipshot O Ring Guitar or Bass Control Knob, Polished Chrome $6.99
1 x Genuine Hipshot Button Set of 6 A12 Amber also fits Grover $10.55
1 x Genuine Hipshot Mini O-Ring Guitar or Bass Control Knob Chrome $6.95
The tone knob is going to be smaller than the volume. I'm going to try to match the amber of the neck to the amber of the tuning button. Saw this arrangement on a jazz bass, it looked cool. So now 4 gits and a bass have added to the design.
Edit 8/3/19 purchased tape and rags for finishing neck. $7.
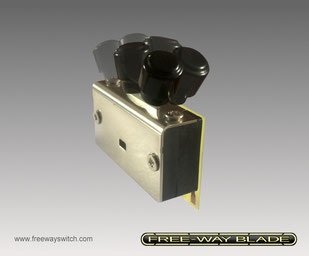
Edit 8/9/19 purchased Free-way 3b3-01 Switch from Vision Guitars $42.95
Edit 8/12/19 purchased dunlop dual design strap locks $12.99
Edit 8/12/19 purchased a fresh bottle of tru-oil $6.99
Edit 9/10/19 purchased mushroom buffer head and scratch x. $25
Running total in guitar fund $55.07 (8/14/19)
(Running total $1302.26 (8/12/19)
NECK Superwide Strat, Right Handed Reverse, Birdseye Maple, Indian Rosewood, Wolfgang, (Stainless), 21, Arizona, Turquoise Stone Dots, GraphTech White TUSQ XL - Standard Nut, $308.00
PICKGUARD Jazzmaster, Right Handed, Red Pearl, 2 Humbucker, Control 1: Volume; Control 2: Tone; Control 3: None, No Upper Switch, Lower 5 Way Blade Switch, Bridge Cut Non-Jazzmaster® Tremolo $40.00
PICKGUARD TREM Cover Red Pearl, 1 Rectangular Hole $15.80
CTS500 500K Pot, By CTS 2 $10.00
MJ1 Mono Jack, By Switchcraft 1 $3.00
SJP1C Square Side Jack Plate, Chrome 1 $5.00
S1 Pickguard Screw, Dozen, Chrome 2 $4.50
S4 Neck Screw, Set of 4, Chrome 1 $2.60
Total $388.90
Edit (7/15/19: Engraved Neck Plate $20.00
Edit (7/17/19): Keda 5 dye powder kit (No tax if ordered direct) $17.99
Edit (7/26/19): ordered from sporthitech, no tax and minimal shipping cost if ordered direct from them.
1 x Hipshot Grip-Lock 6 in line Left Hand staggered post Chrome locking tuner $51.45
1 x Hipshot O Ring Guitar or Bass Control Knob, Polished Chrome $6.99
1 x Genuine Hipshot Button Set of 6 A12 Amber also fits Grover $10.55
1 x Genuine Hipshot Mini O-Ring Guitar or Bass Control Knob Chrome $6.95
The tone knob is going to be smaller than the volume. I'm going to try to match the amber of the neck to the amber of the tuning button. Saw this arrangement on a jazz bass, it looked cool. So now 4 gits and a bass have added to the design.
Edit 8/3/19 purchased tape and rags for finishing neck. $7.
Edit 8/9/19 purchased Free-way 3b3-01 Switch from Vision Guitars $42.95
Edit 8/12/19 purchased dunlop dual design strap locks $12.99
Edit 8/12/19 purchased a fresh bottle of tru-oil $6.99
Edit 9/10/19 purchased mushroom buffer head and scratch x. $25
Running total in guitar fund $55.07 (8/14/19)
(Running total $1302.26 (8/12/19)
Attachments
Rick
Epic Member
- Messages
- 7,203
I know I have 30 days to finish the neck for the warranty, so I'm lining up the materials so I can get right at it.
1) Keda dye. I'm going for an orange amber to contrast the turquoise body. Probably 2 to 3 coats max. Hopefully, the bird's eye's will pop. Bought
2) Tru-oil, my other necks have about 12 coats. Probably will have to buy another 3 oz bottle.
3) Applicator for the dye
4) lint free cloth to wipe off the dye
5) steel wool to scuff the neck to remove the warmoth sealer, after the first coat of dye, after each coat of tru oil. Also to smooth out finish transition between fretboard and neck. Bought.
6) Blue tape to maskoff neck
Rick
Epic Member
- Messages
- 7,203
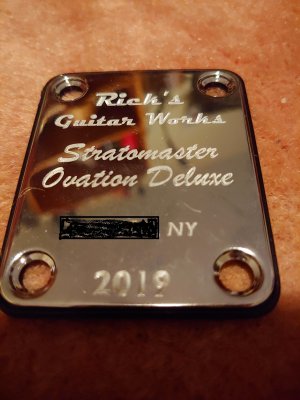
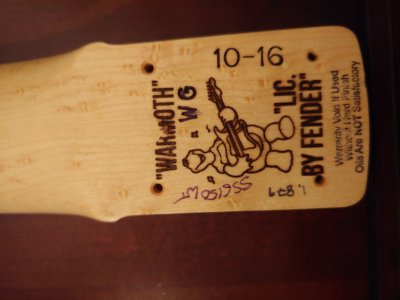
Neck Plate arrived. I gave my workshop the most obvious name. Then acknowledge the four guitars that went into the current build, Stratocaster, Jazzmaster, Ovation Breadwinner and a Teledeluxe. The fonts are magneto (wonderfully retro), brush script (very fendery), gill sans italic bold (also fendery) and gill sans.
Attachments
Rick
Epic Member
- Messages
- 7,203
Arrived 8/15
Order shipped 8/9. :turtle:
edit 8/15 Out for Delivery 9:06 A.M.
edit 8/14
In Transit 08/14/2019 6:19 A.M. Hodgkins, IL, United States
Departure Scan
08/14/2019 5:48 A.M. Hodgkins, IL, United States Arrival Scan
08/10/2019 4:49 A.M. Portland, OR, United States Departure Scan
08/10/2019 1:19 A.M. Portland, OR, United States Arrival Scan
08/09/2019 10:35 P.M. Fife, WA, United States Departure Scan
Past Event Shipped 08/09/2019 9:14 P.M. Fife, WA, United States
Origin Scan
Past Event Label Created 08/09/2019 2:58 P.M. United States
Order Processed: Ready for UPS
 ccasion14:
Rick
Epic Member
- Messages
- 7,203
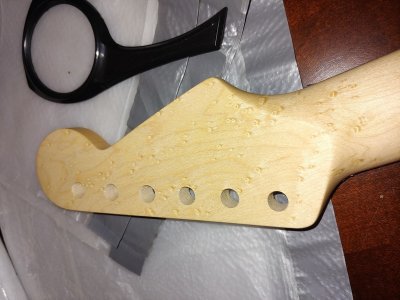
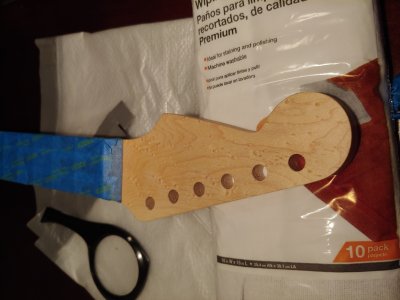
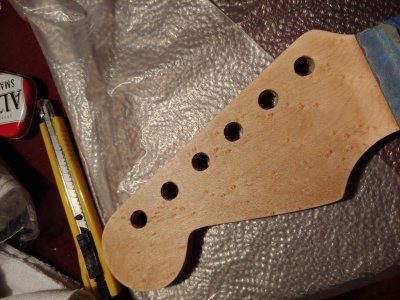
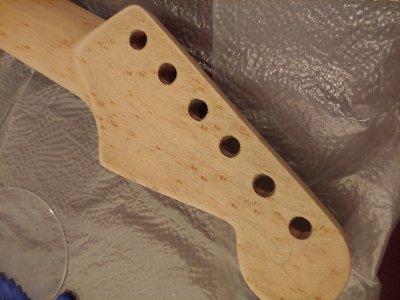
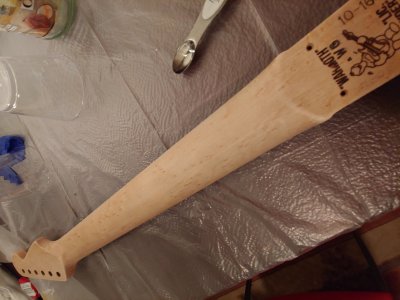
Neck Arrived in good order. Forgot to take before pictures before taping, but the turquoise dots will match the body perfectly.
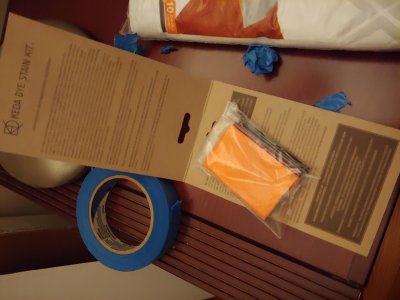
Annexed are pics of the taped up neck before dying, and a pic of the dye kit. I'm going to try to make the neck an orange golden amber.
Annexed are pics of the taped up neck before dying, and a pic of the dye kit. I'm going to try to make the neck an orange golden amber.
Attachments
Rick
Epic Member
- Messages
- 7,203
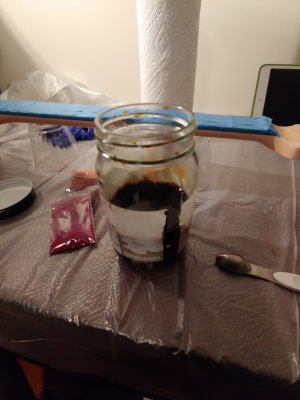
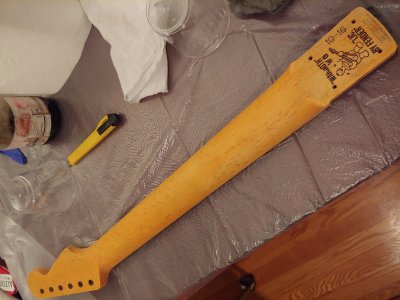
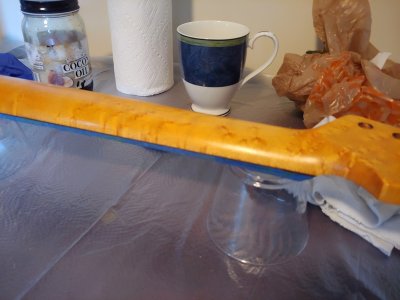
Did the first round of dying. I died it a dark amber to highlight grain features and the bird's eye. The formula was 6 oz of warm water, 1/4 teaspoon yellow, 1/8 teaspoon red, 1/16 teaspoon brown and 1/16 teaspoon blue. This stuff is very powerful so you have to work quickly. I put on the dye. Let it soak for two minutes, then wiped off the excess. I should've only let it sit for a minute because it made the sanding with 400 grit more difficult. So now the bird's eyes pop. After sanding with 400 grit, I sanded with 0000 steel wool. Next step will be to get the plain parts of the wood more orange.
Attachments

Rick
Epic Member
- Messages
- 7,203
This round is to make the unambered features, orange.
2nd dye mixture: 3/8 teaspoon yellow + 1/8 teaspoon red into 6 oz warm water
Applied first coat of dye. Only let it sit a minute, wiped off with old t-shirt. Let dry 24 hours.
Very light sanding with 0000 steel wool to knock down the grain
Applied 2nd coat of dye. Only let it sit a minute, wiped off with old t-shirt. Let dry 24 hours.
Very light sanding with 0000 steel wool.
Burnished wood for 45 minutes using an old soft t-shirt.
Let dry another 24 hours.
Wipe gently with naptha to remove oil.
Let dry .5 hours
Apply first coat of tru-oil as thin as possible.
The burnishing removes any excess dye and lets the dye lie properly in the grains. (at least that's what the directions say)
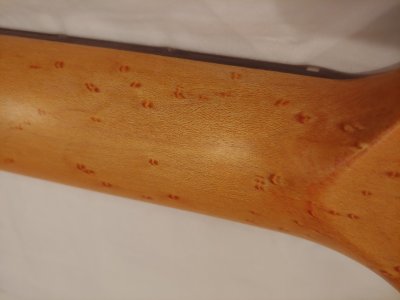
The before dye pic is after I dyed the bird's eyes amber, but before dying the neck orange.
Next pics, baring any issues will be after the last coat of tru-oil.
2nd dye mixture: 3/8 teaspoon yellow + 1/8 teaspoon red into 6 oz warm water
Applied first coat of dye. Only let it sit a minute, wiped off with old t-shirt. Let dry 24 hours.
Very light sanding with 0000 steel wool to knock down the grain
Applied 2nd coat of dye. Only let it sit a minute, wiped off with old t-shirt. Let dry 24 hours.
Very light sanding with 0000 steel wool.
Burnished wood for 45 minutes using an old soft t-shirt.
Let dry another 24 hours.
Wipe gently with naptha to remove oil.
Let dry .5 hours
Apply first coat of tru-oil as thin as possible.
The burnishing removes any excess dye and lets the dye lie properly in the grains. (at least that's what the directions say)
The before dye pic is after I dyed the bird's eyes amber, but before dying the neck orange.
Next pics, baring any issues will be after the last coat of tru-oil.
Attachments

Rick
Epic Member
- Messages
- 7,203
I now have 5 coats of tru-oil (about 8 to go), and the neck is coming out stunning. This keda dye / tru-oil finish is simple and beautiful. Three coats of dye followed by tru-oil. And probably in less than a week it's done. (Of course, I'll have to let it sit for two weeks to cure, and then hit it with some meguiar's scratch x, but man it's easy (at least so far!)) Much easier than the wudtone, but I have to thank wudtone for introducing me to the world of dye.
The pearlescent on the body, and the chatoyance of the neck are nice combo.
Edit: 8/29/19 I just finished the 7th coat this morning. Interestingly, on the 5th coat, I had an overrun. Carefully sanded it off with 0000. For the remaining coats, I'm using tru-oil thinned to 50% with naptha. On coats 6 and 7, no issues. Putting on two coats a day, morning and night. In theory Monday night it should be done. :cool01:
Edit 3/30 I put the 9th coat on this morning. I'm aiming for 14 coats. Should be done Sunday night. That gives me monday to fix any issues. Let's hope I'm putting it on perfectly.
Why 14 coats you might ask? In my research I've seen people put on and as few as three coats on maple, and as many as 25. 14 is right in the middle so it seemed like the safe amount. Plus it can be done in a week and while the finishing is fun, I'm getting tired of it and want to move on. The more I think about, the more the warmoth finishes seem to be a great value.
Edit 10 coats
Similar threads
- Replies
- 27
- Views
- 3K
- Replies
- 89
- Views
- 8K
- Replies
- 3
- Views
- 936