

You are using an out of date browser. It may not display this or other websites correctly.
You should upgrade or use an alternative browser.
You should upgrade or use an alternative browser.
Jazzmaster Build with a Home Finish
- Thread starter Rick
- Start date
Rick
Epic Member
- Messages
- 7,187
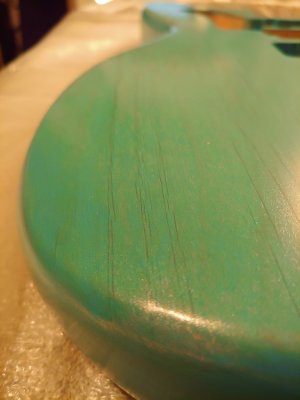
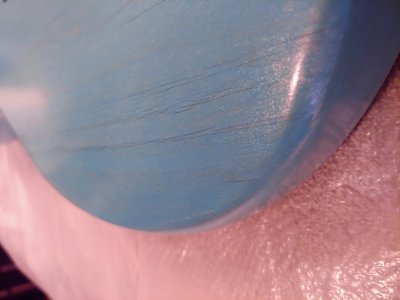
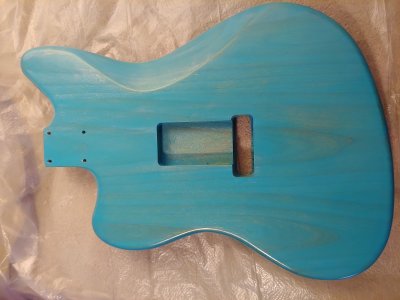
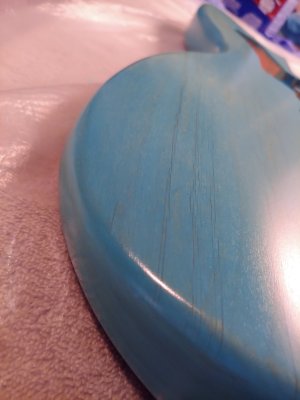
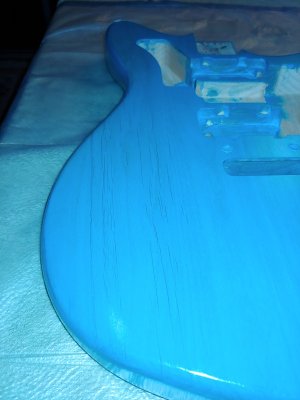
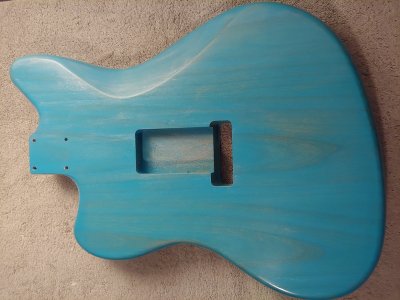
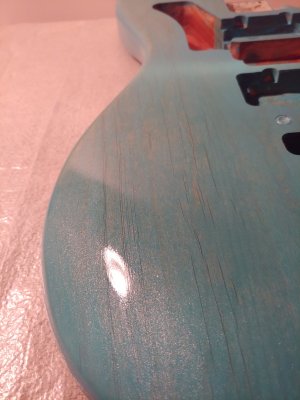
Here it is after the highlights. They aren't like flakes or sparkle. What they do is make the finish reflective. The kit comes with 25 ml of gloss and I used just over 5 mls for the first top coat. I put it on real thin, and underneath the gloss the highlights look sharp. Because of the reflectivity it's hard to photograph. Probably wind up with with 4 top coats with smidge left over.
I took these pics before putting on the top coat. It shows how reflective it's become. The reflectiveness makes it hard to translate the color with my cell phone camera. In the close up you can see how the highlights embed themselves. I'll probably use tru-oil in the pick up cavities and trem space. Also, will use the tru-oil if I want to make the top coat deeper. We'll see how it evolves.
As usual, more pics at each stage.
The top coat seems to be a more viscous version of tru-oil.
Attachments
rgand
Epic Member
- Messages
- 5,934
Looks like those highlights did the trick.
For more gloss, Wudtone can be buffed with typing paper after a couple weeks curing time. On mine, I used a clean cotton pad on a palm buffer with no polishing compounds at all. I'm going to use some wipe-on poly for the one in progress right now.
For more gloss, Wudtone can be buffed with typing paper after a couple weeks curing time. On mine, I used a clean cotton pad on a palm buffer with no polishing compounds at all. I'm going to use some wipe-on poly for the one in progress right now.
Rick
Epic Member
- Messages
- 7,187
My plan is to let it sit for two weeks after 4 top coats are on it. Then, put some tru-oil in the pick up cavity and trem cavity. At that time make an assessment if I want a deeper finish with the tru-oil. Probably two coats of the tru-oil on top. Then let it sit for a month and then buff. The directions say to let the guitar rest 48 hours between top coats and make them as thin as possible, so let's see ... 3 more coats, another week, rest two weeks, maybe two or three coats of tru-oil, let's say a week for that, let it sit for a month, two more months! Oh well ... Rome wasn't built in a day.
It'll give me time to acquire parts, but crikey that's a long time.
Maybe I'll go with wipe on poly.
It'll give me time to acquire parts, but crikey that's a long time.
Maybe I'll go with wipe on poly.
Rick
Epic Member
- Messages
- 7,187
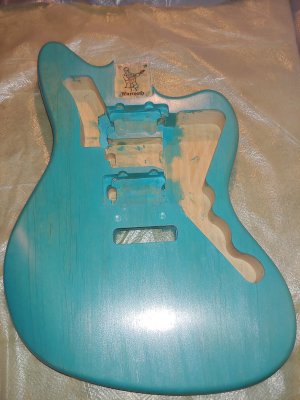
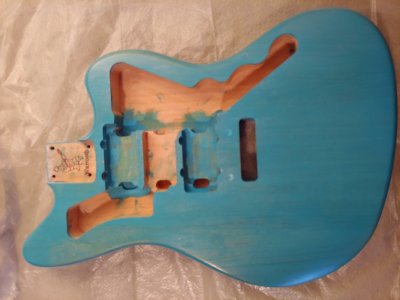
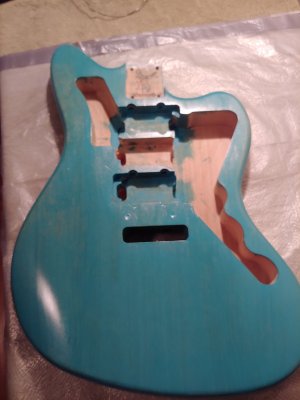
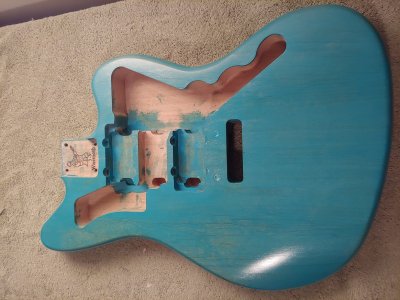
Here it is after the 1st Coat of the top coat. It's looking like something now. I'll say that tru-oil is a lot more easy to manage. You gotta make sure each coat is real real thin. Also, the bottle was supposed to have 25 ml of top coat, but I realize now that it had shrunk down to 20 ml. The first coat used about 5 ml. I applied the second coat last night and used about 4 ml. I'm left with about 11 ml. I looked at it this morning, and it looked good. I can see putting two coats of wipe on poly in the control cavity and in the trem cavity, then applying a couple more coats of tru-oil on top. More pics to follow.
Attachments
Rick
Epic Member
- Messages
- 7,187
And the saga continues ...
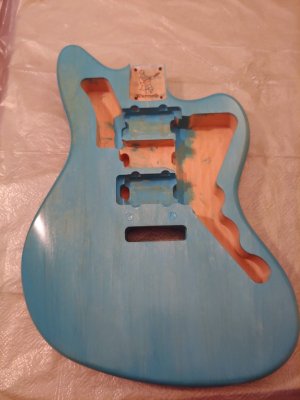
This is the second top coat. Some depth forming. Put it on real thin ... 8.5mls left. that means I used about 3 ml on the 3rd coat. At this rate I have enough, safely, for 2 more coats. Might squeak out 3. That means I'll be done next Thursday, when I'll make an assessment about a couple coats of tru-oil.
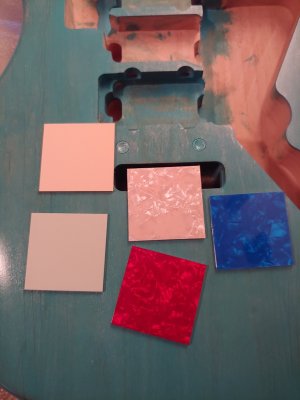
I'm beginning to think about the pickguard and the fretboard. I have black, black pearl, red pearl, cream, blue pearl, white pearl, mint green, vintage pearl, tortoise shell and vintage pearl swatches and pieces to compare. For the fretboard I'm either gonna go with birdseye maple or goncalo.
This is the second top coat. Some depth forming. Put it on real thin ... 8.5mls left. that means I used about 3 ml on the 3rd coat. At this rate I have enough, safely, for 2 more coats. Might squeak out 3. That means I'll be done next Thursday, when I'll make an assessment about a couple coats of tru-oil.
I'm beginning to think about the pickguard and the fretboard. I have black, black pearl, red pearl, cream, blue pearl, white pearl, mint green, vintage pearl, tortoise shell and vintage pearl swatches and pieces to compare. For the fretboard I'm either gonna go with birdseye maple or goncalo.
Attachments
Rick
Epic Member
- Messages
- 7,187
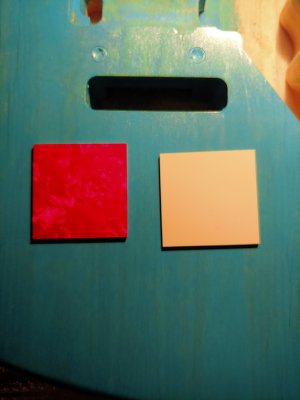
Here'sssssss ... the third coat. Interesting how it can be super blue in some pics. Also some pickguard swatches. The main colors in body are green and blue with some yellow. The mint green isn't green enough, though I'd go with it over white. I don't want black. Not too fond of the vintage pickguard. So it's coming to blue, red or cream.\
I put on a 4th top coat, and I might have enough for one more, reallllllly thin 5th coat. Will assess on Wed.
I put on a 4th top coat, and I might have enough for one more, reallllllly thin 5th coat. Will assess on Wed.
Attachments

Rick
Epic Member
- Messages
- 7,187
I've jettisoned tortoise, black, black pearl, white, white pearl, vintage pearl and now mint and I'm looking for something different.
The cream picks up the yellow, and the blue picks up the blue (obviously) and the red totally contrasts. Tough decision, but very fun.
I'll take some pics after the fourth coat has dried.
The cream picks up the yellow, and the blue picks up the blue (obviously) and the red totally contrasts. Tough decision, but very fun.
I'll take some pics after the fourth coat has dried.
BigSteve22
Hero Member
- Messages
- 2,798
Always been partial to white pearl on blue.... :icon_thumright:
Rick
Epic Member
- Messages
- 7,187
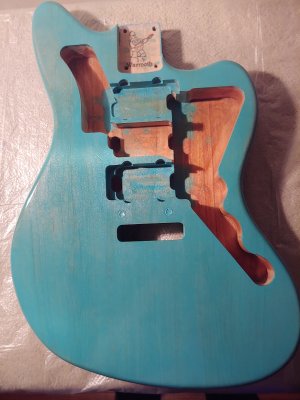
Here's the fourth coat. One last fifth top coat applied, pics on thursday. I'll decide then whether or not to do more top coats with tru-oil
As for the pickguard, I eliminated the blue pearl, as there being too much blue. Left with the red pearl and the cream.
The cream with the turquoise has a wonderful industrial 50's vibe, think muscle car in a pastel blue, cream seats and cream sidewalls, chrome trim.
The red pearl is like a tomato in my garden, with green plants, yellow flowers, and the brown earth.
I suppose it'll come down to the fretboard, if I go with maple, then it'll be cream, picking up that 50's vibe. If I go with something darker like rosewood or goncalo alves it'll be, red pearl, picking up on that garden vibe.
By the way, the red pearl is a lot prettier than in the pics. For some reason my cell does not pick up its reflective depth.
Attachments
Rick
Epic Member
- Messages
- 7,187
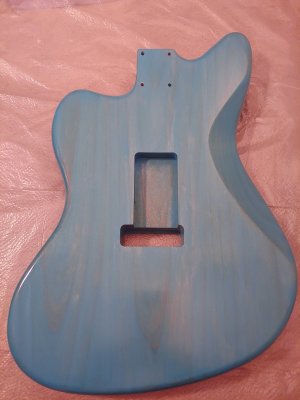
Well ... the wudtone is all used up ... YEAH! Still thinking about putting on 3 or 4 coats of tru-oil, then letting it sit a month and then buffing.
Attachments

Verne Bunsen
Hero Member
- Messages
- 2,518
Looks great! I love the texture that remains with those Wudtone finishes, makes me want to do one.
rgand
Epic Member
- Messages
- 5,934
The Wudtone finish feels great, too. It's a thin finish and they claim the guitars sound better with it.-VB- said:Looks great! I love the texture that remains with those Wudtone finishes, makes me want to do one.
Rick
Epic Member
- Messages
- 7,187
At this point I'm looking at an hobre neck. Shaft in birds eye. Probably an amber finish. Fretboard, either rosewood or bird's eye. In lays, either nothing, or celtic cross.
I got the tru-oil. Probably put on 4 or 5 coats. I found that after 1.5 months the tru-oil buffs to a nice gloss.
I got the tru-oil. Probably put on 4 or 5 coats. I found that after 1.5 months the tru-oil buffs to a nice gloss.
Rick
Epic Member
- Messages
- 7,187
Not so sure about the hombre neck. Leaning towards cream pickguard for either rosewood or maple fingerboard. In my pursuit of a deeper / wetter look I added 2 coats of tru-oil. Probably going to add 3 or 5 more coats. I did 7 on a previous swamp ash body and that seemed to be enough.
Attachments
Similar threads
- Replies
- 27
- Views
- 3K
- Replies
- 89
- Views
- 8K
- Replies
- 3
- Views
- 928