ESS-335 Kit (Non Warmoth)

Ddbltrbl

Hero Member
Messages
755
So...
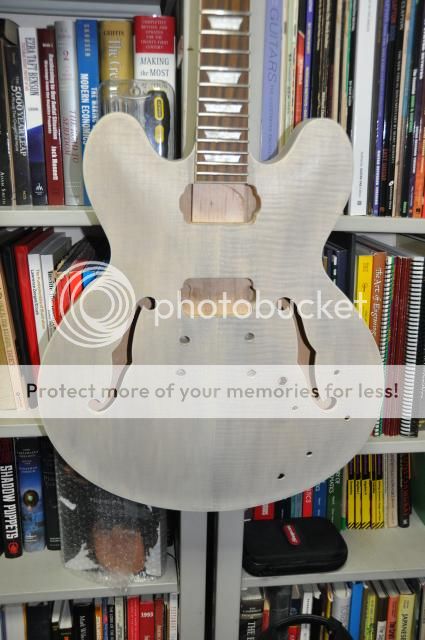
After seeing Magicbisket's posts here GFS 335 Kit, here Just Out of the Box, and here Work in Progress I determined I really needed a 335 and that I should try this for myself. :dontknow:

I got the kit last August and really haven't found any time to put towards it until this week. The kit was complete and arrived in Yokohama in good condition. When I opened it I found several little issues, but I was generally happy so far. The biggest concerns I noticed immediately were:
1. Horrid nut installation:
RIMG0016_zpscb8da859.jpg

Sorry I didn't get a clearer picture. I really wanted to replace the nut anyway, but the original nut is installed so deep and uneven that it will take some work. Plus the headstock was done so that it undercuts the nut by about 1/3rd. You can't really see it in the picture.

2. Rough neck pocket:
RIMG0021_zps2f20ce46.jpg

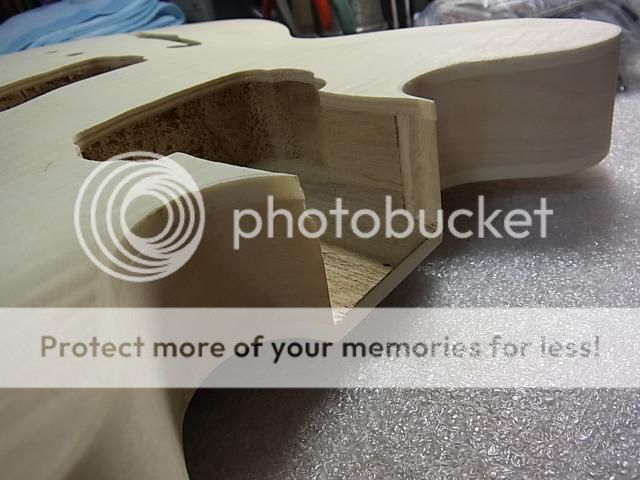
I'll fix that so it's not noticeable, but makes you wonder about the setup.

3. Various scratches and gouges, and similar glue issues to what Magicbisket ran into with his.
RIMG0032_zpse517a578.jpg

RIMG0033_zpsee08d4e9.jpg

RIMG0038_zpsb4b96c25.jpg

Fortunately I have the benefit of his experience and knew to check first. Bottom line; if you're going to do one of these kits, expect to do a lot of prep work before it goes together.

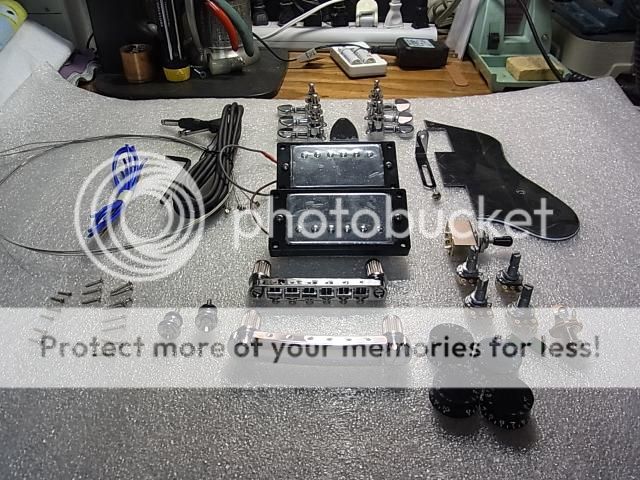
The hardware is pretty cheap (to be expected in a $200 kit) so I plan to replace a lot of it. Particularly the pickups, jack and 3-way switch. I also noticed that the bridge is non-standard. The posts are larger and the thread size different than the standard Gibson, so I maybe stuck with it. It's not too bad, but I will probably at least replace the saddles. And, I think I will replace the tuners with mini Schallers.
RIMG0053_zpsbdb281f2.jpg


I spent 3 evenings sanding out all the problems with the body and getting all the surface prep the way I like it. Besides the scratches and glue, I found a number of areas were the binding or the channel was uneven in thickness. But, I think I've finally got it all ready to go.

I plan to do the whole guitar in a red dye, so I think I will glue in the neck before I start the finish. Anyway, I didn't care for the headstock as it came, so I did a little modification. Here is the orginal, followed by my mod.
RIMG0013a_zps9f04434e.jpg

DSC_0001_zps94d8cc01.jpg

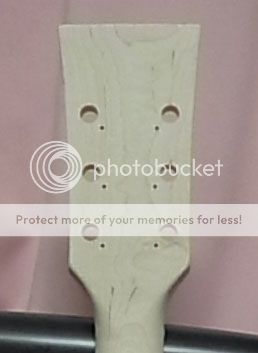
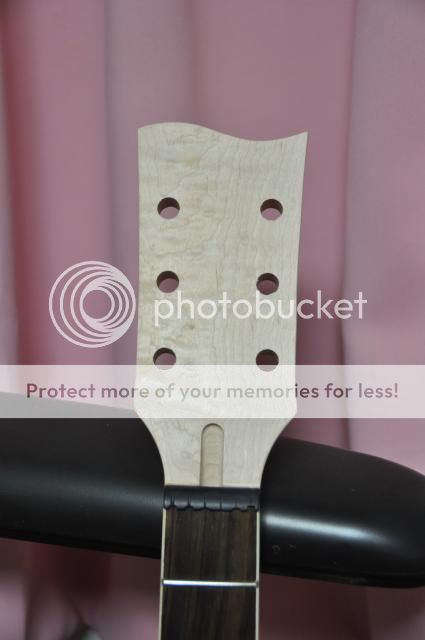
As you can see, I installed a Earvana nut. I had to put quite a thick shim under it to make it work. You can also see the poor shape of the right side of the headstock that I still have to clean up.

I also discovered that it is 12 3/8" from the nut to the 12 fret, but closer to 12 3/4" from the 12th fret to the center of the bridge. Will check tomorrow whether I can move the neck 3/8" closer to the bridge without causing problems for the neck pickup. I also just noticed on GFS's site that the current kits don't have the bridge holes pre-drilled, so this wouldn't be a problem. Nor would replacing the bridge.
:dontknow:

Anyway, I don't think I would recommend this kit to anyone without at least some experience!  :sad1:
 
Well, there doesn't seem to be a great deal of interest in this project, but I guess I'll see it through to the end.

I double checked the scale length and confirmed that there is about 1/4" more distance between the 12th fret and the bridge than there is between the nut and the 12th fret. I emailed GFS about what could be done and they responded that they wanted pictures. So, I sent them some. but they responded that they wanted to see the total scale length showing both ends of the measuring device like I was trying to pull something on them. :icon_scratch: In fairness, they did mention the possiblity of returning it for a replacement. But I figure it isn't worth the trouble and cost of shipping it back to them. So, I'm going to go ahead and build it as best as I can as is.  :sad1: I'm learning a lot about dye finishes, and I guess it is better here than on a really nice and expensive Warmoth body. :dontknow:
Anyway, I got the surface prep done, though 2 quick rubs with 320 on the area on the lower front part of the body where the scratch was, was all it took to break through to the 2nd layer of the veneer. Obviously, someone at the factory tried to remove the scratch before me.  :dontknow: I found another spot on the back up at the corner of the neck pocket that was already through to the second layer as well. Both are going to take some effort to hide. :doh:
Next I hit it with a light wash of black, and sanded it back being very careful not to sand through the veneer any where else.
DSC_0005-1_zps4d1f8eac.jpg

DSC_0006-1_zps43923d2f.jpg

The spots don't look too obvious yet in those shots, but you can really see them after I got the red on.
Here it is almost ready for the first coat of poly... just got to make that spot less obvious!  :icon_scratch:
DSC_0022-2_zps7aaf7320.jpg

DSC_0023_zps71eaf15f.jpg

Will post again after I get the first coat of clear on. :guitarplayer2:
 
Thats starting to look really nice! I cant wait to see it with the clear coat on. Keep up the good work!
 
Lookin' good!

Be aware, if you aren't already, that it's even easier to sand/buff through clear coats than it is to get through veneer. So, be sure to get enough coats on there that you reduce that risk.
 
Looks good.  Like Cagey said the veneer is thin.  There is another build with one of these going on. They went for blue.  There were some issues with a glue line.  It does not look like you have that issue.  I like the headstock.  Simple
 
Thanks for the caution Cagey! Not my first time around for clear coats, so I know to be careful. But, I swear to you this one spot in the veneer was as thin as toilet paper! The rest of it seems to be OK.  :dontknow: But, I do appreciate your advice!  :icon_thumright:

DMRACO -- yeah, I was fortunate enough to read Magicbisket's post before I started on this, so I knew I had to pay close attention to the center seam. They apparently aren't very careful to finish the edges of the 2 halves before they join them. The result is no matter how far down you sand there is a fairly wide glue stripe. In fact, at the very bottom of the back there is about 3/8" of the seam that actual has a 1/16" gap in between the 2 halves, filled with glue of course! I just sanded the whole thing carefully and then used a paint brush to apply dye heavily above the glue. It ain't perfect, but it is pretty hard to find. Now I'm trying to do the same thing for the thin spot in the veneer.

I got the headstock idea from my very first guitar, a 1972 Sears "Space Dot" (SR) branded Teisco 1445 like below, though the wave went the opposite direction on the Teisco.  :toothy12:
1445_aa.jpg
 
Found a little time to get started on the poly coats. Here's a couple of shots after the first coat.  :dontknow:
DSC_0027a_zps7398eaeb.jpg

DSC_0029a_zpsff7f8aa2.jpg

Still a lot left to do.  :guitarplayer2:
 
Thanks Johnny. I made some more measurements and found that the bridge is wide enough that I should be able to just make it work by moving the saddles way forward. But, I am debating just pluggin the bridge post holes and re-drilling them!  ???

Thanks Clearerphish! It took some work with a  brush and different concentrates of the dye. You can still tell, but even up close it looks pretty much like a natural pattern in the maple.
:guitarplayer2:
 
If you do plug and redrill be sure to post plenty of detail pics. When I read that statement, a  :sign13: went off in my head. For some reason I was overlooking the SEMI in semi-hollow. Will have to see about shimming/re-angling the neck pocket.

I might can have a flatmount, no angle 335 after all.
 
Yeah Swarfrat, I was thinking along the same lines, but its probably too much work to make worthwhile to me for this project. I got to mull it over a bunch more before I decide.  :dontknow: But, the new kits from GFS don't have the bridge holes pre-drilled! :icon_thumright:

DMRACO - Good poly and a spray booth are damn near impossible to make happen here in Japan, at least for a hobbyist like myself. So, I'm cheating and using a wipe on poly from Miniwax. It takes a lot of coats and a lot of work, but I've gotten pretty good results with it so far (3 guitars and multiple other items). It just takes some time and lots of patience. I'll do 3 or 4 coats with a light buff in between, and then lightly sand for smoothness, then repeat. Depending on how well I prep the surface it can take me 4-5 rounds of that and a good buffing to get a good thick glassy look. In the case of this project, it is going to take at least that much! I really envy folks with a nice shop or garage to work in!  :toothy11:
:guitarplayer2:
 
Did you happen to take any measurements on that tenon before gluing it in?
 
Yes, what measurement do you need Swarfrat? I'll dig my notes out tomorrow and post whatever you want.
 
I think this should be sufficient to completely characterize it:

g6520_zps4c1d26a2.png
 
I'm curious about your finishing process.  I am wanting to do something similar with one of my projects.  I am following the process laid out on the Fret Tech site under Info & Pictures (you have to scroll down a bit).

http://www.frettech.com

He recommends doing two or three light spray on coats of poly before doing the wipe on coats.  Did you do this?  His reasoning is that it helps if and when you need to repair a chip.  That makes sense, but while I may have a better opportunity to actually do the spraying, I'm really worried about messing that part up.

Also, what do you use to buff down with between coats?  He recommends steel wool but I was wondering if the 3M pads would work as well.
 
@swarfrat
Neck Outset = 5 3/4"
Neck Thickness (Thickest point) = 1 7/8"
Tenon Thickness = 11/16"
Tenon Width (at tip which is widest point = 2 1/4"
Tenon Length (from end of fretboard to the tip) = 1 3/4" originally, I removed about 1/16" from the tip of the tenon trying to adjust the scale length issue. But, now that means my neck pickup ring is going to set right on the edge of the pickup rout. Had I removed any more, the fretboard would have protruded past the edge of the hole, and would have started to run the risk of too loose a fit side-to-side in the neck pocket.
Also, your drawing seems to show tenon length measured from the heel of the neck, but the heel shape is pretty arbitrary, so I measured from the end of the portion of the neck covered by the fretboard to the end of the tenon, which should give you a more accurate reference. Hope this helps, and if you need other measurements just let me know.
:eek:ccasion14:

@Johnny
Disclaimer - I'm not an expert. You might want to ask Tonar, or maybe Cagey before making any decisions on finishes. :)
But, based on what experience I have, I totally agree with what Mr. DiStefano says in his "Guitar Finish" articles.
I did not do an initial spray coat, because I am having trouble identifying a reliable poly spray I can obtain locally. I can't even get the Miniwax Wipe On Poly here and had to carry it back in my luggage from the US. However, I would have done so if I could have gotten a reliable spray. As Mr. DiStefan says, you will get some mixing, that will inevitably get on any binding you have. That can even happen a little in the 2nd, and maybe even the 3rd coat, so if you are doing a red dye job like I was, you may have to scrape the binding with every coat... that is unless you like pink bindings!  :dontknow: :laughing7:
One additional reason to spray beyond what Mr. DiStefano gives is that the thicker base given by the spray will also help to more quickly fill any of the inevitable "texture" in the wood, getting you to the smooth gloss finish in less coats with less concern for breaking through to wood when you buff with steel wool, or do a smoothing sand after several coats like I do. Also, Wipe On Poly coats are very thin! If you don't use a spray base and find some smoothing that is needed, I suggest you wait until after you have applied at least 3 coats to do it. And, you might not want to try to get it perfectly smooth the first time! Just get it good, wipe on 3 more coats of poly, and then smooth it out again... wash and repeat until perfect! For that reason, I wouldn't worry too much about messing up any base spray coat; you can always smooth out any flaws after a few wipe on coats.
However, if you don't have any place you can spray on poly then, its' "wipe on" all the way! :laughing7:
I have used both steel wool and 3M (Gray Scotch-Brite) pads. I personally prefer the pads, but I always use a pad that has been broken in a bit. With a light touch the pad will act just like steel wool, but be careful because with a heavier touch it will still act like 320 grit.
My strongest advice to you is about surface prep. I can't stress enough to make certain you have all scratches or anything else out before you stain or coat! If you think you have it good enough, I would suggest sanding the whole thing one more time with 320. Seriously, the first 2 times I did this finish on a wood project, the first clear coat showed me scratches in places I was certain were good to go!  :tard:
And, I really like Mr. DiStefano's suggestion of buffing the wood with a paper towel (I use the rolls of blue shop towels) after you clean it with a little lighter fluid and prior to applying the first coat.  :icon_thumright:
Hope that helps.  :eek:ccasion14:
 
Thanks - and good call on the heel to tenon length - that was just a sloppy drawing mistake. So I think this might work:
Bridge to 12th12th to Heel Bridge to HeelWidth Neck Thickness Tenon LengthTenon Thickness Bridge to Tenon Pocket Depth (Thickness – Pocket Depth) Pocket Length
GFS 335 12.375 5.75 6.625 2.250 1.875 1.750 0.688 4.875
Fender 12.75 5.625 7.125 2.188 1.000 5.250 1.250 4.875 0.625 0.375 3

So I think this will work - but I'm afraid it might be ugly than I originally thought The bolts and neck plate would be completely clear of the body (did I do the math right? I think I did.) There's plenty of thickness to adjust any neck angle out. Perhaps the biggest issue (aside from the awkwardness of the protruding bolt on neck) would be that the 1/16" width gap split in two is going to have to be filled - leaving a 1/32 wall that's 5/8" x 3" on either side is beyond my routing abilities.

I didn't do the math on the pickup route to see if that would need to be included in the block, then routed out, but aside from that it looks like a rectangular block 5.25" x 2.25" x 1.25" glued in there would let you mount our favorite parts maker's fender compatible necks into a 335. You'll probably want square heels though. Weee bariatric 335's galore!
 
Back
Top