Ugly Duckling build thread (roasted swamp ash Jaguar)

Logrinn

Hero Member
Messages
3,634
The first thing I did yesterday was the bridge.
This Jaguar will be getting a Gotoh Tune-o-matic bridge:

838.jpg_m.jpg


So how do one go about to fasten such a bridge in the holes routed for Jaguar/Jazzmaster bridge thimbles?
Easy! With the help of these "excenter" bushings I fond on Rockinger's website.

1b1.jpg_m.jpg


Here's a better picture from Rockinger's website:
Observe the offset holes that allows for adjustment of TOM bridges with different post spacings.

1658c_600x600.jpg


The bushings in place:

7bf.jpg_m.jpg


One of the TOM posts screwed in:

c3c.jpg_m.jpg


Bridge in place:

331.jpg_m.jpg


Next up - the tailpiece.
Should I go with the straight ...

a51.jpg_m.jpg


or with the diagonal one?

730.jpg_m.jpg


To be continued ...
 
Logrinn said:
...Easy! With the help of these "excenter" bushings I fond on Rockinger's website...

Neat. Another useful thing to file away.

Logrinn said:
...Next up - the tailpiece.

Should I go with the straight ...

or with the diagonal one?...

Go with the straight, but the other version with the longer string length/shallower break angle.  :evil4:

Just kidding. Both look good - the angled one is a more unusual look I suppose, but there's a lot of room for some cool engraving on the straight one.
 
Fat Pete said:
Just kidding. Both look good - the angled one is a more unusual look I suppose, but there's a lot of room for some cool engraving on the straight one....
Wow, I've never seen a Jazzy/Jag hard tail conversion plate with angled string mounts! That is so cool. I would definitely use that one, in fact, if I had known about them at the time, I would have used one on mine! And, it would still make a fine canvas for engraving, (if that's your intent), maybe something similar to the work Doug did on my Tele bridge....
 

Attachments

  • Big Steve bridge.jpg
    Big Steve bridge.jpg
    51.2 KB · Views: 12
Logrinn said:
So how do one go about to fasten such a bridge in the holes routed for Jaguar/Jazzmaster bridge thimbles?
Easy! With the help of these "excenter" bushings I fond on Rockinger's website.
What a cool solution.

Logrinn said:
Next up - the tailpiece.
Should I go with the straight ...

or with the diagonal one?
I would probably use the straight one but both will look good. I haven't seen the angled one before.

So far, you've posted about two things that I didn't know existed. Both are good finds.
 
Rgand said:
So far, you've posted about two things that I didn't know existed. Both are good finds.

Thanks, Robert.
That's what so good about this forum. There's always something to discover or learn.
 
So I've decided to go with the diagonal tailpiece (for now - if it looks wrong or weird or doesn't feel right I can always change to the straight one).
I first saw this one (the straight short tailpiece) at Faction guitars, but they were out of stock when I was collecting parts for this build.
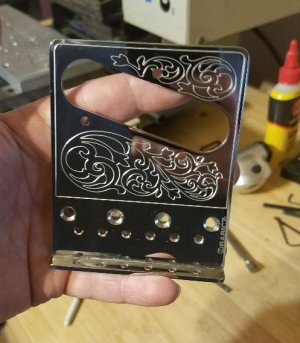
By chance I instead found a guy on Reverb that does similar stuff at a fraction of the cost - Expressway Guitars. He also had this diagonal tailpiece that I ordered at the same time. Very cool guy to work with, helpful and extremely fast delivery. Highly recommended if you're in the lookout for some stuff like this.

The plates are steel and buffed to a shine, but the edges are very sharp:

155758078477557400_resized.jpg


A couple of episodes of Miracle Workers on HBO while rubbing the edges with some 220 and 400 grit sandpaper took care of that.

155765954062350700_resized.jpg


Unfortunately I realized that I don't have the right type of screws for the tailpiece, so for now it's only in place with some pickguard screws - much too short for this tailpiece I would think.
But this is the result:

155765954608290400_resized.jpg


155765953920170600_resized.jpg


Then I did some shielding, my first attempt with copper foil. It's only the pickup cavity so far, but still ... Not too shabby:

155765954371994300_resized.jpg


More to come ...


The edge of that plate cleaned up nicely. Good job, there.

It'll be nice to see how that plate looks with the PG and control plate on.

I see he also makes a diagonal blade switchplate for the Jaguar. Are you going to do standard Jag wiring or something simpler?
 
Thanks.
I did get the diagonal switchplate as a matter of fact.
I will not be doing the standard switching but something much simpler - sort of.
I'm going for a 4-way Tele switch. That will give me the option of having both single coil pickups in series. And since I got this pickup set from Creamery I choose to have the neck pickup wired RWRP so I'll get true humbucking wiring.
I'm also planning on having the switch wired differently than usual:
1: both in series
2: bridge
3: both in parallell
4: neck

We'll see how that goes ...

Here's the switch and plate:

155768469297741800_resized.jpg


That will make the guitar really nice to use. I just ordered one of those plates myself and I'm not even building a Jaguar. For now... :laughing11:
 
I just used the same type of tail piece on my jaguar that i finished yesterday, and I used pickguard screws. Seems to be no issues so far
 
I think I would be inclined towards finding something a little sturdier than pick-guard screws. I doubt they will hold well over the long term.

Especially for Logrinn when he unleashes the offset fury on this new build  :icon_thumright:
 
stratamania said:
I think I would be inclined towards finding something a little sturdier than pick-guard screws. I doubt they will hold well over the long term.

Especially for Logrinn when he unleashes the offset fury on this new build  :icon_thumright:

:toothy12: :toothy12: :toothy12:

Good advice. I have managed to do unspeakable things to guitars on stage ...
 
stratamania said:
I think I would be inclined towards finding something a little sturdier than pick-guard screws. I doubt they will hold well over the long term.
As I recall, I used #6x1/2" stainless, oval head, wood screws on mine. I know I looked for information on the proper size, but don't think I ever found a definitive answer, so I just used what would fit in the holes and the plate countersinks. Also a plus that they were available at a local hardware store!
 
BigSteve22 said:
stratamania said:
I think I would be inclined towards finding something a little sturdier than pick-guard screws. I doubt they will hold well over the long term.
As I recall, I used #6x1/2" stainless, oval head, wood screws on mine. I know I looked for information on the proper size, but don't think I ever found a definitive answer, so I just used what would fit in the holes and the plate countersinks. Also a plus that they were available at a local hardware store!

That seems a pragmatic piece of engineering. The art of that looks about right sadly seems to get lost at times  :rock-on: :icon_thumright:
 
Screwing on pots to the control plate. I really liked the kill pot by Shadow that I put in my Mustang, so I decided to go with another one in this Jaguar. That’s the one on the left and I’m using a Bourns pot for the tone. Both 500k which might be a bit too bright with these single coils I’ll be using. We’ll just have to see ...

155768440595060600_resized.jpg


Another view:

155768440295827700_resized.jpg


Now pots with different shafts might cause problems when it comes to knobs. I had these Danelectro type knobs that could match the colour of the body, but they’re made for split shaft pots:

155768440444101900_resized.jpg


The solution? The excellent Knobeez knobs I’ve used on several of my builds. Just press them on - done!

155768440908369400_resized.jpg


Now if I only had a pair of the same colour ...

155768440747584100_resized.jpg

 
Too bad those Danelectro knobs don't go on that pot. The Knobeez do look good on there, though. I still have that black pair. You want me to send them over?
 
Very kind of you to offer, Robert.  :eek:ccasion14:
But I think you should keep those for a future build.
I have given some thought to a push-pull pot together with a 3-way blade as an alternative to the 4-way blade. And I have such a pot that also happen to fit the Danelectro knobs. So I’ll find a solution one way or another.
 
Back
Top