Some build pics and a question...

Paul_in_KC

Junior Member
Messages
39
So, I guess this is sort of a continuation of my first post in "Out of the Box"

Here are a few pics of my Telecaster build.

First, a finished picture of the neck. It's a new USA Fender American Standard neck. I replaced the standard white plastic markers with abalone that I selected to complement the body finish. It turned out great. I am really happy with the result. I think it looks great on the guitar too.

VGK0FK2t0l2bZxdSYpbmQcA_7d2r11bsicd5oEatYLS-d6bQD4QxT6j5JXIjMuOCLvdQDGo5bzc5WcKY9XW_P2LkstXtOQRcmcf4MhzgttdQ39KEz_2ESG7nvYPB8phWbkRocaZHAa-z6qu4OHMctFxKSVY74P0W1FlsbVOFf_UCKIe4KYwOgvO_aCDzQUmJKrywRYh446vI-8jmISI6WLhzvEmb1LgjYT7oKO-yX6QEfu4plE8RzHcJPlAGILXG9VDvO8QvUseg2IM-l-qp3KfOdng9VdtkZh9MjvpQ62cA5xP45c9h9xKngmahCV4mkvFUj-6zEwBT44Gc3Ek1QDkVXXOfm-Bk_j21Uo-y9VSULQhyoVHI_0i769HLGLy9rgObYwIQZE73478enRSJbJihGkmbyN8ctmcYgGWekHbD21Wq1MBGxuJP1ovJ0Pgz820PfF6u97_AxNTiDQh-9n0Lo0D21h67ZHmdLioYZRmQf3TeYFX8nL6XWQjdCoQ3RrRO5_8b2JHxhHGa3323Wfzwgb2UAAMH6cSqLY4chzXvvaRfCd7b8xWxqgOnb1DzAsxXg8SEBqdKZ1egCLkp6lpl6wv57mD0dfXeTvSjI2UAEBl4Vg9f5Nid=w1809-h593-no


Since this neck has the Micro-tilt feature - I decided to install the parts in the body for that to be functional...
mrMk6OSHuicysM31n7xDYbmeomG2sGenghM-ftIPntxRf9eslsfjlPR10tosWx5G6721Nk8ifuMIUryt18LRwI1G0qf2DEhA0nyYgb43U9AysZXRsHgEDKC9VgTtThokDe2AivCLPhSlh8h4WONc0gg02W0VOZEHGnWtJZ-kIGmlgGfbCgbglLFPlyiu1MCAL3QyDy95iaS0YshF4qTRc0oGD3Pbzl_6159DWoTaz6MZR5RDRvvp8Vfh-NXGsAEBWEXfWMpZXCM5gC5xHvYQympm3AyY3v4DJRp_4uUPaVERzuj-Z3o1-QgBSS6A4CpVYjDfE56sTEQSMjxOqPge3g-LuUygOLm642U-E_FE_gKXSpO7mh8Or302CddYejZTq_tle9dgDlt_KWuvvb41rFdHKnPfec3K8j1xM-g7IJX2wl7kgIazhYRMqvNpeuvoDzCxvSPxj_kyMer_KBv1VJPfzMFbTOV5no4TWeWGWUdOnRUgFoRLPJAqprHF3ueTJ1GAW4kB3puodJ3QwichvMC5NbcucCXbKZF1QtgUdoRIl2Ib9LMcAI4sCoU_2XNYEcVFAa5Nwtohca3CYTGIoOvKwBs4JFKGoQqdRpqL4Om47svgs0Stngnw=w1236-h877-no


Here is the neck on the body before I started working on the body...
tER3salyPqmB_WrFR1_k6TGW694VtZYlBe-O_A0nD47ldVH625k_-9ZZaBlVW1m9Ox53knM2jLZvLp7DGvH0fbT9S4M5Fog3vYaGhfIqzgkdlHt4uEEUSQZah16hK1bxdkP--jlwrcduVMmm5lIhvfWV2TNEGmhtGAj5fivd1-KDPcvQoA48vISFfpHgKQByVJMJPoSQokZ7c4s9wIjvqYzjy_iKYNBnq8EimRTdNDxwCe3Jkw0URVHRwoMPtvFojAa0-fMViHXKcYwk1IQ74fVPyBpf39MTYuL2oNmIFljzftjI0qeT5fC9pbX0G_A5ZLXQe-ns3598T6J4UuMbBXJceERqW1S4mxhssqbDe0UTcnwiBek-jmkrTut_Q2fDxglmedtZfNIYr4mM5olMwxvL5lvzrjZ_dzZOwdqmrmwgV5-FoJSmMiX47QmcaSM5YcFaOE3p71ApRBi4w_pOksHeRtyHlRtInQfEmGjZOoJKFULWtArD5TdVNxnFr2KH20ZTWfydTI7dei9Q0roed3Ch42Fb0Qripi75j-qaWZpkXCKVFT24YiPgZQhP3tZ2XQcmHM3DiEOm3-CGrfZ_uRhP1M-OgRPDJjTyliP4fr1YDdUEkNxrzExu=w480-h876-no


Shielding the cavities - first with paint and then with copper. I was just going to use the paint - but someone said they had some trouble with the shielding paint flaking and causing problems in the electrical components. So, I decided to line the paint with copper. The cooper will keep the paint from flaking if it was going to - and is a lot more conductive than the paint.
G2TGELtbIb1X1y6Fl6H7TGWVTVSe5j0ewSV3NLAkXQTEzyozJgObbDVEdvvo9S7ZIosnyQZPZJHq9vyOydc08kXrbHHYNgObBYScYWhe9aWYae2S3I-gVUTxk4zdsP7qDd94Tr_inIXAupf5adDZlVl3MTuxG_VvYHlxiv9L1Zc-WxLy1fQKHvFGsDfEUbUDvCmtOQUdGazrP37Npj7de3VAMY4mWwbq4YgRSWyA-hBHEt8Jk8UhjJO31I6tSrg3PRkf9pe2KRCVrjd0uUNjLUzko7ld4vrGiwILFLeJpHIl5YQM1Mh9c5p7By1XU9xQ-T7_76YF5DU5bK0yWtg4gpHn9u2dTkDnux34k8Uak062erepxKlLc23BKCzXCB7YNQ9WQqH24HB7r6fWu0N0NhCGBbsUjaCm0mu9YDt_u7WN56pbbHRc9U5jfutZwwf2PdHZIYt8t4tocm-2rmezOa76GSdVWVm2RwWHGG1SFOoeXGX8O8LTrMCVK6jozBEB5YZp_7Zg8me2yLiPg3DlliB9IN0pUrGhEB5LrjElWXbOJWA2JEGlJDPXjBBRLQrwnwoIX6qiPwp_S4MUpuHuYOVle9Fbddu6PW3UQvz5_ek6jn5JZbIpDnz0=w1200-h876-no


Here is the body with the bridge and pickups (Lindy Fralin) installed...
[I think she's a looker]
Pzki0e9rdmTQop_YD_1BFKCzOXNZAaab4G1UZq9wz2XM-ZgobATd_GClzS6V1YWQd-tPNuDizOAiTMORDIpUNBdnpwnV2C_ajKyzdy5Oh3dqkoUs135PANYvbymtBBn75PyBU59nJtQX2W3wyjLWuCrEphm4ftrezYE4YQ70zbJVRbsUdYhr3jR6cAeZEK8W0bDNdSqgBBW-S1ku0FBNLCn7a05btye32BDY9KtXx8UTMNC-veEptHrgLmALwaGPlW-lbapO2KFP0cBN99aeQL9AtPrhwQxNmHrebIi4SywZkoQ_7RU1DZCWG5IHerlB--BiStgo85R7-Wqc4VZTy6Hq51rsOezM1Ph9X97Kqj3qS6FQ0cYV8oaJmQlQIHYrwIFcfA_ox9ZDbpDIqsDl-xCn4mgvP1LNbGLTf7Twp4DBoGaVeAp3toQLtJza0z5_vWLlNPdCszQ_fi8tEd1k75inTxhV_MsgS4LUwpm4AQdGv6YTHacdDNh6JHx0ILOImoqzdN7VF62RGY4bfmsZC454HIWw4ka2eSWXdMSfNflQShUneYYu3h4O8lh2reNVt7HDjRdOTxukCG8HX41ixn1Dp2z00DWhbPoMtY-rdXu5bpbiwGX_ZX6F=w1109-h876-no


So, here comes the question. It was at this point, when I started to install the controls (going to wired with S-1 switch on volume like American Deluxe) that I realized that the S-1 switch and tone pot that I ordered are "short" thread/shaft and won't mount with the rear route as is.

I really want to use the S-1 switch - but it's not available in a long thread version (as far as I know).

It seems that other's here have simply routed more material around the mounting hole - similar to what Warmoth does around the selector switch mounting.

Anyone here with direct experience resolving this?

I considered switching to a 4-way selector and long-thread pots. But can only find those in split-shaft. And I'm not sure if the knobs that I bought to mount on solid shafts will work with the split. I hate to buy new knobs too.

Any input would be appreciated.

Thanks,
-Paul
 
Input: That last photo sure looks good. The color is really nice and the chrome adds more class to it.
 
Paul_in_KC said:
...I considered switching to a 4-way selector and long-thread pots. But can only find those in split-shaft. And I'm not sure if the knobs that I bought to mount on solid shafts will work with the split. I hate to buy new knobs too...

Looking mighty fine!

Regarding the 4-way switch, I love that configuration and frankly haven't managed to figure out why it isn't stock... Super versatile and you don't have to give up anything. It requires that the neck pickup cover has a separate ground lead, chances are good that the Fralins came that way though?

Regarding the knobs, that shouldn't be a show stopper. If your set-screw knobs are 6mm, they'll go right on a split shaft pot. Just align the set screw with the split. If the knobs are 1/4", brass adapter sleeves can be had to fit them properly on a 6mm split shaft. I have a whole bin of those adapter sleeves and would be happy to set you up with a couple if you need them.
 
Rgand said:
Input: That last photo sure looks good. The color is really nice and the chrome adds more class to it.

Thanks Rgand!

Yeah - I have to agree. I think its looks are improved by the installation of the pickups and bridge. Though I wasn't expecting that.

-Paul
 
Verne Bunsen said:
Paul_in_KC said:
...I considered switching to a 4-way selector and long-thread pots. But can only find those in split-shaft. And I'm not sure if the knobs that I bought to mount on solid shafts will work with the split. I hate to buy new knobs too...

Looking mighty fine!

Regarding the 4-way switch, I love that configuration and frankly haven't managed to figure out why it isn't stock... Super versatile and you don't have to give up anything. It requires that the neck pickup cover has a separate ground lead, chances are good that the Fralins came that way though?

Regarding the knobs, that shouldn't be a show stopper. If your set-screw knobs are 6mm, they'll go right on a split shaft pot. Just align the set screw with the split. If the knobs are 1/4", brass adapter sleeves can be had to fit them properly on a 6mm split shaft. I have a whole bin of those adapter sleeves and would be happy to set you up with a couple if you need them.

Thank you Verne!

The knobs and pots that I have are Fender American OEM packaged parts. Not sure what size that is, but I can measure when I get home.

I may take you up on your generous offer - but I'll have to decide if I'm going to route some more and stick with the original pots and switches; or go with the 4-way and long-thread split-shafts.

Incidentally, the Fralin neck pickups don't come standard with the cover separated from the "black/neg" pickup output. You have to separate and run a third wire for the series option (which I already have done - since I was planning to use the S-1 switch for series - like the later American Deluxe models).

-Paul
 
Paul_in_KC said:
So, here comes the question. It was at this point, when I started to install the controls (going to wired with S-1 switch on volume like American Deluxe) that I realized that the S-1 switch and tone pot that I ordered are "short" thread/shaft and won't mount with the rear route as is.

I really want to use the S-1 switch - but it's not available in a long thread version (as far as I know).

It seems that other's here have simply routed more material around the mounting hole - similar to what Warmoth does around the selector switch mounting.

Anyone here with direct experience resolving this?

I've done it before.  Not for S1 switches, but for other pots that weren't designed for the thicker "panel" a rear route presents. It's not tough to do if you're careul. You just need a drill press and a 1" - 1 1/4" Forstner bit. If you don't have a Forstner bit of that size, be sure the one you get has the smooth outer edge cutting ring as opposed to the serrated edge...

Clifton-Forstner-Bit-2.jpg

Those drill flat-bottomed holes, so they're perfect for relieving the cavity a bit for the pot.

forstner-bits-header-2012.jpg

Dont forget to use the depth stop feature of the drill press to keep from drilling through the body's top, or it'll ruin your day  :laughing7:
 
Cagey said:
I've done it before.  Not for S1 switches, but for other pots that weren't designed for the thicker "panel" a rear route presents. It's not tough to do if you're careul. You just need a drill press and a 1" - 1 1/4" Forstner bit. If you don't have a Forstner bit of that size, be sure the one you get has the smooth outer edge cutting ring as opposed to the serrated edge...

Clifton-Forstner-Bit-2.jpg

Those drill flat-bottomed holes, so they're perfect for relieving the cavity a bit for the pot.

forstner-bits-header-2012.jpg

Dont forget to use the depth stop feature of the drill press to keep from drilling through the body's top, or it'll ruin your day  :laughing7:

Thanks Cagey.

I guess Forstner and drill press are the way to go. I have the drill press, but not the Forstner bit. I'll have to pick up one of those.

Thanks again.

-Paul
 
Be aware that the centering point and the spur cutter around the circumference of the circle go slightly deeper than the bottom of the hole. The center point doesn't matter so much in this case, as you're going to need a hole in the center anyway, but don't try to make the overal top thickness too thin or you're liable to inadvertently cut through the top. You only need to thin the top out just far enough so you can thread the pot's retainer nut over a thin washer. About 3 threads, and you're there.
 
For your micro-tilt function - did you add the metal disc into the neck ala Fender? Also, do you plan to drill the hole in your neck plate for adjustment with allen wrench?
 
AirCap said:
For your micro-tilt function - did you add the metal disc into the neck ala Fender? Also, do you plan to drill the hole in your neck plate for adjustment with allen wrench?

I was also wondering this. In addition, the neck plate for the micro tilt has a hole in it. Without those things it will not function.
 
AirCap said:
For your micro-tilt function - did you add the metal disc into the neck ala Fender? Also, do you plan to drill the hole in your neck plate for adjustment with allen wrench?

AirCap - the metal disk is already in that neck. It's a USA Fender American Standard. As is the neck plate that I used. I'll post a pic of it all together when I get a chance. But it looks (and works) like a Fender American Standard.

And the mirco-tilt came in handy right away. This body has the 720 pocket mod - so, needed to dial in some neck angle. Was super quick and simple with the micro-tilt.

-Paul
 
stratamania said:
AirCap said:
For your micro-tilt function - did you add the metal disc into the neck ala Fender? Also, do you plan to drill the hole in your neck plate for adjustment with allen wrench?

I was also wondering this. In addition, the neck plate for the micro tilt has a hole in it. Without those things it will not function.

Regarding the question on the neck - see my response to AirCap. It's a USA Fender American Standard neck - so it already has the little metal disk.

Regarding rest - Of course. And needless to say, I wouldn't install all of the parts and then use the wrong neck plate. But buying the correct neck plate is even easier than finding the correct parts to add to the body. I'll post a pic with it all together - but probably won't be until late this evening at the earliest - as I am playing hockey this evening after work and won't have time until after that.

Here is the correct neck plate...
2YuZxPg1eZMJGLUDbWu5MOI86rg18EsiNHYLDdM-5EuGc23OQtdOJgVjfaRulOQa9yDOwtxvTVKUfEM7wyNdwrHTScdOGAA_VjEEvebQB7VJHugkYMop4R5LQlChlsAOB6YPvHL4CuJiSOXV9XQfJQaQKI-J6pczH4wHeuKuQzsEKfcyazT2EarCFO0DLa8f0fXQbOjyJ966Hk2UB6yehP49vH9FTTX-ulzWrkWDeWT0p7nESRxLITD0shMW5JKEGcFSqOkbzlNL-vbeMJz1RZHLyMkdzz9XwtIKEA33c8rN8scK5uO0Oz1Rdw7LjVhkoYC69cIGcLYsNGq0zIfu4XRAZ5iaql4DoKWsT6ohQerVq-yk2zpVzftCSrroAoczJVIpVTxISVw9XCyD2q8-FIEHjZ31-2ULLfXOj4FWMohrC_um4EP76kM4ED6i4VnMCWJPy9VZaN8jMZvvRTiDoCf2WZ0EmS9B5zcnF5ks6hImQI0rQDseJVRUPYLVgkv-WivYE_P2D5V5Z0gi4ubGFqYRr82tMhUfslg3YRpkCHW5w36AXk2OO2NGTfHwJhchn9F0ZMq-NToP1v_1xhhfiQeKJXMPGBe9p2w9H5EO_i1Oz0KSJG3ZqDDX=w685-h862-no


Fender's part # 0991445100. Can be purchased from lot's of sources.

Sorry if I skipped too much detail in the post. I was just trying to get up to my question regarding the rear route and see what other folks had done with that situation. The neck was a pretty cool project by itself. I replaced the plain white plastic fret markers with abalone. The abalone complements the finish beautifully and makes it look like they were custom made for one another (which they kind of were).  :icon_biggrin:

-Paul
 
Cagey said:
Be aware that the centering point and the spur cutter around the circumference of the circle go slightly deeper than the bottom of the hole. The center point doesn't matter so much in this case, as you're going to need a hole in the center anyway, but don't try to make the overal top thickness too thin or you're liable to inadvertently cut through the top. You only need to thin the top out just far enough so you can thread the pot's retainer nut over a thin washer. About 3 threads, and you're there.


Amen to that - and I may drop a little epoxy around the edge where it gets cut slightly deeper. It couldn't hurt to strengthen that a little.

Thanks Cagey!
 
Here's the pic from the back so you can see the installed neck plate with Micro-tilt fully functional...
ori8I--tZEqwukqFPiy9g20sCWIS9PBWf7h087dkcbdR7geSq3icI4NyA4OgqT6bdX1p0W8ZKjG06xprRuNXpOEY0yEW7M644evoPKhp1D0NMurqpIMGhAUNfuW1lS2F-MiFFNzZd8Pa6j6fKvSXuIa48P8ywc7oxS87UYNbXSbbm1sAtO5QR1BuN4Utzc4B7MTUdmfXKRr3E8Drj8LLKnG_jJsmZr5J6ct_2nfADXw5kTOqH7wMtPllzUMXsSQMkwVv0FxQhyS-2vYABoQVk60vjiPM5iAcKJlm3idEWF6MKrLJjU1HyINaxm-Lp7UYGqueECJ_7RmoQMbQ-tsLW3SXZSUEMU8z_IIXLFmu6tF-rgRxFl-mYaP3AWfCEROmoLEjiZEhKYZk_gbklqIPnOALYjqtmrKffLhDeO890rstzugQfCdRw82PpVMW-2iKbyFUZTf1ZMBHY_neaOleJulZHofZxLSPVr6R4hM982GLMa-B7-D847Bvx3C7oozLMLL3M3Q-a6CSk8tEVuYoCk5FdQXMN6GJh2Rs_5eHrqUq0eLhC7oo9OCHwyH2aW3ex0GwYj_ak8PPGPwc_8z8dHc11L5d1mobUIdJKBtwvew30FaphBs6li9g=w690-h933-no


Managed to get it done (pic taken) before I got ready for hockey.

Also picked up a Forstner bit on the way home - so hope to start getting that set up tonight or tomorrow.

-Paul
 
Micro-tilt question answered though one of the pictures I cannot see. I had noticed the neck was a Fender so it was more the body part I was wondering about. I have one of these on a Tele so just wanted to make sure you hadn't missed a detail.
 
Cagey said:
I've done it before.  Not for S1 switches, but for other pots that weren't designed for the thicker "panel" a rear route presents. It's not tough to do if you're careul. You just need a drill press and a 1" - 1 1/4" Forstner bit. If you don't have a Forstner bit of that size, be sure the one you get has the smooth outer edge cutting ring as opposed to the serrated edge...

Clifton-Forstner-Bit-2.jpg

Those drill flat-bottomed holes, so they're perfect for relieving the cavity a bit for the pot.

forstner-bits-header-2012.jpg

Dont forget to use the depth stop feature of the drill press to keep from drilling through the body's top, or it'll ruin your day  :laughing7:

Cagey,

I got the Forstner bit - but I couldn't come up with a way that I was happy with holding the guitar body on the vise pedestal. So, I decided to go with the freehand Dremel tool approach. I have a pretty steady hand for things like that.

I would have preferred the drill press, but just couldn't figure out how to hold the body (without damaging finish). My problem may have been due to the size of my press. It's not the smallest drill press you can buy, but it's on the small side.

Anyway - I'm quite happy with the results. Here's a pic with one of the spots completed (near frame). The other just has the copper foil and paint skinned. With the additional routing complete, the two pots fit neatly in their spots.

AFzS_OdjOtobqZsRzhGEhoKO53o0N6tPryh_CQdvhHENgbY2YpvEZSU_2Py54YV0tLyQgP2S6RhBePttp1k0CcRMmpm4Pdj9yBy1gMoeWDV57fuQWf2T3GP9Spx1tMw7eaPamfcsiSajHIiP0_hf2A2tCuh2dVSKV-d5KbEoylzyR9QQdzSWKP6hMY-kFH8mv5_EOx6Th2qQKkaOfsSOSzXQduYy4JZQOdd4Mfes2tT5jwcdtsKToi14DY4k80tOhbEKJxMuovIV3fP1BlqzDHGi1pppuwcZ1VeKjl6rHfi-9tmmT73_ZgRXXmUH8YwJlBXd9Ew1tL-eSkHZeAesRAxGQhj6SE1F9_PmwdSZp9erYUsF9_cKW8zVrHNGmtv3WSBz-jfa1c6qIoRMhRIM9-3pliBy3jJc0_hS3VwmqQTY69hpXlIxoPDBAlrPMEtlRVw_jEZT7y_ahlTQM_CqgZGUJgRFrmxZwZx_2k52zs2xKFlkpjlk8nDNuBSai1dK0_ZuayhLqgtnrXYB8PyeHmfC1UsGcihjuEB8phiUNpSdSYf-QS4cJeloxBJQKVZiXEZThfC2IgvhGqQ9xXbbAtLsFfr8d7zTfn-a-t2-iUdSJnOuTrulVn3d=w1248-h888-no


It's almost finished now - I just need to take more pics.

-Paul
 
Your picture doesn't show up. The link is ridiculously large - the forum software might not be able to handle it.

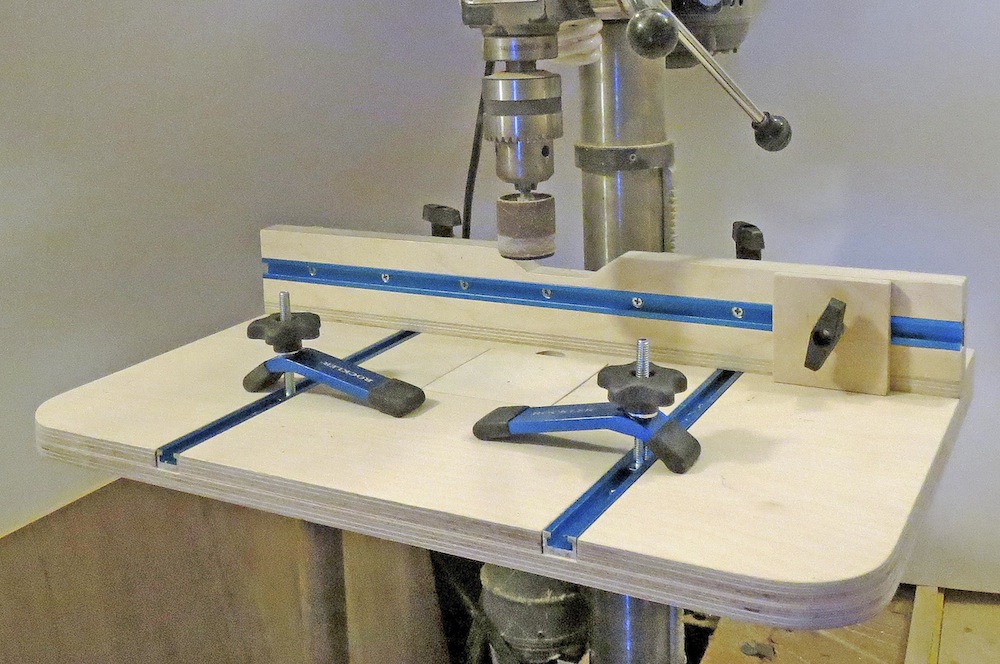
As for clamping to the stage on the drill press, what I've done is create a larger secondary stage that attaches to the press' stage, so I have a friendlier surface to work with. Kinda like this, but mine's not quite as fancy...

Drill-press-fixture.jpg

With bodies, especially finished ones, you just need to put load-spreading pads under clamp heads to keep them from marring the surface.
 
I can see the picture as well, and a pretty fine job of free-handed Dremeling it shows! I'm sure that you've done all of your test fitting, but do be certain that your pot lugs won't make contact with the shielding given that they'll be recessed down in there!
 
Back
Top