LP Build (non-Warmoth)

OK time for an update  :)

Since the neck is now glued on, the next order of business is to do the rest of the potentially "rough" jobs before finishing up the gloss on the finish.

I started with the pickup rings. I used calipers and masking tape to locate them side-to-side. Front to back there's really only 1 right position since the pickup rings aren't any bigger than the pickup rout holes.


Then I taped the rings to the body and used an inlay tracing scribe to mark the screw hole locations.

These pickup ring screws are #2 size, so I'll use a #1 drill bit size to drill the pilot holes. The tricky thing is that the body is carved AND the pickup rings sit at an angle on the body so that they're parallel to the strings. Solution: tilt the drill press!


I verified the tilt with the pickup ring actually on the guitar:


Then drilled! This was definitely a tense part of the build, I had it built up in my head beforehand as super scary but everything went well. The guitar did barely fit on the drill press (which I just got, for this job) so I'm glad I got a 12" model and not a 10".


Success!!


Next I hammered in the bridge post inserts. Again, SCARY! The holes had some junk in them from finishing/sanding, plus I think the wood swelled a little when wet sanding the finish, so I used a rattail file to clean up the tops of the holes a big.

I used a little wooden clamping caul to hammed onto, and split it right in half! I guess it's good that things are nice and tight since it's a press-fit. The bridge and tailpiece are a locking set from Tone Pros, by the way. I bought them from PGK with the guitar kit.


Next I did a final "glaze coat" of shellac, then polished things up with some Novus #2 plastic polish, then virtuoso polish. The finish doesn't look any different in photos but it sure has improved in person!!

I installed the tuners using the same procedure as in my Tele build thread. I think the open brass gear tuners with the keystone buttons look great on the headstock with the darker mahogany.


Next I decided to string the guitar up before installing the electronics, just to check for any issues and start roughing in the nut. Very exciting!


Look, it's a real guitar!! Woohoo!!


The acoustic tone is great! Pretty quiet as is normal for a LP, but tight sounding with great sustain. Intonation is good, action is high of course but playing well. I'm loving the neck profile and the fretwork seems great.

So then it's on to the electronics. I first drilled out the holes and mounted the jack plate temporarily. I again used masking tape as a guide to get things even and centered.


Then I wired up the switch and mounted it, and then mounted the pickups.
Anybody have a good tip on getting the switch really tight? That knurled ring really doesn't give much to grip onto...


Oh by the way I'm using some Seymour Duncan Seth Lover pickups. I have a set already in my Gibson 61 Reissue SG. I didn't love them initially, but after a magnet swap to Alnico 5's I absolutely love them. Since the LP has a maple cap I'm thinking the stock A2 magnets might be okay here, so I'm installing them as-is for now. I can always swap out the magnets later if I want a little more treble.


After routing all of the pickup and switch wires, I marked them and taped them out of the way so I could drop in my pre-wired harness from earlier.


Nice little position indicators for the pots. Oh and a tiny hair in the finish, oh well.


I got fancy with the grounding when wiring the pickups to the harness, tried to do a little chain over to the grounding buss.

 
I was installing the knobs after wiring up the electronics, and the bridge tone really seemed to be a tight fit. I was pushing it on pretty hard and, boom!


Looks like the tone pot pretty much blew up. Haven't had this happen before! Luckily I was able to put it back together and bend the little tabs to close it back up. I bent the split shaft together slightly and everything went on okay. Phew!


The tone pots have an unused lug, and the uninsulated shield wires from the pickups and switch are making me a little nervous about an accidental short. So I put a little piece of shrink tubing onto the unused lug. There's still a lot of places for those wires to accidentally touch though, I think for my next build I'll use insulated shielded cable.


---------------------------------------

Almost done!!


Of course the first big chord into an amp was...disappointing... I had the output jack wired backwards ( :help: ). Took me an hour to find it too. Oops... After that things are sounding good though! Still tweaking the action and setup but I really like the guitar so far.

I got this nice photo of the finish on the back while I was installing the control cavity covers. Definitely my best french polishing effort yet, I'm happy!


And I thought I'd leave a little time capsule inside the main cover:


Cool little split screen I did for my instagram page:


I still want to get the headstock finish looking a little better (more on that later), so I'm waiting to put on the truss rod cover. But that and a possible magnet swap in the pickups are all that's left! I've been playing the guitar quite a bit lately and can now highly recommend precision guitar kits  :icon_biggrin:.
 
THat piece is just beautiful.  Wonderful job you've done.  And much gratitude to you for sharing every step of your journey.  May you enjoy much rockin' out with that beauty.
 
davegardner0 said:
Anybody have a good tip on getting the switch really tight? That knurled ring really doesn't give much to grip onto...

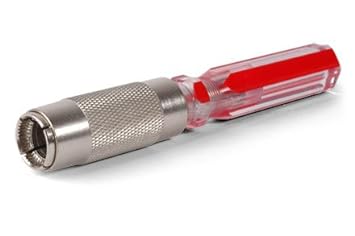
There's a specific tool for those switch retainer rings...

317ORwsgQtL._SX355_.jpg

You can get them from a number of places, but oddly enough, StewMac has the best price on them. That's so weird, I'm at a loss as to what to say.

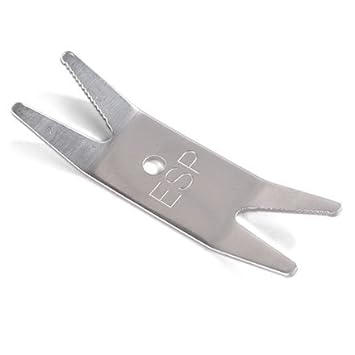
They also have something they call a "Multi Spanner Wrench" for doing that. It's less expensive, but to my eye, it looks like an accident waiting to happen...

31sZ79mI2aL._SY355_.jpg

It's appropriately expensive for what it is, so my faith in StewMac's avarice is restored.
 
I definitely know what you mean about Stew-Mac... On one hand their stuff is typically awesome. On the other hand it's not cheap. It's right on the line of "is it worth it?" for me. Certainly makes the job easier if you spring for their stuff.

But thanks for the recommendation! Hopefully I'll use this tool more than once...
 
It's not something you use often, but when you do, it works so well you're glad you have it. Just about anything else is either risky for your finish or may chew up the ring or both.
 
Looks great. That's a job. I really liked following this one.  :icon_thumright:
 
Well done. Looks very good.

That was quite some attention to detail on the pickup ring pilot holes but was there a reason you did not use the drill press for putting in the bridge and tailpiece inserts?

 
I've never really gotten along with Les Pauls; the neck and the weight just don't do it for me.  Not completely sure why, but I just can't do it.  Maybe it's the fact that all of the guitars I've owned/played tend toward the thinner, traditional C shape.

And then I see guitars like that and I'm like "well maybe I could learn to love it" because, great Caesar's ghost, that is just an absolutely gorgeous guitar.  But I feel like it would become a very expensive, very pretty wall decoration - but oh boy would it be a pretty wall decoration!
 
I know what you mean. I've been falling in and out of love with Les Pauls since I first learned of their existence, and have owned several of them. But, every time I get one, I find I like looking at it a lot more than playing it, so it ends up getting sold. The one I have now has been around a couple years, though, and will probably stay around. It's very well done and has neck-thru body construction so you don't have that massive heel they usually do. Still heavy as sin, though.
 
Thanks for the front row seat, really enjoyed the show! Great results, enjoy your new guitar.  :headbang:
 
stratamania said:
Well done. Looks very good.

That was quite some attention to detail on the pickup ring pilot holes but was there a reason you did not use the drill press for putting in the bridge and tailpiece inserts?

I thought about using the drill press, but then again it's not really an arbor press. The hammer just seemed like a better tool for the job. I'm glad I didn't try the drill press, with the force required I can image screwing up the bearings in the drill press (especially since mine is a cheap one).
 
The first time I used my drill press as a ferrule/bushing press, I was concerned about the same thing - it's not an arbor press; it's not designed for that kind of load. But, the amount of pressure needed is actually pretty low and presents no undue stress to the thing. Now I've done it countless times, and there doesn't appear to be any adverse affect.
 
Sovereign_13 said:
I've never really gotten along with Les Pauls; the neck and the weight just don't do it for me.  Not completely sure why, but I just can't do it.  Maybe it's the fact that all of the guitars I've owned/played tend toward the thinner, traditional C shape.

And then I see guitars like that and I'm like "well maybe I could learn to love it" because, great Caesar's ghost, that is just an absolutely gorgeous guitar.  But I feel like it would become a very expensive, very pretty wall decoration - but oh boy would it be a pretty wall decoration!

I have to agree with you that LPs are some of the best looking electrics around!
 
Cagey said:
The first time I used my drill press as a ferrule/bushing press, I was concerned about the same thing - it's not an arbor press; it's not designed for that kind of load. But, the amount of pressure needed is actually pretty low and presents no undue stress to the thing. Now I've done it countless times, and there doesn't appear to be any adverse affect.

These were the only bridge studs I've ever installed, so I have no reference point on how tight is normal. It's definitely possible that the PGK kit has undersized holes and so the fit was much tighter than it needs to be...
 
Well, there's a lotta surface area to bridge/tailpiece bushings, so even a correctly sized hole feels tight. But, still. I don't think there's any hardship for the drill press. I've swung 2" Forstner bits in hardwood with the thing and that doesn't even slow it down while those bits do some serious hogging. I know there's a different force involved with that than what we're talking about, but what it points to is how robust the thing needs to be in order to handle that sort of load and still be a useful tool. This is just a 12" Delta benchtop press, too, not some floor-standing industrial monster with a 3 phase motor and a license to kill.
 
Back
Top