LP Build (non-Warmoth)

Tomatonator said:
Very nice burst and inlays. It's also good to see your airbrush - I have probably the equivalent 90s one I used on models many moons ago which I planned to try on my ash body. Did you use the standard nozzle? I bought an extra one with larger coverage so I have a 0.4mm and 1mm nozzles. Also how big of an ink cup did you use? I only have a tiny one so may need to get another so I don't have to refill too soon but they're not too expensive.

My airbrush is from the 90's too, it's a Aztec A270 sold by Testors. I just run it from a 5 gallon air tank, not a sophisticated setup but it works for me. I only have the stock nozzle (not sure what size) and I used the cup it came with for the stain. It holds maybe 1oz max? I used about exactly 1 cup full to spray the brown on the burst, and maybe 1/2 cup to spray the orange on the burst and for the black on the headstock.
 
I've never used an air brush, but have often thought it might be a handy thing to have. Gotta be tricky mixing colors in such small batches, though.
 
I usually end up mixing about 10x the stain I need, at least. You're right it would be hard to mix really small quantities, plus the worst thing ever would be to run out of stain half-way through - you'd never be able to match the color exactly with a new batch. Plus the Keda dye I use is really cheap.
 
I'll be using Angelus leather dyes as per BigD guitars on youtube so no mixing for me :) He rubs the dye on his axes but I think he's sprayed it too. I have a compressor without a holding tank or moisture filter but I think it will be ok. A holding tank like you get these days means the compressor isn't constantly running.
 
Moisture/oil filters keep you from spitting large water/oil droplets which can ruin a finish ("fish eyes" and whatnot). Tanks provide a buffer so you don't get a "pulsing" flow and also allow the air to cool a bit, which is important. Spraying compressed warm air exacerbates the normal condensation problem you get from rapid expansion of the gas (air), which causes it to lose energy and condense whatever moisture is in the ambient air. Might not suffer with stain, but with lacquer, you'll get some serious "blush", which results from water vapor trapped in the finish.

You could get a holding tank and the appropriate filters and a regulator to get your compressor gussied up for fine finish work, but if it was me, I'd first get some scrap and learn to rub in the dye to get the effect you want. It's more work, but also more controllable. Finish can be stripped fairly easily relative to trying to remove dye/stain, which is sorta permanent.
 
Absolutely agree with Cagey, some sort of holding take is needed for an airbrush (it's all that I have actually), as the air out of a compressor's output would be "pulsed" which wouldn't work for spraying. I don't have a moisture trap but I probably should get one, I haven't had a "spit" out of my airbrush yet but it definitely could happen. I do have a little crack in the tube that goes from the stain bottle to the airbrush though and sometimes I loose suction a little bit which makes my airbrush shoot out tiny droplets. I should look for a non-damaged bottle lid one of these days.

As far as rubbing the dyes, I didn't have much luck trying to rub anything besides the base color of the burst but others have done so and produced great results. I can see how it would alleviate the stress of trying to spray in the fade, although I think doing a burst is still stressful with any technique.
 
Rubbing dyes in isn't really that tough to do. If you watch some videos of it, it often seems even easier than you'd think. Unfortunately, the artists don't always tell you things that may have become second nature to them, but are critical to success.

Foremost among them is starting from the darker portions first when your applicator is freshly charged with dye. The first area you touch is gonna get the largest dose of dye, with the intensity diminishing as the dye held by the applicator is gradually consumed. This can leave what are sometimes called "witness lines", where the transition from one shade to another is stark enough to be visible to the naked eye. It's not only the amount of dye, but also how long it's allowed to stay in place. So, the thing to do is work with small areas, starting from the darkest part, and working quickly to gradually feather it out to the thinner areas.

Also, keeping some of whatever solvent you're using close at hand is a good idea, too. A bowl of clear water/alcohol/acetone nearby is used to dip the applicator in from time to time to keep the dye wet and mobile, so you get an even or more gradual coat, depending on the results you're looking for.
 
Everything Cagey said is true.  I got great results (IMHO) using rubbed dyes for this strat.  Water-based General Finishes dyes straight out of the can for this one.  This is the final version, after having dyed it once before.
15614422227_5588e754f2_b.jpg


The first try came out great, too, but I decided I would prefer a subtler look, and so I sanded it back and went again.

First attempt:
9743600686_8cb012317b_c.jpg

Second (and final):
9761906575_d4b96ebd5d_b.jpg


Nice!! Those bursts look really great. I like them both.

I guess it's just whatever technique you try first and get comfortable with. For me I like the straightforwardness of just spraying stain onto the wood where I want it to go, and I'm comfortable (more or less) with blending things that way. I mix my aniline dye with alcohol so it dries/flashes off really quickly and I can see the final product right away. The rubbed burst/ombre looks just as good but it sounds like the whole philosophy of applying it is different. Good stuff all around though!
 
Nice finish Bagman. What's the top coat? I'm favouring airbrushing with mine because I don't want to move the timbermate out of the grain by rubbing. Maybe I'm supposed to apply a sealer after that stage but planned to dye then oil.
 
Tomatonator said:
Nice finish Bagman. What's the top coat? I'm favouring airbrushing with mine because I don't want to move the timbermate out of the grain by rubbing. Maybe I'm supposed to apply a sealer after that stage but planned to dye then oil.

If you're doing a rubbed-on finish over a dye/stain, you can rub the top coat on IFF the stain/dye and the top coat have different solvents (i.e. water-based vs. oil). If they have the same solvent (like in my case, the dye and shellac are both alcohol-soluble) then you need to spray on a sealer coat to seal in the stain before you rub the surface.
 
Yeah the Timbermate is water soluble, then leather dye (not sure if rubbing that would move the filler), then tru oil. The 1st coat of Tru oil would seal I think but I'm planning to spray the dye.
 
I don't have any experience staining already grain-filled wood. But I think you'd be okay rubbing oil over your water-based grain filled, and also the dye as long as it's water or alcohol-soluble (which it seems to be based on a super quick google search).
 
I think it's time for an update!

So the body and neck are both french polished to a reasonable gloss, so the next step was to do some assembly work on the guitar. I wanted to get everything done that could potentially scratch the finish before doing my final few glaze coats of shellac to bring out the mirror gloss finish. This included sanding the contours onto the bottom of the pickup rings (sandpaper face-up on the top), making a template of the pot holes to do the wiring, and sealing the end grain in all of the holes (pots, switch, pickups, tuners, etc.). For the sealing I used a tiny paint brush with shellac. One coat wicks into the end grain and seals things up to prevent issues if moisture were to ever infiltrate these holes and swell the wood.

I made a template out of thin plywood and wired up the volume and tone pots. I used Stew-Mac's Emerson pots for the volumes, and standard CTS pots for the tones. All 500K audio taper. The caps are Mallory, including two 0.001µF caps wired in series with 150k resistors for treble bleed circuits. I used a bus bar for the ground, something that I haven't done before. I think it'll help when wiring up the shielded pickup wire as the grounds can go to the bus bar instead of the pot backs.


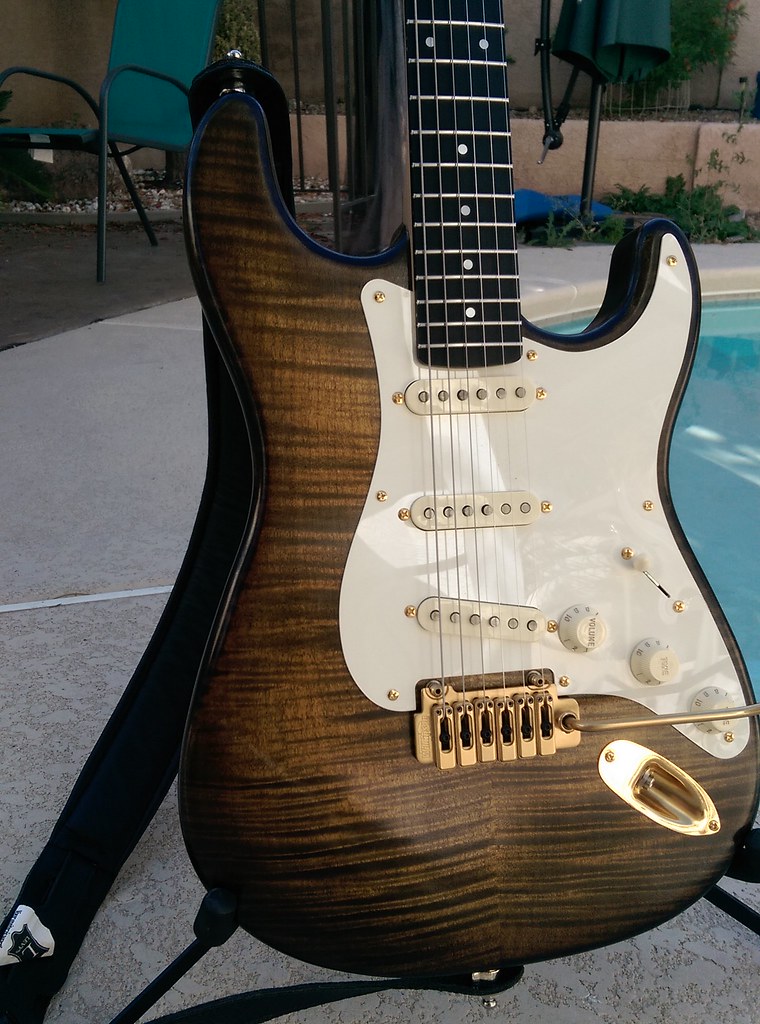
Next is one of the most fun parts of the build...the final gloss! I did some "glaze coats" on the body with extra thin shellac, then hit the surface with some Novus #2 polish to bring things to a mirror finish. I'm immensely proud of how this came out, it's my best french polishing job so far by far:


I am putting off finishing the headstock face until later though, it's really challenging since the clear shellac is over black. Basically any imperfections really show, and the small surface area makes it hard to get a streak-free and contamination-free surface while french polishing. So my strategy is to finish building the guitar and give the shellac a month to cure/harden. Then I'll rub out the surface with fine paper and the polishing compound.

Anyway, now the stressful part...gluing the neck!!! I'm using fish glue from Stew-Mac, as it is supposed to crystalize when it cures just like hide glue for a better sound transfer between the body and neck.
http://www.stewmac.com/Materials_and_Supplies/Glues_and_Adhesives/Glues/Wood_Glues/StewMac_Fish_Glue.html
The advantage over hide glue is that it has a 30-minute working time vs. hide glue's 1 minute. So this provides a whole lot more time to get things clamped properly. Plus if there's an issue I can actually pull the tenon back out and try again without the glue hardening. The downside is a 12-24 hour cure time, not a huge deal.

My time from buying the kit to setting the neck is actually a full 2 years because of delays/life/etc., so it turns out the amazing "suction" fit of the PGK neck joint had actually turned into not fitting at all after I pulled off all of the masking tape. So I lightly sanded the surfaces of the body and neck where they mate. Man this mahogany sure smells nice when sanded!  :icon_biggrin:


Next I worked out the clamping cauls, protectors, etc., applied glue to both surfaces, and went for it! I used 2 cam clamps as shown. Before I tightened them down I pushed the neck along its axis into the body as hard as I could to make sure it was seated. The clams provided force against the fretboard but also stopped the neck from sliding back out. In retrospect I probably should have used a giant rubber band or something to continuously push the neck into the body but this worked okay.


It worked! And wow, it instantly feels like a guitar when holding it.


I had a little bit of glue squeeze out that I wasn't able to clean up while gluing because the clamps were in the way. Luckily fish glue cleans up easily with some water. I just needed to wet the surface, wait 10 minutes, then gently scrape off the glue.


Excellent work. That's a beautiful instrument. I'm looking forward to seeing it complete. Keep the pics coming.

Incidentally, when you have new/fragile finishes that you need to protect because the part is going to be handled/moved a lot, a handy product that may save some grief is what is often called "friskit film", aka masking film, anti-mutilation film, etc. It's a clear or translucent film with a low-tack adhesive that you can use to cover the body without worrying about it leaving a residue or pulling the finish up. Signpainters and airbrushers use it for masking/templates/stenciling, some manufacturers use it to protect finishes from abrasion during shipping, etc. You see it on led/lcd displays all the time. I keep a 24" wide roll around here for new bodies, so they stay new until ship time. Adds some cost to things, but nowhere near what new finishes or repairs do.
 
That is an amazing thing!  I'm astounded by the quality and beauty of your work and the guitar!!
 
Cagey said:
Excellent work. That's a beautiful instrument. I'm looking forward to seeing it complete. Keep the pics coming.

Incidentally, when you have new/fragile finishes that you need to protect because the part is going to be handled/moved a lot, a handy product that may save some grief is what is often called "friskit film", aka masking film, anti-mutilation film, etc. It's a clear or translucent film with a low-tack adhesive that you can use to cover the body without worrying about it leaving a residue or pulling the finish up. Signpainters and airbrushers use it for masking/templates/stenciling, some manufacturers use it to protect finishes from abrasion during shipping, etc. You see it on led/lcd displays all the time. I keep a 24" wide roll around here for new bodies, so they stay new until ship time. Adds some cost to things, but nowhere near what new finishes or repairs do.

That's a great tip! Thanks!  Where do you buy the stuff? I haven't had any issues with accidental damage so far with the Lp, but i did with the purple bass so I'm very familiar with the anguish of scratching a new finish...
 
I can't find where I ordered mine the last time, but there are lotsa suppliers. Next time I'll probably just go here to save on shipping. It comes in different widths; the 24" is probably the most useful. Most guitar bodies are 12"-15" wide by roughly 18" tall, plus you want to be able to fold over to the sides while you're at it.
 
Nice looking guitar. I'm also looking forward to seeing it finished.

Kevin, thanks for the reminder on the Frisket film. I found it on Amazon and just ordered some. Here's the link.
 
Back
Top