Jazzmaster build

Verne Bunsen said:
I'm interested to see what you encounter when you go to fit the trem; I've got a Mastery trem for my JM build as well. I had hoped to leave the router in it's cage for this one...

At its deepest point, with the trem not under tension, it measures 1 1/4". The Warmoth trem rout is 1 1/2" deep. I dry fitted it, held it down, and actioned the trem bar: didn't encounter any problems. FWIW the holes aligned perfectly:

XHGWkI0.jpg


Also FWIW, according to info I've found on-line, so the usual caveats apply, Fender's vintage JM trem rout, measures either 1 1/4" or 1 3/8" deep.
 
I see Mastery doesn't put that silly locking stud on their part, as seen here...

1420.jpg

That's where I had trouble with fitting. 
 
Good to know! When you mentioned clearance issues, my thoughts went immediately to the arm-tensioning mechanism underneath the Mastery unit, but looks like that is a non-issue. Which is excellent.

Nice choice on the polished finish! I went that route too.
 
Put the mounting strips into the pup cavities and have spent a little more time dry fitting the pick guard. Have shaved and sanded a bit more the area around the neck pocket and still may do just a bit more before drilling and fixing it with screws.

Here are the fabulous foam strips:

ESTvTr6.jpg


And a shot of the guard at the neck pocket:

ey2isdc.jpg


I used an Xacto knife to "shave" it a bit, protecting the body with some low tack tape and a metal ruler, then sanded the edge of the guard with 220 grit to smooth it:

cYRuru7.jpg


Here's how it looks in place:

1uvJi0m.jpg


You can see that the guard and bridge touch in one spot. I hope this won't be a problem (the bridge is sitting flush on the "lips" of the thimble). Here are a couple of close ups showing same:

M2YBRPW.jpg


fC1regC.jpg
 
Great thread, Brother. I'm sitting here in the planning stages my next build, A Jazzmaster. Thanks for the play-by-play description of your build. Lots to consider and learn.

That's gonna be one slam'n axe!
 
stratamania said:
@Glimmer, thanks for the link to the Albert  Ayler trio. I'll check it out.

If you like it – and I realize it's not everybody's cup of tea – you might also wish to check out his Live in Greenwich Village from 1967. Coltrane had just died and Ayler (one of two musicians Coltrane had requested play at his funeral [the other was Ornette Coleman]) opened the performance with a fine homage in his memory.

BigSteve22 said:
Great thread, Brother. I'm sitting here in the planning stages my next build, A Jazzmaster. Thanks for the play-by-play description of your build. Lots to consider and learn.

Thank you for the comment. I've learned so much here I'd be pleased if this were of some help to you.
 
Just of of curiosity, I thought Rasaan Roland Kirk was one of the two invited to play.  :glasses9: Or maybe I'm mistaken.  :dontknow:
 
I love RRK but it was Ayler and Ornette who performed at the funeral. Here's the program:

coltrane2.jpg


Coltrane's "shift" to free playing is one of the most enigmatic and inspiring transformations in a musician's life that I'm aware of.  :icon_smile:
 
Well now, then....are you aware of this?

http://www.coltranechurch.org/

I went to a service once, it was quite an experience!
If you find yourself in the Bay Area, you may want to check it out.
 
Definitely unaware of that; thanks for pointing it out. I note that they sell "trinity holy oil" in their webshop. Maybe it could be used to finish a saxophone...?  :dontknow:
 
While I build up the courage needed to drill holes for the pup covers and pickguard :binkybaby: , I thought I'd put on the strap buttons (Callaham stainless buttons and screws + black felt washers from I forgot where). Measured, taped, marked the spot then drilled the hole for the one on the cutaway.

BSQUGg0.jpg


pzPF6pu.jpg


Countersank the hole:

3kD7uUv.jpg


OXm29a5.jpg


Then had second thoughts about the size of the bit I used. Afraid it was too small. Measured again, decided to go with the next bit size up then redrilled and recountersank, waxed the screw and mounted the button. It was a nice, tight fit:

TiIorPf.jpg


AuqjSqR.jpg


Repeated process for the other button, et voilà :

O031wvC.jpg


I had some questions about tricks I learned on this forum and elsewhere (i.e. using superglue on countersunk edges as well as in holes and adding a drop of wood glue on screw), and wan't sure how they would work with other things (Wouldn't waxing the screws run counter to using the aforementioned glues? Would pre-threading the holes make for a slightly looser fit? :dontknow: ). In the end I opted for the less involved (but hopefully still sufficient) approach above.

edit: Forgot to say that FWIW I did not hit a chamber on either end.
 
The time had come to attach the pick guard, a moment I had been fearing. Unnecessarily, it appears, since everything went ok. :icon_smile: I had already dry-fitted the guard + neck twice, reviewed the whole thing several times in my head, reread stratamania's post in the purple strat build thread covering pick guard fitting, and just took my time.

The first order of business was to drill holes for the pup screws. In a way, these holes determine everything else since the pup routs are tight, as are the pup holes in the pick guard. I actually put the empty pup covers in the routs and drilled through the holes in the cover "ears" to get it right. Next I taped the pick guard in place, dry-fitted the neck again just to be sure, then likewise drilled the through the holes in the guard rather than mark where the holes should go with an awl, remove the guard, and then drill the holes. It seemed to me it would be easier to guarantee that all holes the would align, and they did.

fhqXr3u.jpg


Next I removed the guard and countersank the holes:

PSuvcjm.jpg


FJGN8kp.jpg


The finish lifted a bit on one of the holes so I did wick a little CA glue around the edge. Let it cure for a while then put the guard back on, running the ground through to the trem rout:

hVpnG1h.jpg


Thought I would tape the guard down again but in the end didn't as the holes were all aligned perfectly. I just pre-threaded with wax then screwed the guard down, beginning with two sets of holes on opposite ends of the guard. Everything went fine. Test-fitted the neck once again: once again, a nice, snug fit.

WeRJOaS.jpg


Actually, the fussiest bit of business was removing the adhesive, which had gotten under a few screws, in addition to under the pots, jack, and pup selector switch, all of which I wound up removing (well, not the pots, just the knobs) in order to get every last bit of adhesive out. Here's how she looks so far:

3UXJO0a.jpg


tjdR6ZU.jpg


Vdw4WTa.jpg


Next in line are the vibrato and neck, which I'll do in a day or two simply because it's easier to store the guitar as it currently is than completely assembled. I've ordered a case and once it gets here (by Thursday, I'm told), I'll finish up then take the guitar off to a tech for a nut and set-up.
 
Oh man, I love the jazzmaster body shape, and especially the BK wood. This looks amazing so far!
 
Well done and thanks for the shout out again.

I am so grateful and pleased others are finding it useful and helpful.

The direct link to the post on the thread I talk about pickguard fitting is :-

http://unofficialwarmoth.com/index.php?topic=22445.msg336594#msg336594

I think it's worth noting that you can get decent results without being quite so exacting as the approach documented in my linked thread.

However if you are fitting something such as a Jazzmaster guard which by all accounts can be finicky or the Strat guard I was mounting which had little tolerance due to the Kinman pickups and K9 switching system it's definitely worth taking your time.

Also if you haven't done the job before spending a bit more time will help you get a good result.

@Glimmer, looks like this will be a fine instrument.
 
Thank you guys for the comments. I'm pleased with how it's coming along.

stratamania, I have definitely found your thread useful, as I'm sure others have. Though I've not done everything as you did in that build, it was extremely useful for me to get a sense of the overall operation, and have a detailed explanation for the various steps, many of which I needed to make on this guitar. As this is my first build, there were many things I simply wouldn't have known to anticipate. This gave me much needed "heads up" to potential problems and solutions to them.

I've also read and learned from a lot of other build threads on this forum, as you can imagine, as well as from individual posts on problems and snags that others have experienced. Spent a fair amount of time on youtube, too. If anything I think I've over-researched and overthought things. And for questions that I couldn't find an answer for, folks here have been more than generous with advice and opinions. For me this has meant that I knew more or less what I was getting into at each stage of the build and I definitely felt some confidence going into it.

More soon...
 
Great that's what the forum is for.

Generally we are pretty focussed and so forth with little noise. Which is great.
 
Well, I've completed the assembly of the guitar, but hit two minor snags on the way. :( Basically, all that remained to be done was attach the vibrato and ground it, and attach the neck. I planned to do so early this this week, so that I could drop the guitar off at my tech's by Friday as I'm leaving town on Saturday. With any luck, I thought, he can cut the nut and set it up in time for my return.

In preparation of installing the vibrato I looked over the vibrato page on the Mastery website on Monday night. To my surprise I noticed that my unit appeared to be missing a nut. :eek: I emailed them to verify and, yep, the nut had been forgotten during assembly. They offered to send me one but fearing it wouldn't get here in time, I asked that they send it directly to my tech. No biggie, of course, except that that meant I wouldn't be attaching the vibrato myself as I had planned to do (the goal was to do as much of this as I could). :tiny-twinge-of-regret: So I'll be taking the guitar sans vibrato attaché. I've asked the tech to fit the nut they'll have sent, then install the vibrato.

The second snag was the case: after exploring the various possibilities I wound up ordering the current Fender offering (in brown/gold, should you care to know). It arrived on Tuesday – in plenty of time for my purposes – but there was just one problem: the guitar didn't fit. It's too long, such that the top 1/2" or so of the headstock sits on top of the padding at the head of the case. :confused4: Now, I had read that some people's JMs didn't fit in that case, but unable to find the interior dimensions on-line I decided to take my chances. That turned out to be a mistake. Pity, ’cause it’s a lovely case in that color combination. I went with my next choice, from SKB. It arrived in two days – today – and fit perfectly. I could finally proceed to attach the neck and finish assembly.

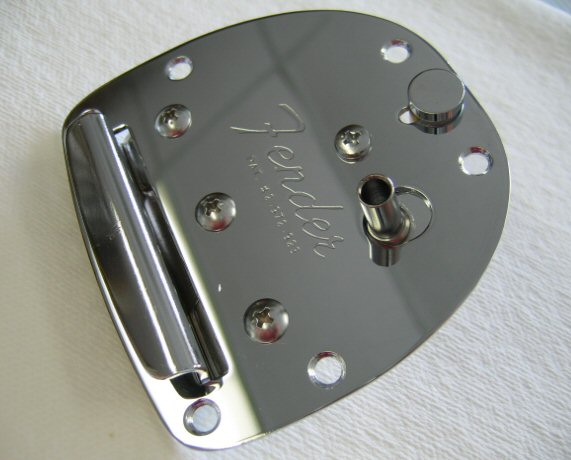
It took all of two minutes to do: I waxed the screws (stainless ones from Callaham), fitted the neck to the body, set the neck plate (polished stainless from Callaham) in place, then screwed in the screws, which went in smoothly and effortlessly. The result:

m5MWbJc.jpg


VisNwzt.jpg


kQy9MFt.jpg


MoFhxnt.jpg


nbR0Gd3.jpg


Feels nice and solid. And the guitar itself, which I can now actually hold like a guitar, feels great. Balance seems good (a little hard to tell for sure w/out the vibrato), and it doesn't seem heavy. We'll see when it's all finished. I also held some thread from the outer e bridge slots to the corresponding tuner pegs: they aligned over the magnets as they should and seemed appropriately spaced with respect to the edges of the neck. Again, we'll see how things are after the nut / set-up. I was finally able to dispense with the boxes the body and neck came in and put the guitar in its case (you'll notice one of my assistants in the first pic):

XRxGn0J.jpg


xwDdvmt.jpg


wejA4No.jpg


Note the room around the headstock:

xNZdZ2y.jpg


So, tomorrow I'll drop the guitar off and will report back once I've gotten it back. Hopefully, there will be no problems w/the electronics or anything else. Should that be the case, this will cease being a build and will actually be...a guitar. :icon_smile:
 
Back
Top