Pele fade Strat build

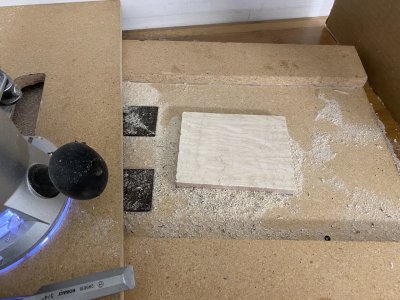
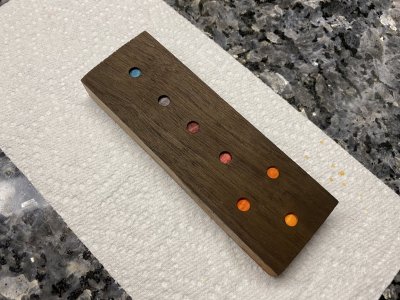
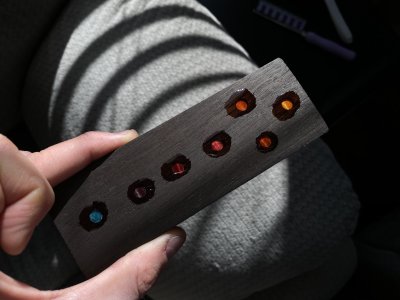
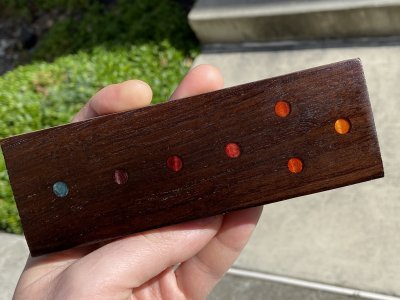
If/when you find a plug cutter, make sure the plug you end up with will fit in a standard Forstner bit diameter. Makes drilling the fretboard nice and clean and leaves a flat-bottomed hole, both of which are critical. Don't want to have to replace a fretboard  :laughing7:
 
To clarify I'm not planning on drilling inlays into the fretboard, just replacing existing dots.

While I just found a 1/4" plug cutter at Lowe's the thing just burns the wood even at the lowest possible speeds, even with softer woods.
Looking at the reviews it looks like I'm not alone so that one is going back soon...
 
I don't remember where I got mine, but I've used them to cut out Rosewood, which is pretty hard stuff.
 
Just as a suggestion, Amazon sells 1/4 maple dowel and small razor saws that don't tear out very much. However I don't know how much you want to sink into this. :icon_thumright:
 
PhilHill said:
Just as a suggestion, Amazon sells 1/4 maple dowel and small razor saws that don't tear out very much. However I don't know how much you want to sink into this. :icon_thumright:

I'm definitely ruling out using plain woods at this point.
 
Some progress with the dots.
1st pic: surfaced the scrap piece of curly maple.
2nd pic: a few dots made from it. To maximize chatoyance with such tiny dots I think I have to make them from the sides of the piece (1/4 sawn) rather than top/bottom.

Surfaced the pieces to equal height (3rd pic), and then started cutting the dots in couple of them wherever figuring was strongest. This should look interesting once stained.
 

Attachments

  • 1-surface.jpg
    1-surface.jpg
    479.2 KB · Views: 8
  • 2-dots_slabs.jpg
    2-dots_slabs.jpg
    460.6 KB · Views: 10
  • 3-cuts_surfaced.jpg
    3-cuts_surfaced.jpg
    492.5 KB · Views: 8
  • 4-dots_cut.jpg
    4-dots_cut.jpg
    406.8 KB · Views: 19
Those are coming out nice! I was wondering how well the curl would show up in such small parts, but it's clear.
 
Cagey said:
Those are coming out nice! I was wondering how well the curl would show up in such small parts, but it's clear.
They definitely show up really well with the 1/4 sawn cut; they were a bit underwhelming with the flat sawn cut (2nd pic) despite this piece of maple being highly figured.
 
docteurseb said:
Cagey said:
Those are coming out nice! I was wondering how well the curl would show up in such small parts, but it's clear.
They definitely show up really well with the 1/4 sawn cut; they were a bit underwhelming with the flat sawn cut (2nd pic) despite this piece of maple being highly figured.
Yeah, the direction of the cut can make a big difference in the appearance of the figure. Looks like your doing a fine job so far. I didn't realize the look you were going for at first, but your right, the figured maple looks a lot better in this application. Can't wait to see the end result.
 
Fortunately, having the tool means you can make enough to "cherry pick" the results.
 
Attached is what I got using those curly maple dots inserted into a walnut piece (dyed as well).

Looks better than the plain dots to me, but they are ever so slightly larger than the 1/4" hole which makes them very fun to install (with a hammer). Not sure yet I'm willing to do that on a $300 neck.

Next step is to fill w/ clear epoxy.
 

Attachments

  • IMG_6368.jpg
    IMG_6368.jpg
    574.6 KB · Views: 24
Seeing a bit of side grain does help them. It'll be nice to see how the clear does on them.
 
It definitely looks a lot less toy-like with the figuring of the wood.

This time I used Gorilla epoxy 'glue', big mistake...
Packaging looked cool with the mixing already done, but that thing turns mostly opaque...
Luckily I was able to mostly salvage it, and will try again using the usual epoxy I have (just had a hard time making it really hard but at least it's always clear).
 
It might be worth looking around to see if they sell smaller quantities of that clear epoxy resin table top coating, like you see a lot on bar tables. I had a quick look around, but it seems they always want to sell it by the gallon. 
 
docteurseb said:
Attached is what I got using those curly maple dots inserted into a walnut piece (dyed as well).

Next step is to fill w/ clear epoxy.

I was thinking clear coats all fretboard Wood like a maple neck , so you only  fill w/ clear epoxy on dots that sunken than darker wood on side ?
 
Finished the test piece.

Trying to remove the excess epoxy was the usual expected mess (scraping/digging into the wood, etc...), it didn't help the epoxy didn't get very hard.

To make things look decent again in that 2nd pic I ended up sanding again with the radiused block, stain again the walnut piece, and then apply gloss wipe on poly to give some gloss back to the dots.
Definitely not something to attempt on an already inlaid/fretted neck.

The recessed dots look very nice, but that's probably a little bit too much over the top given how over the top the body already is.
 

Attachments

  • IMG_6370.jpg
    IMG_6370.jpg
    597.6 KB · Views: 17
  • IMG_6380.jpg
    IMG_6380.jpg
    757.7 KB · Views: 65
it is interesting look , only people know about guitar wood will guessing it is maple , if not told .

other people may think it part of transparency resin colour .
 
Back
Top