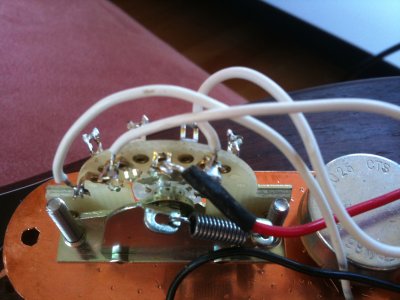
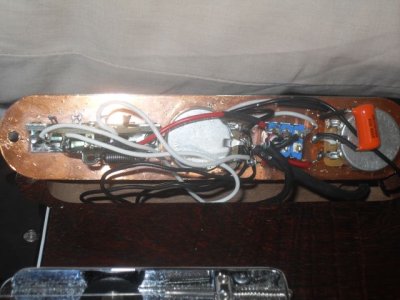
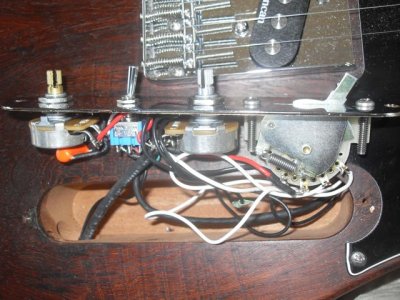
Switched connections to other side. No real improvement. Enclosed photo (connections from left to right in photo:bridge, middle, neck(black/red) connection to vol pot. will search on. does the fact that noise disappears when touching knobs or control plate point in any one direction as to cause? appreciate continuing help. I know if I take it to guitar tech he will just solder to pots and say that was the problem

You are using an out of date browser. It may not display this or other websites correctly.
You should upgrade or use an alternative browser.
You should upgrade or use an alternative browser.
Noise. The Search Continues.
- Thread starter leejord
- Start date
Firebird211
Hero Member
- Messages
- 734
I see, the red one isn't the output from what you said, but is the P-rails. I don't think you need a tech, although, it may be worth it to you to prevent further headaches. I believe you are doing a good job wiring yourself. A little test that you can do if you already have not, to test whether or not you have to solder to the back of the pot, is to check the ohms (200 scale) from the back of the pot to the tip of the knob. I don't see why pots like you have wouldn't have continuity there, but possible. If the continuity is terrible by whatever reading you are getting similar to what I had describe before I would solder ground to the back of the pots as well as the ground lugs to the face of the pot. Of course this really shouldn't be necessary. If you can, try to take some shots of the wiring that show as much of a section of the circuit as possible, as well ( like a top view of the whole control plate). I am curious to know what the deal really is. :icon_scratch: It is hidden well. I have some stupid questions to ask that I wanted to add: Why was the red wire the last wire on the first wiring pic, but moved to the third terminal on the second wiring pic? The noise stops (all together?) when you touch the knobs, but do you hear a scratching noise as you turn the pots?
dont know if this switch is standard 5-way (came from warmoth) but with original wiring (1st photo), the lug closest to headstock was always "in contact" and the lug closest to bridge was "in contact" when switch pushed towards neck ie p-rails . If makes no sense, will notate a photo. On new side (2nd photo) lug closest to bridge is output and lug next to it is "in contact " when selector pushed towards neck. Back of pot to tip of knob for both vol and tone = 0.2. Seem to get more noise when turning knob between 50% and 75% of its rotation( only vol pot). Above and below this noise much less (as Im touching the control). Will take more pictures
Firebird211
Hero Member
- Messages
- 734
I believe it is standard, but it has the spring. The 5-way that I am using for reference is a strat type, but I am very sure they are interchangable. Check this site out, it has multiple diagrams for these switches. http://www.premierguitar.com/Magazine/Issue/2009/Apr/The_Anatomy_of_the_Stratocaster_5_way_Switch_Part_III.aspx I am used to making the output wire a different color, but this diagram shows me why the red wire moved were it did. Sorry about the snipe hunt I sent you on.

I went to Warmoth to get a closer look of your switch. I can get a clean view of the contact wheel in this photo, and it is consistent with the switch I have, so the wiring diagram in the link does apply to you. Basically you can arrange the pickups any way that you want, but the output will always have to be on the A terminal or else the circuit hardly ever gets a chance to complete and you get noise. If you verified it is correct, then you can move on to something else. Your pots sound fine too, I figured since they were CTS. The whole knob turning thing I explained before I can offer a experience that I had. Twice, but not every time I installed new pots and they made scratching sounds for a while until I kept using them. I attributed that to the posibility that the carbon strip inside had been lightly coated with a protective film. :dontknow:

I went to Warmoth to get a closer look of your switch. I can get a clean view of the contact wheel in this photo, and it is consistent with the switch I have, so the wiring diagram in the link does apply to you. Basically you can arrange the pickups any way that you want, but the output will always have to be on the A terminal or else the circuit hardly ever gets a chance to complete and you get noise. If you verified it is correct, then you can move on to something else. Your pots sound fine too, I figured since they were CTS. The whole knob turning thing I explained before I can offer a experience that I had. Twice, but not every time I installed new pots and they made scratching sounds for a while until I kept using them. I attributed that to the posibility that the carbon strip inside had been lightly coated with a protective film. :dontknow:
Cagey
Mythical Status
- Messages
- 24,425
Firebird said:Twice, but not every time I installed new pots and they made scratching sounds for a while until I kept using them. I attributed that to the posibility that the carbon strip inside had been lightly coated with a protective film. :dontknow:
There's no "protective film" on the wiper or the resistor strip, but they're not perfectly smooth after manufacture. A little break-in might be required. It's also not a "carbon strip", per se, like there was 100 years ago. It's carbon-impregnated plastic, which is why you should never solder directly to the pot body. That resistor strip is flimsy and easily distorted with heat. I know some guys do it anyway and get away with it, but best case is you shorten the life of thing. Worst case is the pot's shot right after installation.
Firebird211
Hero Member
- Messages
- 734
Cagey said:Firebird said:Twice, but not every time I installed new pots and they made scratching sounds for a while until I kept using them. I attributed that to the posibility that the carbon strip inside had been lightly coated with a protective film. :dontknow:
There's no "protective film" on the wiper or the resistor strip, but they're not perfectly smooth after manufacture. A little break-in might be required. It's also not a "carbon strip", per se, like there was 100 years ago. It's carbon-impregnated plastic, which is why you should never solder directly to the pot body. That resistor strip is flimsy and easily distorted with heat. I know some guys do it anyway and get away with it, but best case is you shorten the life of thing. Worst case is the pot's shot right after installation.
That explains it perfectly, thanks Cagey. :icon_thumright:
Firebird211
Hero Member
- Messages
- 734
No, that's not really necessary to do do that for your wiring. Fender does that for the strats to make the other rail of the 5-way, switch the tone pots depending on what pickups are selected. Just be sure that the rear view of the switch as your control plate is upright and is wired that way on either rail. You probably had it right, but from the wiring diagram and your picture, I suspected that you soldered the output wire to anything but the A output terminal. I figured that was possibly why the noise was so hard to get rid of. If this is all wired fine, then you can move on to looking for something else, but I'm starting to run out of ideas again of things to try and look for. :icon_scratch: It is such a specific symptom, so it should be the known specific problem that is causing it, but we went down that road already. Do you have electric finger tips? :laughing7:
Firebird211
Hero Member
- Messages
- 734
Good point Pabloman. You don't have that many components, but your pots are suspect. Use your ohm meter to test the outer two terminals, which should read somewhere at or above 500k. Test between the left and center, and the right and center, while moving the knob. You should see the value increasing to 500k. You should even make sure there is no continuity between any of the three terminals and the chassis of the pot. Check this link out for a close look at the inside of a pot. http://www.projectguitar.com/tut/pots.htm, but don't pay any attention to the modification that the guy did, or do it yourself. It is a cool mod, but I like bypass switches better myself. I just wanted to give you the ability to see the inside without doing it to your own pots. Your pot's are wired in the circuit, so keep that in mind when checking this stuff.
These are measurements for volume pot.(multimeter on 2M ohm)
Outside lug to lug: fully open & closed 0.540
Outside lug to middle lug: open-0,closed 0.540
Lug receiving 5-way selector output to back pot: 0.540 open & closed
Mid lug to back pot: 0.530 open, 0-closed
Lug connected to ground lug: 0-open/closed
Measurements for tone pot
Outside lugs: 0.440 open/closed
Lug receiving wire from vol pot to mid lug: 0.440 open, 0-closed
Unused lug to mid: opposite of above
Used outside lug to pot body: 0.540 open/closed
Mid lug to Pot body: open 0.968, closed 0.540
Unused lug to body: open/closed 0.968
Not sure what this all means
Firebird211
Hero Member
- Messages
- 734
With the Ohm meter on the Meg scale (not to be confused with the Peter scale...joking), as it appears from your readings, 0.540 in Megs would be 540K. Keep in mind that the ohms meter is using a battery, which is trying to push current through from the black to red lead. With the pots in the circuit, there are some things you just can't isolate. The outer two readings seem promising and the pots look to be ok.
Firebird211
Hero Member
- Messages
- 734
Leejord, at this point you have tried everything that we told you to do. The only thing to do now is to verify everything, so nothing gets overlooked. Use your ohm meter to verify every little ground point is present and accounted for, even to the output jack contact (not just terminal). Verify with your ohm meter, the signal path for every pickup, right from the pickup to the output jack's contact. Test every signal wire in that path end to end, and even skip a few just to see if there is an abnormal amount of ohms in the path. If there is, then that points to a bad wire or bad solder joint in that path. I kind of wish your pickups had the board on the back with the solder terminals, so you can really check right up to the pickup before the cable it is hooked to. Verify the basic operation of the guitar is fine excluding the annoying noise. Post a birds eye shot of the control panel wiring, so we may see something that you don't. This experience has made you better at electronics, so don't beat yourself up over it.
Im learning a lot about wiring. very handy with screw driver as well. no control plate has been removed as much as this one.added some more photo's. I might just start over and try a piece of copper to solder all ground wires to. if still prob, let the professionals have a go. really appreciate everyones input, especially firebird on this topic and cagey on previous one.thanks.
Firebird211
Hero Member
- Messages
- 734
leejord said:Im learning a lot about wiring. very handy with screw driver as well. no control plate has been removed as much as this one.added some more photo's. I might just start over and try a piece of copper to solder all ground wires to. if still prob, let the professionals have a go. really appreciate everyones input, especially firebird on this topic and cagey on previous one.thanks.
You are welcome buddy, I would try the copper wire, that is what I always do and I don't barely get a peep of noise out of my guitars. :icon_thumright: I will give the photos a lookover, and let you know if I find anything.
Cagey
Mythical Status
- Messages
- 24,425
It looks like all those white wires coming from the selector switch are signal wires, and none of them are shielded. That's less than ideal. Your body is acting like an antenna, they're picking up you, and when you touch the pot or strings, you're grounding yourself, not the guitar. So, the noise goes away.
Shield those wires, and they won't be so quick to pick up signal reflected from you.
In any event, you may be trying to cure something that typically doesn't need curing - a guitar with the volume turned up that nobody's touching. In real life, that's pretty uncommon. You always turn the volume all the way down unless you're actually playing something, otherwise the thing will make all kinds of unwanted noises just from handling if nothing else, and may even go into feedback, screeching at you so you learn to turn the volume down before you let go of the thing.
Firebird211
Hero Member
- Messages
- 734
I know how you guys usually feel about shielding the compartment, but I notice his isn't. On the two electrics I have, one's selector switch is connected with shielded cable, and one isn't, but they are both shielded compartments because you all know how I am about switches and controls. Both guitars idle silent, of course less in single coil mode. :dontknow:
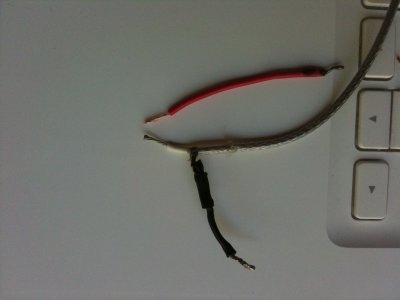
2 of white wires on selector switch are 'hot' from pickups. from advice cagey gave me on other thread, I cant really change these to shielded ( advised not to splice to pick-up leads and may wreck pickup if 'I' change lead entirely). That leaves 2 that I could shield.its pretty crowded on ground lug already and could be difficult to add 2 more wires(ie from new shielded wires) Should i sandwich another lug underneath vol pot or is their another method. Have also enclosed photo of wires I used. I think they are copper. should i be using something else? I did actually try to shield control cavity.Had a lot of difficulty getting solder to run onto copper tape across joins so pulled it out.
Attachments
Similar threads
- Replies
- 41
- Views
- 9K


