Leaderboard

EMG Solderless + 18V Mod + Low-Battery Indicator - I'm Lost

alexreinhold said:
Thanks for the explanations everyone - I get the difference between series and parallel at this point but I would still be a lot more happy if I actually understood the fundamental electrical engineering component better. A colleague of mine is a physicist who builds amplifiers himself - so I will let him crash-course me :)

stratamania said:
Having a switch to switch between 18V series or a single battery running in 9V as EMG suggested might  give a chance to see which set up you prefer. Though the only practical purpose I can think of is if you need to replace batteries and only have a single replacement available as you are about to play Madison Square Garden may have a benefit. Though the moral here is if you are using active pickups is to have spare batteries in the gig bag.

@Stratamania I have 2 questions and 1 remark regarding that. Questions:
1. so the push/pull wiring diagram from EMG makes sense, you just don't see the practical purpose in it, right?
2. isn't there supposed to be an actual sonic difference between 18V and 9V?

Remark: Madison Square Garden might be a stretch but I refuse to stop dreaming :) But in all seriousness, the guitar that I am building is supposed to be as metal as possible. And the beauty about metal is that we metalheads do take it seriously but also like to make fun of ourselves. One of the things that is right on the edge of being dead serious and total BS is the legendary 18V mod. And I thought it was a nice gimmick to be able to switch between the standard 9V (as the default) to 18V mod just because I can. Does that make sense?

To answer your question number two, look to the link that I posted that indicates perceived results to be subjective specifically to headroom.  To understand headroom, read up on “audio gain staging” or “gain structure” to put into its proper context. 
 
Per 1. The EMG push pull wiring looks correct from what I can see. I don't see any practical purpose unless you want to do an AB comparison as an experiment, but after that you might want to stick to 18V.

Per 2. See answer from TFS

 
The sonic difference is that if you run out of headroom and are clipping (distorting the peaks) at 9V, then 18V gives you more headroom to avoid clipping. And note that in most cases things not intentionally designed with pleasing distortion in mind should not really be expected to distort in a good way.

If you aren't clipping at 9V, there should be no difference.

 
Thanks guys, and thanks for the link Tony!

I'll do the push / pull and a/b it. If I hear a difference, I'll record a clip and posted it here.
 
OK, I am almost there but will need help.

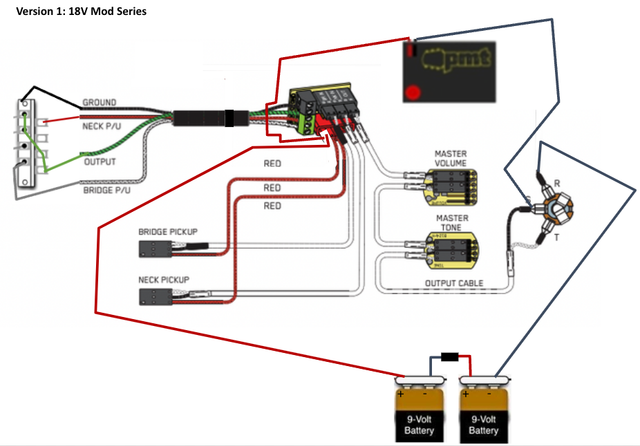
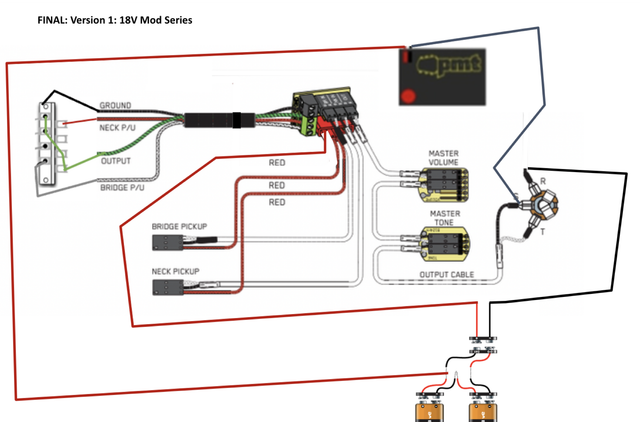
I went for the 18V wiring (see diagram below) but the batteries are not recognized by the pickups. I can confirm that the preamps of the pickups are not fried because I tested a standard 9V setup (full solderless) and it works like a charm.

Now, I have two theories:

1. splicing and connecting the red battery wire with the low battery indicator and the cut off connector piece from EMG went wrong. What I did: I tied the ends of the three cables together (i.e. red low battery indicator, red battery cable and red cut off connector piece from EMG solderless battery connector wire) and tinned them with my soldering iron. After that I covered the connected ends with the heat shrink tube (but did not heat).

2. something is off with the double battery box I got from Warmoth. This is my first time ever installing a battery box. Any obvious things I might have missed? Note: I double checked and can confirm that I did not mix up any of the four wires.

Any other things that my cause this?

Here's the diagram again:
Screenshot-2022-03-16-at-10-09-02.png
 
I don't see a place  for the battery ground  connection to the preamp? If the diagram is exactly what you've got done, I think your preamp is ungrounded.
 
Sadie-f said:
I don't see a place  for the battery ground  connection to the preamp? If the diagram is exactly what you've got done, I think your preamp is ungrounded.

What are you referring to as a preamp?
 
stratamania said:
Sadie-f said:
I don't see a place  for the battery ground  connection to the preamp? If the diagram is exactly what you've got done, I think your preamp is ungrounded.

What are you referring to as a preamp?

I took the top center block, with 11  wire connections  to be a pre-amplifier.  I don't know much about EMGs so for all I know the preamp is built into the pickup or there's no actual preamp at all, however, I still don't see a way that the ground wire is connected to any electronics except for the jack ring connection and the battery voltage indicator.
 
Sadie-f said:
stratamania said:
Sadie-f said:
I don't see a place  for the battery ground  connection to the preamp? If the diagram is exactly what you've got done, I think your preamp is ungrounded.

What are you referring to as a preamp?

I took the top center block, with 11  wire connections  to be a pre-amplifier.  I don't know much about EMGs so for all I know the preamp is built into the pickup or there's no actual preamp at all, however, I still don't see a way that the ground wire is connected to any electronics except for the jack ring connection and the battery voltage indicator.

Ah, that is simply a combined battery buss and connectivity block.

If you look at the pickups there are two connections coming out of them into what is represented as a white cable to the connectivity bus in addition to the red cable for the battery. Each end has a quick connector and looks something like this.

pu_cable_1.jpg

https://www.emgpickups.com/pu-cable-active.html
 
I have an idea but I am not sure about one thing.

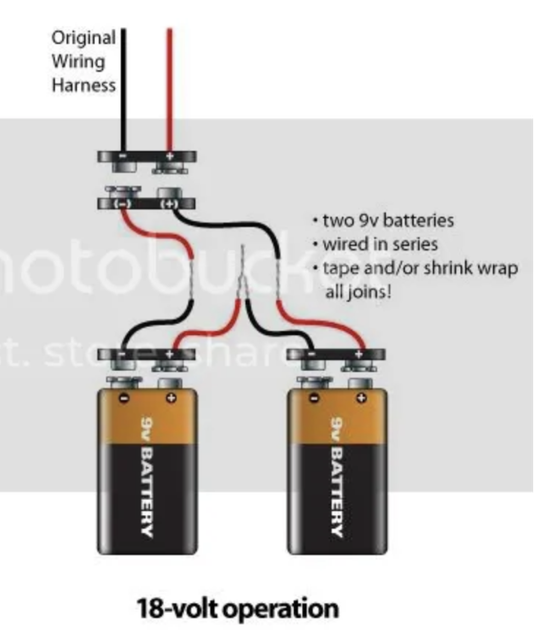
I will buy an extra battery clip and follow this exact wiring instead (i.e. clip to clip):

Screenshot-by-Snip-My-at-26-Mar-2022-at-18-23-09.png


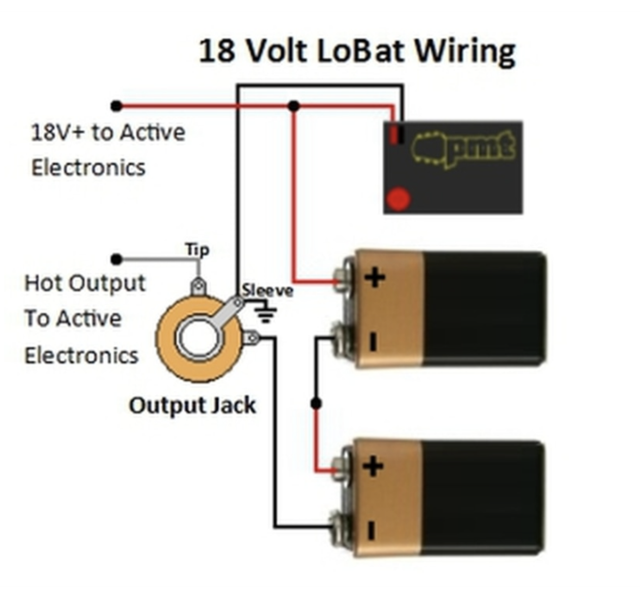
But I will also have to sneak this guy in:

Screenshot-by-Snip-My-at-26-Mar-2022-at-18-23-33.png


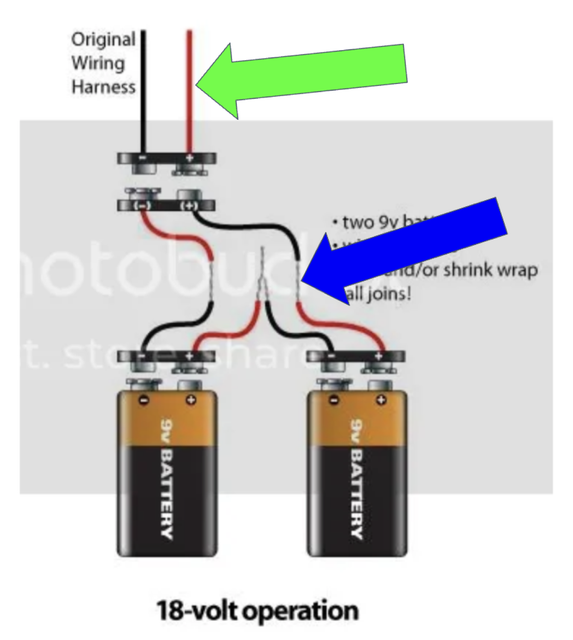
However, I am now unsure how exactly to wire the low battery indicator. Is it where the green arrow is or where the blue arrow is?

Screenshot-by-Snip-My-at-26-Mar-2022-at-18-24-32.png


Or could I maybe just slice it into the red EMG wire I already cut from the battery clip and connect it to the Buss completely separately?
 
The low battery indicator can go in either location. However, I think it's a 9 volt low battery indicator and since you're planning an 18-volt circuit, you might need a voltage divider in there somewhere.
 
You could connect it using either of the three mentioned options. I would use the bus...tidier.

On the previous question, break it down to simpler steps. Is it working without the low battery indicator in circuit for example. Or if it works in 9V and add in one thing at a time and you will identify when the problem appears.

 
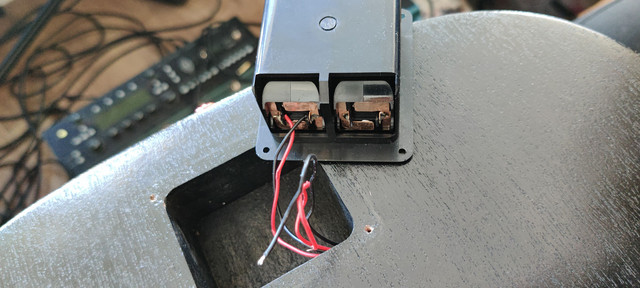
I found the problem - and damn, WHAT a stupid one. In order to avoid everything tangling from the guitar I had pushed in the battery box. When I was about to give up, I pulled it out and saw this:
IMG-20220327-101217.jpg


How annoying... fixed it and now it's working like a charm. However, I'm not 100% sure if the Low Battery Indicator is working correctly. The instructions say that - when wired correctly - the indicator should light up for a second when i plug in my cable. However, in my case, it lights up constantly when I put the cable in halfway. As soon as I push it in in full, the light goes off. Hence, when plugging in the cable, I see the light very briefly as the cable is touching the output jack - but I wouldn't call it 1 sec. I wonder if this behavior is normal. It seems logical.
 
TonyFlyingSquirrel said:
What is that black box in the top that says "PMT" on it?
Is that the Low Battery Indicator that you're referring to?

Yes that is the low battery indicator.

Theoretically it looks about right. But do you have pictures of the actual wiring if there is still a problem.
 
for those interested. GuitarElectronics.com (from whom I purchased the battery indicator) responded this:

Yes, the time it will flash is nor exactly a second. AS long as you see the light come on, then go off, it is working correctly and the batter is good.

So I guess, I'm done :)
 
Excellent, now we wait for quite some time to see if the indicator lights up as the batteries get low... :icon_thumright:
 
Back
Top