Issues with newly built guitar

O

Orange Tortex

Guest
This thread applies to several topics, so I’m putting it here. It’s also a copy+paste of my TGP post.

I finally got my Warmoth guitar assembled and strung, but now I’m facing a few problems.

One is with the truss rod. My neck is modern construction, which has a double truss rod with a heel and side adjust mechanism. Problem is, no matter how much I try to adjust the side screw, it doesn’t seem to change anything. I’m measuring with feeler gauges and the strings never get closer nor farther.

Second is the pickup height. They’re wood mounted humbuckers that I’ve modified to be adjustable by sticking foam to the baseplates. But even at their maximum height, they are still very far from the strings. With the E string fretted at the last fret, it measures about a quarter of an inch on the neck pickup and even further on the bridge. My theorized solution is to cut wood to fit the cavities and glue them into the body, then screw the pickups into them. Could that work or is the current height generally acceptable? It’s a Strat, so there is no downward angle of the strings like on a Les Paul.

Third is the wiring. Before this project, I’ve never soldered anything. And as it turns out, I wired the switch backwards, and the middle position does not work at all. I can’t physically turn the switch around because the wires are too short, so I’ll have to redo it. The switch shown on my diagram is different from mine as the lugs are mirrored, so I simply inverted it accordingly. As for the middle position not working, I can only imagine I wired something incorrectly, because for some reason my multimeter will not give me a reading no matter what method I use to test.

Lastly, the noise. The pickups work individually, but they are both super noisy. They buzz like a single coil would, even with low gain and volume. Could this also be a wiring issue? I’m not surrounded by a surplus of electromagnetic energy so I’m guessing shielding probably wouldn’t help?
 
Never had A problem with the first issue.
Your solution for two sounds good.
For three and the humming I just follow the directions and if it doesn't work I bring it to a pro.
 
Orange Tortex said:
One is with the truss rod. My neck is modern construction, which has a double truss rod with a heel and side adjust mechanism. Problem is, no matter how much I try to adjust the side screw, it doesn’t seem to change anything. I’m measuring with feeler gauges and the strings never get closer nor farther.

The side adjust is a cam that's only going to work once the normal end nut has been setup, and the side adjust may not have as much total adjustment range as the nut.

Here's a Warmoth page with a video at end that shows how it works
https://warmoth.com/guitar-neck-truss-rod

Second is the pickup height. They’re wood mounted humbuckers that I’ve modified to be adjustable by sticking foam to the baseplates. But even at their maximum height, they are still very far from the strings. With the E string fretted at the last fret, it measures about a quarter of an inch on the neck pickup and even further on the bridge. My theorized solution is to cut wood to fit the cavities and glue them into the body, then screw the pickups into them. Could that work or is the current height generally acceptable? It’s a Strat, so there is no downward angle of the strings like on a Les Paul.

That's exactly what I did with my build, cut a base that would work with shims underneath. I didn't glue them, rather they're held in place when I tighten down the screws that mount the base plates I made into the body.

Third is the wiring. Before this project, I’ve never soldered anything. And as it turns out, I wired the switch backwards, and the middle position does not work at all. I can’t physically turn the switch around because the wires are too short, so I’ll have to redo it. The switch shown on my diagram is different from mine as the lugs are mirrored, so I simply inverted it accordingly. As for the middle position not working, I can only imagine I wired something incorrectly, because for some reason my multimeter will not give me a reading no matter what method I use to test.

Lastly, the noise. The pickups work individually, but they are both super noisy. They buzz like a single coil would, even with low gain and volume. Could this also be a wiring issue? I’m not surrounded by a surplus of electromagnetic energy so I’m guessing shielding probably wouldn’t help?

I don't know about your middle position, I don't see a diagram on your post.

The noise is probably emi, have you grounded the wiring to the bridge? With a trem bridge, you usually solder to the spring adjustment claw. Ungrounded, the strings are very efficient antennas.

Also, your ground system should be each individual grounded item connected to a common point. Usually that's the volume pot. It doesn't matter what point is chosen as central, but only that should have more than one ground connection, else you can get a ground loop, which can also pickup emi.

 
1. try the big-boy adjuster at the heel and see if you get some movement

2.  bro, just get longer screws lol

3. i would unsolder everything and do all the wiring again from scratch
 
p.s.

Soldering is tricky, particularly soldering a small wire to something large, like the body of a pot or the trem spring claw. For those you can either turn the heat up a lot, or use a larger tip, or both. Practice helps of course
 
Sadie-f said:
Orange Tortex said:
One is with the truss rod. My neck is modern construction, which has a double truss rod with a heel and side adjust mechanism. Problem is, no matter how much I try to adjust the side screw, it doesn’t seem to change anything. I’m measuring with feeler gauges and the strings never get closer nor farther.

The side adjust is a cam that's only going to work once the normal end nut has been setup, and the side adjust may not have as much total adjustment range as the nut.

Here's a Warmoth page with a video at end that shows how it works
https://warmoth.com/guitar-neck-truss-rod

Second is the pickup height. They’re wood mounted humbuckers that I’ve modified to be adjustable by sticking foam to the baseplates. But even at their maximum height, they are still very far from the strings. With the E string fretted at the last fret, it measures about a quarter of an inch on the neck pickup and even further on the bridge. My theorized solution is to cut wood to fit the cavities and glue them into the body, then screw the pickups into them. Could that work or is the current height generally acceptable? It’s a Strat, so there is no downward angle of the strings like on a Les Paul.

That's exactly what I did with my build, cut a base that would work with shims underneath. I didn't glue them, rather they're held in place when I tighten down the screws that mount the base plates I made into the body.

Third is the wiring. Before this project, I’ve never soldered anything. And as it turns out, I wired the switch backwards, and the middle position does not work at all. I can’t physically turn the switch around because the wires are too short, so I’ll have to redo it. The switch shown on my diagram is different from mine as the lugs are mirrored, so I simply inverted it accordingly. As for the middle position not working, I can only imagine I wired something incorrectly, because for some reason my multimeter will not give me a reading no matter what method I use to test.

Lastly, the noise. The pickups work individually, but they are both super noisy. They buzz like a single coil would, even with low gain and volume. Could this also be a wiring issue? I’m not surrounded by a surplus of electromagnetic energy so I’m guessing shielding probably wouldn’t help?

I don't know about your middle position, I don't see a diagram on your post.

The noise is probably emi, have you grounded the wiring to the bridge? With a trem bridge, you usually solder to the spring adjustment claw. Ungrounded, the strings are very efficient antennas.

Also, your ground system should be each individual grounded item connected to a common point. Usually that's the volume pot. It doesn't matter what point is chosen as central, but only that should have more than one ground connection, else you can get a ground loop, which can also pickup emi.
It is grounded to the claw, though I had to solder it several times because it tends to break off easily. I tried scratching the claw as well as dipping the wire in flux, but nothing seems to help. As for my ground, it’s all on the volume pot.
 
Also here’s the link to my TGP post it has pictures in a reply

https://www.thegearpage.net/board/index.php?threads/issues-with-newly-built-guitar.2305437/
 
Cool, so the ground wire to the claw is almost certainly what's called a cold solder joint, it might be connected (check with an ohmmeter), however, I'd say see if you can break that blob of solder off with pliers and redo.

Try turning the soldering iron up hotter, and at first, don't put the wire on, just tin the surface with a small pool of solder, then re-melt that, and attach the ground wire to the molten pool.

Same with the pot bodies, they don't look like the solder is correctly laid onto the base.

Here's a basic link on solder problems, at the least you have 2 and 4, probably 1 also.

https://www.eptac.com/5-common-solder-mistakes-and-how-to-resolve-them/

Here's my bridge ground, it's by no means beautiful, more solder than needed for the job, however, I did as I described, flowed solder onto the spot, before connecting the wire, and too much solder isn't pretty, however I'm not working on a satellite, the fraction of a gram won't be a problem.

Also, I just use 60/40 tin/lead. It's much easier to work with than tin/silver.
 
Sadie-f said:
Cool, so the ground wire to the claw is almost certainly what's called a cold solder joint, it might be connected (check with an ohmmeter), however, I'd say see if you can break that blob of solder off with pliers and redo.

Try turning the soldering iron up hotter, and at first, don't put the wire on, just tin the surface with a small pool of solder, then re-melt that, and attach the ground wire to the molten pool.

Same with the pot bodies, they don't look like the solder is correctly laid onto the base.

Here's a basic link on solder problems, at the least you have 2 and 4, probably 1 also.

https://www.eptac.com/5-common-solder-mistakes-and-how-to-resolve-them/

Here's my bridge ground, it's by no means beautiful, more solder than needed for the job, however, I did as I described, flowed solder onto the spot, before connecting the wire, and too much solder isn't pretty, however I'm not working on a satellite, the fraction of a gram won't be a problem.

Also, I just use 60/40 tin/lead. It's much easier to work with than tin/silver.
Yeah the solder on the pots probably doesn’t look too good, but it turns out that the pots actually work. I’m honestly surprised I did as good as I did lol.

I’ll try what you say on the claw, because I’m sure it’ll break off while I’m playing since it doesn’t have a back plate.

And as for my solder, I’m using 60/40 rosin core
 
I started out using too small of a soldering pen.  It was fine for tinning wires and light weight connections, but for pots and ground connections it just didn't put out enough heat.  Those joints would just take too long to melt the solder and yet pot internals would cook.  Bought a decent 40 watt pen and it made all the difference.  Solder now flows easily on those hard to connect parts!  For what it's worth. :doh:
 
vetteman said:
I started out using too small of a soldering pen.  It was fine for tinning wires and light weight connections, but for pots and ground connections it just didn't put out enough heat.  Those joints would just take too long to melt the solder and yet pot internals would cook.  Bought a decent 40 watt pen and it made all the difference.  Solder now flows easily on those hard to connect parts!  For what it's worth. :doh:

A $100 investment (give or take) into a good, heat adjustable soldering station is totally worth it. I haven't destroyed a pot or a circuit yet, so I'll call that a success. Once you get the technique down you'll also find yourself never wanting to buy a pre-made cable ever again. I've built several pedal boards with custom signal and power connections and it saves a ton of clutter by having everything custom length.

One thing I don't think was mentioned was to also pick up some liquid flux. Even with the solder that has flux in it now I find that it flows immensely better, faster, and to where I want when just a tiny amount of liquid flux applied in the right spot. The less time you have to spend touching the iron to something, the better, and it really does the trick.
 
fauxtoe said:
vetteman said:
I started out using too small of a soldering pen.  It was fine for tinning wires and light weight connections, but for pots and ground connections it just didn't put out enough heat.  Those joints would just take too long to melt the solder and yet pot internals would cook.  Bought a decent 40 watt pen and it made all the difference.  Solder now flows easily on those hard to connect parts!  For what it's worth. :doh:

A $100 investment (give or take) into a good, heat adjustable soldering station is totally worth it. I haven't destroyed a pot or a circuit yet, so I'll call that a success. Once you get the technique down you'll also find yourself never wanting to buy a pre-made cable ever again. I've built several pedal boards with custom signal and power connections and it saves a ton of clutter by having everything custom length.

One thing I don't think was mentioned was to also pick up some liquid flux. Even with the solder that has flux in it now I find that it flows immensely better, faster, and to where I want when just a tiny amount of liquid flux applied in the right spot. The less time you have to spend touching the iron to something, the better, and it really does the trick.
I have paste flux. Does liquid work better?
 
As long as it's rosin, it's fine, same thing.

Vetteman, I've got a wesd51, pricey and worth every single penny. We've got better at work, but this is a fine professional workhorse.
 
Seriously who hasn't miswired a guitar

I've got an LP with the volume control working in reverse direction right now. And I know what I'm doing
 
jay4321 said:
Seriously who hasn't miswired a guitar?

You mean, this month?  :icon_biggrin:

I once forgot to wire a switch entirely, and was thoroughly convinced I didn't hear the effect because it was so subtle. I even convinced a buddy of mine of the same thing, until it was opened it up for a different reason and Lo! A pointless switch!  :laughing7:

It just goes to show, the power of suggestion is tremendous.
 
Related to this topic, does anyone have a recomendation for a multimeter? I don't want to get too cheap like I did on my soldering iron, but prices seem to go from $20 to $250. Since like the OP, I am about to embark on my first build doing the wiring myself (last time I purchased a pre-wired strat pickguard). Also, any suggestions on how to space things for strat controls for a rear rout telecaster? I guess I can just measure the controls on my strat, but was just wondering if there is a template somewhere that I could use to make a board to use during the harness wiring.
 
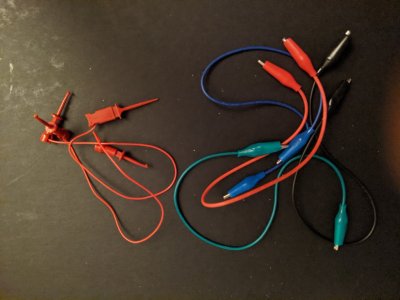
I'm a fan of quality tools, however, get the DMM features you need and maybe save some $$ for all the other tools that make the work easier. For instance lots of test leads (some of mine attached below), I can easily test out an idea, in addition to making it easier to connect the DMM into a circuit. The micro-grabbers are especially useful.

A solder sucker can be handy for unsoldering connections .. I have to go back to fix simple mistakes pretty often.


Attachments

  • 16375382070510.jpg
    16375382070510.jpg
    251.5 KB · Views: 65
Sadie-f said:
I'm a fan of quality tools, however, get the DMM features you need and maybe save some $$ for all the other tools that make the work easier. For instance lots of test leads (some of mine attached below), I can easily test out an idea, in addition to making it easier to connect the DMM into a circuit. The micro-grabbers are especially useful.

A solder sucker can be handy for unsoldering connections .. I have to go back to fix simple mistakes pretty often.
Sometimes I feel so dumb! Not sure what test leads are used for, or how they are used. As far a saving $$, lately I have found that saving money always results in spending more $$ in the long run.
 
Don't feel stupid
Test leads are how you interface / connect the meter with the work you're doing.
So they usually plug into the meter one will be black when I'll be red normally.
Truthfully for most guitar electronic work you don't need to fancy . Inexpensive harbor freight freebie with a coupon or work just fine.
It's nice to have a set of alligator clip test leads . They clip onto your work so you don't have to hold say the wire and the test lead together , just clip it on
 
I agree with mx481, for guitar work you don't have to break the bank. I do a lot of electronics work both for fun and for work. So I'm glad to have a quality solder station and high end DMM (rated for 1000V, can measure very high resistance and also microamp currents).

What I need most often however, are all the other bits, practical tools to make the work easier.


Back
Top