Getting nut slot flat on tiltback Strat neck

Bruce Campbell

Junior Member
Messages
155
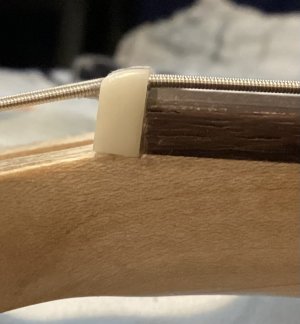
I had a luthier cut a nut for this neck but it wasn't good - it was sitting on a plastic spacer/shim and not set completely solidly, capable of sliding around when pushed. I brought up these concerns and they had attitude about the neck/slot having issues. I put in a nut myself and it's been working but it won't sit flat in the slot.

Any recommendations on how to best do this?
 

Attachments

  • warmothneck.jpg
    warmothneck.jpg
    467.3 KB · Views: 25
See another luthier. He's a turd. I guess I'd try to build up the wood surface with a slurry of baking soda and super glue. There'd be a lot of futzing. Then get a new nut. I can't tell if the fret board is off balance.
 
He sounds more like a bad tech than a luthier. If you're good with a file, and have steady hands, you can probably square it up and make it OK. Or do as Rick suggested and take it to a real Luthier.
 
The nut's too thick and that E-slot is way too deep. Replace the nut. Starting from a fresh, blank nut that actually has the thickness for the available space will cost way less than trying to repair the ill-fitting nut that's there now. Chalk that nut up to a loss, put it in the trash, don't throw good money after bad, and start over.
 
The nut's too thick and that E-slot is way too deep. Replace the nut. Starting from a fresh, blank nut that actually has the thickness for the available space will cost way less than trying to repair the ill-fitting nut that's there now. Chalk that nut up to a loss, put it in the trash, don't throw good money after bad, and start over.
I need to fix the nut slot first. (Thread title.)
 
Remove the nut first

Take and post photos of the nut slot area from a side and top elevation, and any other angles that allows the actual area to be fully visible.

Post those photos and then advise can be given specifically.
 
Last edited:
A nut is much more replaceable than a neck if a filing/shaving/sanding goes too far or something else gets nicked/damaged.
I have to agree with you there, Ned - I'm not on the original nut. Per my original post, the problem is not the nut - I have to fix the slot first. Maybe I'll have to replace the nut when I get the slot even but functionally the nut is performing better than any on this guitar so far, including that of the prior-mentioned tech.

Rick suggests building up the surface rather than filing it away, which seems in line with your concern.

Stratamania, thanks for your suggested next steps - I will post more details ASAP.
 
Nut slot too deep for sure. Nut looks crooked relative to the fret board on bottom. Super glue slurry can be used to build back up slot height. Or strip of playing card shim. Probably, new nut best idea.
 
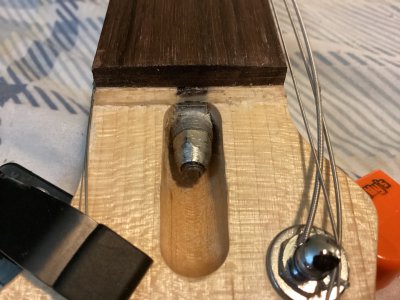
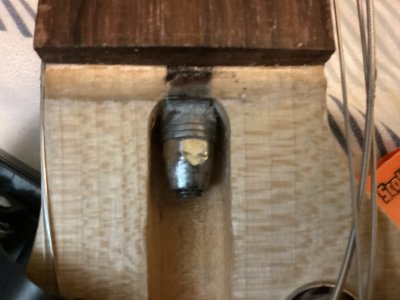
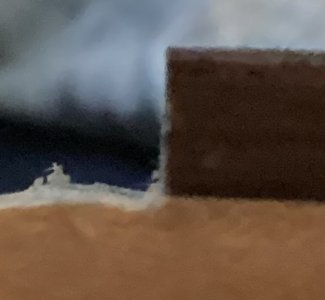
Thanks for the advice thus far - here are some photos of the nut slot (sorry they're not better, having trouble with the closeups on the sides). Looks like the advice already given is the best way to proceed (building up surface to be level 90 degrees with fretboard?), but I'll wait for further feedback.
 

Attachments

  • Headstock.jpg
    Headstock.jpg
    670.7 KB · Views: 12
  • Headstock 2.jpg
    Headstock 2.jpg
    417.1 KB · Views: 9
  • Bass side.jpg
    Bass side.jpg
    92.5 KB · Views: 6
  • Treble side.jpg
    Treble side.jpg
    41.6 KB · Views: 8
Last edited:
The fretboard line where it joins the neck should form a straight line with the nut shelf and at 90 degrees to the fretboards leading edge.

What a mess, did someone just wrench off the old nut or remove some of the wood to try to fit a Stratocaster type nut? This is of course the wrong nut for a tiltback regardless of head shape, and the nut shelf is now a bit of a dog's breakfast.

If it were me, I would clean up the bottom to make it flat with a very sharp chisel, then glue back on a thin piece of wood or veneer to build back to just above the original height. Then, chisel, file, or sand as appropriate to get it dialled in to the exact height and level. Make sure that you do not disturb the end of the fretboard when doing this work.

Once you have the correct level height again, then fit a suitable nut.
 
Stratamania, the previously mentioned tech laid a few strips of plastic shim down and then put a nut on top of it. The original nut was a Corian cut by Warmoth but was cut crookedly by them; I tried my best to make it work but it didn't. Then I took it to the tech who did the above-mentioned shim +

Going back in there, the plastic shim/strip was much more embedded in the surface than I gave credit for originally. I was able to pry the rest of it out, but now I need to do the cleaning and veneering like you mentioned.

What "kind" of nut should the tiltback have? I was going to work with oversize blanks and trim them down - is there an esoteric element to doing this for the tiltback?
 
You need a Les Paul style nut.
Besides the oversize width and too-deep slots, how should the new one differ from the one in the first post's picture? That one is a Gibson-style pre-slotted bone nut with deepened slots.

 
Besides the oversize width and too-deep slots, how should the new one differ from the one in the first post's picture? That one is a Gibson-style pre-slotted bone nut with deepened slots.

Then that is correct!
 
Great, now I just need to fix the actual shelf the nut sits on. I don't think the tech had tried for a Strat-style nut either, but the modifications he made were probably an attempt to avoid the work I have to do now. Maybe there was damage when he removed the original Corian nut by Warmoth and he tried to hide it...either way, thanks again to all for the guidance.
 
Nut Slot = The slot of the nut that the string passes through.
Nut Shelf = The area of the neck that the nut rests upon.

That Nut Shelf needs to be milled, in order to have a level surface.
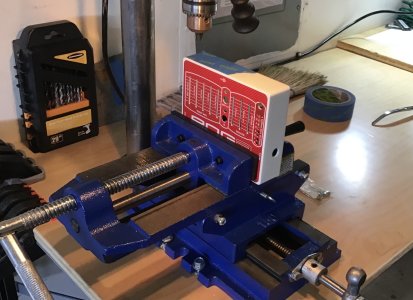
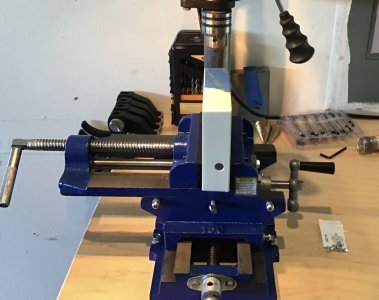
If you have a precision drill press and a milling vice, it can be done with better precision, but mounting it into the vice needs to be precise or you may ruin the neck.
Once mounting integrity is confirmed, as well as the cut depth, even if you’re just cleaning it up, you can use the rotary handles on the device to move the neck slowly, and in very small cut increments, into the cut area.
Use a bit with a very small cut area too. This will help the bit stay cooler too.

Start by dry fitting the bit up against the butt end of the fingerboard, then begin your cut at least one bit depth diameter away from the fingerboard itself to preserve the integrity of the fingerboard. As you advance the bit into the next lane of cutting, overlap your next cutting lane by half a bit depth, with the other half in the prior cutting lane. Go lane by lane this way until you have achieved the nut thickness desired. This will keep continuity in your depth and “level” profile. From here, you can use a file like the Stew Mac one that has a safe edge to clean up the bottom of the shelf you just cut in the first little lane area that you did not cut into, nearest the fingerboard edge. The safe edge is up against the butt end of the fingerboard, which will preserve the intonation integrity of your fingerboard.

Now, get a new nut blank. Mill it to the thickness of the Nut Shelf if needed, then begin slotting and shaping as needed.

Pics of my milling vice/drill press set up with I recently installed a Midi retrofit circuit board and drilled out the chassis for the Midi In jack on. POG pedal For a customer.
 

Attachments

  • IMG_3871.jpeg
    IMG_3871.jpeg
    733.3 KB · Views: 6
  • IMG_3870.jpeg
    IMG_3870.jpeg
    639.6 KB · Views: 5
Last edited:
Nut Slot = The slot of the nut that the string passes through.
Nut Shelf = The area of the neck that the nut rests upon.

That Nut Shelf needs to be milled, in order to have a level surface.
If you have a precision drill press and a milling vice, it can be done with better precision, but mounting it into the vice needs to be precise or you may ruin the neck.
Once mounting integrity is confirmed, as well as the cut depth, even if you’re just cleaning it up, you can use the rotary handles on the device to move the neck slowly, and in very small cut increments, into the cut area.
Use a bit with a very small cut area too. This will help the bit stay cooler too.

Start by dry fitting the bit up against the butt end of the fingerboard, then begin your cut at least one bit depth diameter away from the fingerboard itself to preserve the integrity of the fingerboard. As you advance the bit into the next lane of cutting, overlap your next cutting lane by half a bit depth, with the other half in the prior cutting lane. Go lane by lane this way until you have achieved the nut thickness desired. This will keep continuity in your depth and “level” profile. From here, you can use a file like the Stew Mac one that has a safe edge to clean up the bottom of the shelf you just cut in the first little lane area that you did not cut into, nearest the fingerboard edge. The safe edge is up against the butt end of the fingerboard, which will preserve the intonation integrity of your fingerboard.

Now, get a new nut blank. Mill it to the thickness of the Nut Shelf if needed, then begin slotting and shaping as needed.

Pics of my milling vice/drill press set up with I recently installed a Midi retrofit circuit board and drilled out the chassis for the Midi In jack on. POG pedal For a customer.
You should be sleeping at 3am though!
 
Back
Top