

You are using an out of date browser. It may not display this or other websites correctly.
You should upgrade or use an alternative browser.
You should upgrade or use an alternative browser.
G4: From black to Korina - to DIY chambering
- Thread starter MortenB
- Start date
Thanks Cagey - I'm very pleased..!
Often I tend to agree with you on wood knobs, not super exiting, but I think that's because the knobs are often not matched well enough to the instrument: They are gloss clear on an oiled instrument, the colors or wood grain is not that good a match etc etc. Then the knobs end up looking a bit like an ''add on'' instead of something that is integrated into the design.
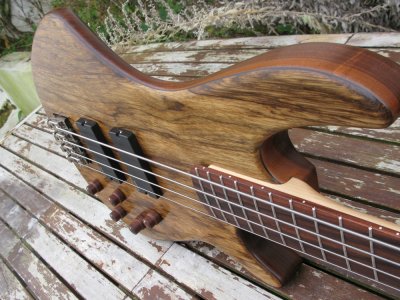
When ordering from THG Knobs one can get a very good custom match, and the finish is second to none as well. They are not cheap, but you get what you pay for..! Here are some better pictures, taken in daylight. I think these knobs are so well matched to the bass... And now I see them on the bass I'm glad that I went for the ''simpler'' look in solid pau ferro instead of knobs made as a stack of walnut / black / black korina. I like this bass to be ''basic'' if that makes any sense.
Now I just need to walnut-veneer the cover on the back - and the bass is done :glasses10:
Often I tend to agree with you on wood knobs, not super exiting, but I think that's because the knobs are often not matched well enough to the instrument: They are gloss clear on an oiled instrument, the colors or wood grain is not that good a match etc etc. Then the knobs end up looking a bit like an ''add on'' instead of something that is integrated into the design.
When ordering from THG Knobs one can get a very good custom match, and the finish is second to none as well. They are not cheap, but you get what you pay for..! Here are some better pictures, taken in daylight. I think these knobs are so well matched to the bass... And now I see them on the bass I'm glad that I went for the ''simpler'' look in solid pau ferro instead of knobs made as a stack of walnut / black / black korina. I like this bass to be ''basic'' if that makes any sense.
Now I just need to walnut-veneer the cover on the back - and the bass is done :glasses10:
Attachments
tubby.twins
Hero Member
- Messages
- 625
MortenB, that's some very nice work. The knobs of pau ferro look perfect.
Do you have a name for the bass yet?")
Do you have a name for the bass yet?
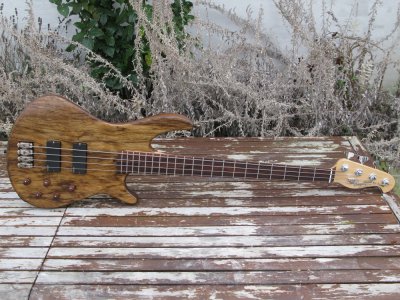
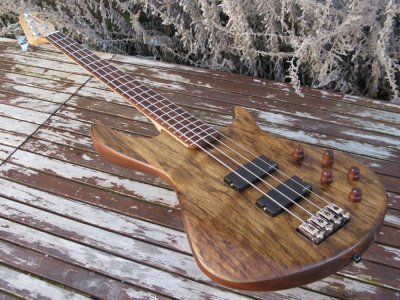
Time for a small update... The bass is now (almost) finished...
I still need to veneer the preamp control cover, but besides that I feel this one is now where I want it to be. I have changed one of the pick ups and this gives a nice improvement (IMHO), but also something that I don't really understand and would love your comments on. Here goes...
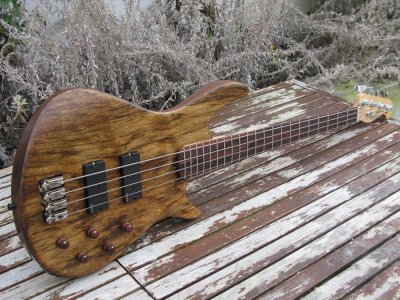
The body was routed for EMG 35's when I bought it, and there were 5 holes for pots, so I ordered these:
Preamp system: http://www.emgpickups.com/accessories/bass-accessories/bass-eq-active/bqssystem.html
Humbucker pick ups: http://www.emgpickups.com/bass/extended-series/4-string/35csx.html
The 35CSX are the warmest and most ''vintage'' sounding of the EMG's and this is what I like, I don't fancy the super open hifi sound. All was good...
Then... I noticed that the neck pick up is exactly in the P bass sweet spot position and it got me thinking about how the bass wound sound with the 35CSX at the bridge and this EMG P bass pick up at the neck:
http://www.emgpickups.com/bass/extended-series/4-string/35px.html
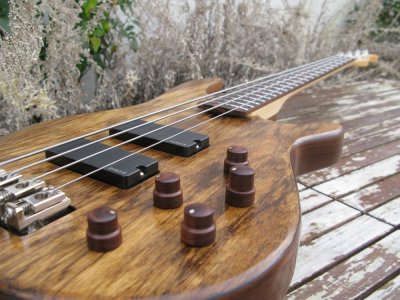
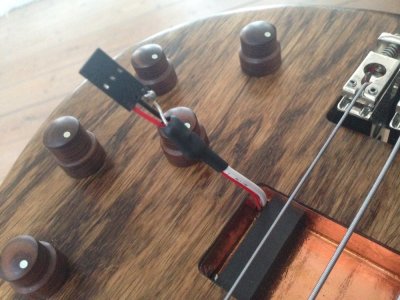
Now I know because I ordered the P pick up and it's now installed. I LIKE :icon_thumright: This is quite an open sounding P pick up, but it's not sterile or mechanical sounding in any way. It has an open, warm and sweet top end combined with the P tone that I really like. So when soloing the neck pick up I have what I would call a modern P bass tone, and when soloing the bridge there is a nice burpy sound. All good, and I really like this big tonal range that I can blend nicely with the ''blend'' pot in the preamp system. The output is lower though from the P pick up, so I had to sneak a 3.3K ohm resistor into the EMG wiring (see close up picture). The resistor is in series with the signal from the humbucker at the bridge.
Here is what I don't really understand:
When I play both pick ups I get a tone that is a nice combination of both pick ups, however the top end is rolled of a bit and the low end is more present and punchy. The difference is a bit like when a pair of new strings has settled in and get's more rolled off. So when I solo any of the pick ups I have a more open treble, and when playing both I have a more rolled of treble... I have tried all possible adjustments of the pick up's, but this small issue is there no matter the adjustment. Maybe it's not even an issue, for instance it's cool when playing with the pick, and if I want the more open sound I can just twist the blend knob in either direction... So it's more that I don't get it, than it's a problem...
Can anyone think of a reason for the rolled of treble and more punchy low end with playing both pick ups..!? Thanks for any ideas or explanations on this..
I still need to veneer the preamp control cover, but besides that I feel this one is now where I want it to be. I have changed one of the pick ups and this gives a nice improvement (IMHO), but also something that I don't really understand and would love your comments on. Here goes...
The body was routed for EMG 35's when I bought it, and there were 5 holes for pots, so I ordered these:
Preamp system: http://www.emgpickups.com/accessories/bass-accessories/bass-eq-active/bqssystem.html
Humbucker pick ups: http://www.emgpickups.com/bass/extended-series/4-string/35csx.html
The 35CSX are the warmest and most ''vintage'' sounding of the EMG's and this is what I like, I don't fancy the super open hifi sound. All was good...
Then... I noticed that the neck pick up is exactly in the P bass sweet spot position and it got me thinking about how the bass wound sound with the 35CSX at the bridge and this EMG P bass pick up at the neck:
http://www.emgpickups.com/bass/extended-series/4-string/35px.html
Now I know because I ordered the P pick up and it's now installed. I LIKE :icon_thumright: This is quite an open sounding P pick up, but it's not sterile or mechanical sounding in any way. It has an open, warm and sweet top end combined with the P tone that I really like. So when soloing the neck pick up I have what I would call a modern P bass tone, and when soloing the bridge there is a nice burpy sound. All good, and I really like this big tonal range that I can blend nicely with the ''blend'' pot in the preamp system. The output is lower though from the P pick up, so I had to sneak a 3.3K ohm resistor into the EMG wiring (see close up picture). The resistor is in series with the signal from the humbucker at the bridge.
Here is what I don't really understand:
When I play both pick ups I get a tone that is a nice combination of both pick ups, however the top end is rolled of a bit and the low end is more present and punchy. The difference is a bit like when a pair of new strings has settled in and get's more rolled off. So when I solo any of the pick ups I have a more open treble, and when playing both I have a more rolled of treble... I have tried all possible adjustments of the pick up's, but this small issue is there no matter the adjustment. Maybe it's not even an issue, for instance it's cool when playing with the pick, and if I want the more open sound I can just twist the blend knob in either direction... So it's more that I don't get it, than it's a problem...
Can anyone think of a reason for the rolled of treble and more punchy low end with playing both pick ups..!? Thanks for any ideas or explanations on this..
Attachments
Cagey
Mythical Status
- Messages
- 24,425
MortenB said:Can anyone think of a reason for the rolled of treble and more punchy low end with playing both pick ups..!? Thanks for any ideas or explanations on this..
Phasing. Not that the pickups are wired wrong, but the way the strings vibrate, the nodes of vibrations and the spacing of the pickups will create additive and subtractive filtering effects separate from the frequency response of the pickups themselves.
Back about 100 years ago, somebody made a bass (Gibson?) with a sliding pickup mount so you could change the character/tone of the instrument by moving it ~3/4" in one direction or the other. It didn't catch on as a desirable thing, but it was a nod to the fact that pickup position makes a lot of difference in what the thing sees due to nodal variations.
Thanks Cagey.
Yes, I was also thinking about the phase response and the (quite complex) nature of blending two sources like this. What is strange is, that I did not notice it before, when I had two identical pick ups (the two humbuckers), but the difference can be down to for instance...
That the new P pick up has a more open top end, so the slightly rolled off treble is more audible now than before with the more rolled off humbucker in the neck position. Or maybe because the phase characteristics is simply different from the P pick up that I have in there now compared to the humbucker and this difference causes this ''feature''...
I might even be curious enough to pull out my oscilloscope and try to measure the amplitude and phase response from the two pick ups
(BTW... These EMG's can't be wired wrong, the installation is idiot proof = Morten proof) :-\
Cagey
Mythical Status
- Messages
- 24,425
It's not an obvious thing, so it's rarely considered. But, it's a large part of what makes traditional (Seth Lover's original design/PAF) humbuckers sound the way they do, even as individual units. There's enough spacing between the two coils to have an effect on the sound, which generally manifests as a loss of upper frequencies. Makes 'em sound "chunky".
When DiMarzio (or, more accurately, Bill Lawrence) came out with the "Hot Rails" pickups, they managed to get the spacing closer so there was less comb filtering loss and you ended up with a humbucker that still had some high end. It also fit in a single coil space, which made a LOT of Strat owners very happy. Make the coil form a bit taller to allow for more winds, use a lighter gauge wire, and you had high output, low-noise, kick-ass sensor.
Mixing pickups is always a tad risky, though. I've got a couple guitars here where the neck/bridge pickup positions sound great individually, but mixing them produces an output that just plain sucks.
Of course, the quality of a sound is pretty subjective. One man's "woman tone" is another man's nagging bitch <grin>
I'm aware of phase response (issues) from my time designing tube amps (high end audio), but since I did not notice this ''feature'' with the old pick ups, I initially ruled out phase issues... But of course you are right, that even if the pick up position is the same as before and therefore also the nodal response, then there can still be issues when matching two different pick ups. Actually that was also my reasoning for buying two identical humbuckers for this beast, but then I got intrigued about trying the P pick up in the P sweet spot...
For now I like this (P + humbucker) better and I will play it for a while to get used to it. Then I will try to go back to the dual humbuckers again to verify...
For now I like this (P + humbucker) better and I will play it for a while to get used to it. Then I will try to go back to the dual humbuckers again to verify...
Time to wake up this thread again...
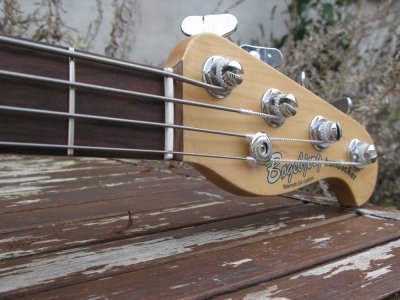
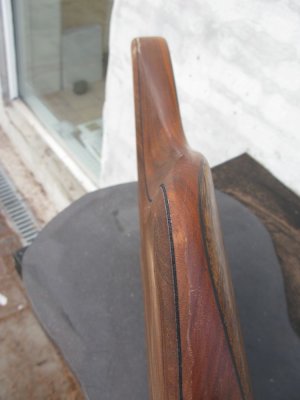
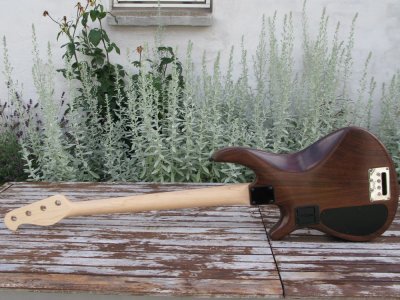
Maybe you remember (or look at the first posts on page 1) that I bought this G4 body dirt cheap from Warmoth, painted gloss black and routed for the 2TEK bridge... I stripped off all the paint and build up a new finish to bring the beautiful black korina and walnut back to life. I also reshaped the fender headstock for a more custom look...
Since then I have been playing the thing - and it has become my favorite bass. I LOVE the tone of this thing and the way it feels. There is one issue though: It's heavy..! Personally I would never opt for the 2TEK bridge - too heavy - and the walnut body is no feather weight either. The bass is heavy, hurts my shoulder after 2 hours, and it has ''body dive''... So what to do?
I considered making a wooden plug to fill the hole for the bridge and then go with another bridge, I like the Babicz. This would be a bit of a mess though, and I would have the expensive 2TEK sitting on the shelf.
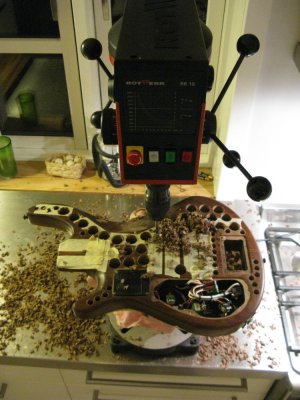
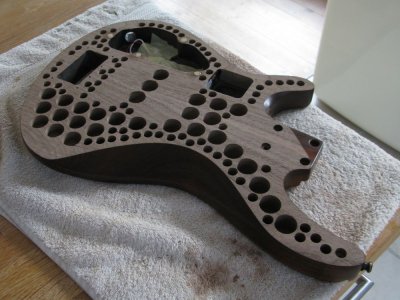
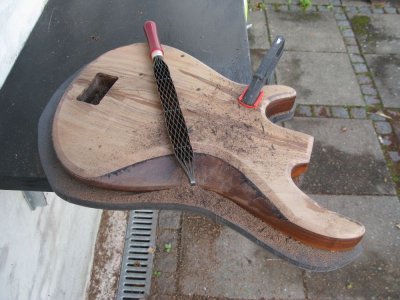
I decided to do a DIY chambering of the body :icon_scratch: This also give me the option to clean the back side further. I don't like the plastic battery boxes. I prefer the batteries behind the control cover. With this approach I will get a chambered body and a clean looking back. Here is the process...
1. Strip body for all hardware.
2. Drill a ton of holes - not all the way through of course
3. Route away (in this case) 6 mm of the body thickness to match thickness of black binding + thickness of new back
4. Glue on black veneer (the black binding)
5. Cut out the control cover section of the back side
6. Glue on new walnut back - not the control cover section though.
7. Install control cover section
8. Route edges and trim area around belly cut out etc...
9. Sand everything
10. Build up oil and wax finish
11. Reassemble
12. PLAY IT
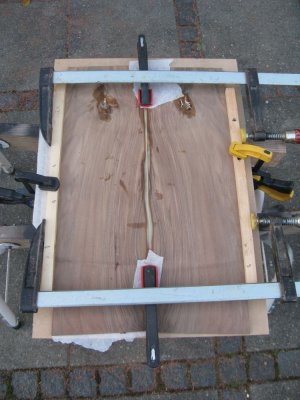
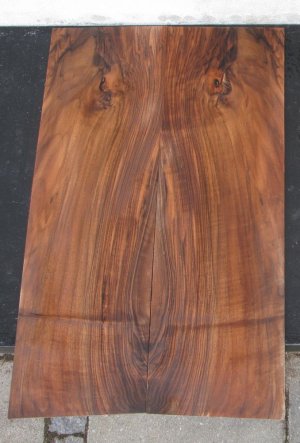
Here are a few pics of the process. I'm done chambering the body, and I have routed away 6mm of the thickness. Also I have glued the book matched set of walnut that will go on the back.
The weight of the body was 2325g (5.12 pounds) before, and now the weight is 1735g (3,82 pounds). It will be interesting how much of the weight comes back on again with the new back. If it ends up at 5.12 pounds then at least I had some fun working with it :glasses10: It will be interesting also if I can tell any difference in tone after the chambering (I doubt it).
Maybe you remember (or look at the first posts on page 1) that I bought this G4 body dirt cheap from Warmoth, painted gloss black and routed for the 2TEK bridge... I stripped off all the paint and build up a new finish to bring the beautiful black korina and walnut back to life. I also reshaped the fender headstock for a more custom look...
Since then I have been playing the thing - and it has become my favorite bass. I LOVE the tone of this thing and the way it feels. There is one issue though: It's heavy..! Personally I would never opt for the 2TEK bridge - too heavy - and the walnut body is no feather weight either. The bass is heavy, hurts my shoulder after 2 hours, and it has ''body dive''... So what to do?
I considered making a wooden plug to fill the hole for the bridge and then go with another bridge, I like the Babicz. This would be a bit of a mess though, and I would have the expensive 2TEK sitting on the shelf.
I decided to do a DIY chambering of the body :icon_scratch: This also give me the option to clean the back side further. I don't like the plastic battery boxes. I prefer the batteries behind the control cover. With this approach I will get a chambered body and a clean looking back. Here is the process...
1. Strip body for all hardware.
2. Drill a ton of holes - not all the way through of course
3. Route away (in this case) 6 mm of the body thickness to match thickness of black binding + thickness of new back
4. Glue on black veneer (the black binding)
5. Cut out the control cover section of the back side
6. Glue on new walnut back - not the control cover section though.
7. Install control cover section
8. Route edges and trim area around belly cut out etc...
9. Sand everything
10. Build up oil and wax finish
11. Reassemble
12. PLAY IT
Here are a few pics of the process. I'm done chambering the body, and I have routed away 6mm of the thickness. Also I have glued the book matched set of walnut that will go on the back.
The weight of the body was 2325g (5.12 pounds) before, and now the weight is 1735g (3,82 pounds). It will be interesting how much of the weight comes back on again with the new back. If it ends up at 5.12 pounds then at least I had some fun working with it :glasses10: It will be interesting also if I can tell any difference in tone after the chambering (I doubt it).
Attachments
Small update...
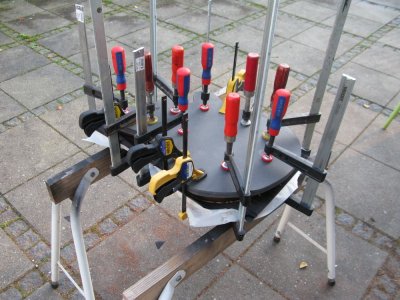
I have glued on two layers of black veneer, this will be the binding. It's clamped and drying. While the binding is drying I have cut out the new control cover that will cover both the preamp cavity and the battery cavity. When cut out this way the grain will still match up when the cover is installed.
I have glued on two layers of black veneer, this will be the binding. It's clamped and drying. While the binding is drying I have cut out the new control cover that will cover both the preamp cavity and the battery cavity. When cut out this way the grain will still match up when the cover is installed.
Attachments


stratamania
Mythical Status
- Messages
- 12,411
Some good work going on there by the looks of it... Look forward to seeing the results.
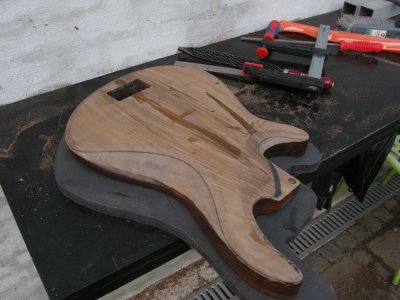
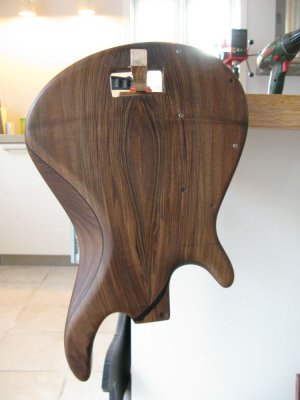
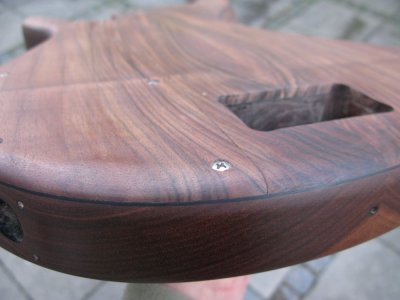
The rough work is done - except for the routing I need to make to recess the bridge on the back. I have applied some water to bring out the color and give an impression of how it will look with a finish on it. The last picture gives an impression on the look with the two bindings and the unique top and back. I dig it :glasses10:
Next is a lot of sanding...
The weight saving will be in the 250g range, I had hoped for a bit more... But on my other goal, that was to clean up the rear and get rid of the plastic box for the two batteries: Success..!
Next is a lot of sanding...
The weight saving will be in the 250g range, I had hoped for a bit more... But on my other goal, that was to clean up the rear and get rid of the plastic box for the two batteries: Success..!
Attachments
Cagey
Mythical Status
- Messages
- 24,425
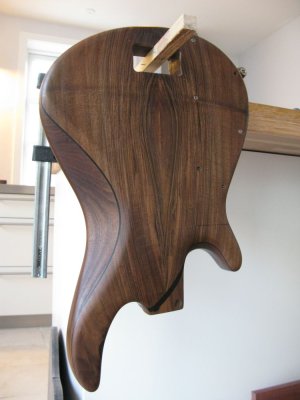
Nice. I really like that pinstripe layer, and the way it fans out a bit on the lower angle by the neck pocket. Also, is that a panel for the control cavity, rather than an insert-type cover? If so, I think that's a great idea. Allows the grain to stay lined up better.
Thanks Cagey... Yes, it's turning out great.
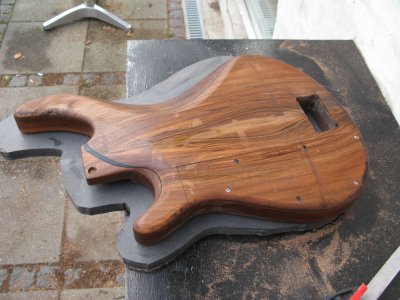
I have now sanded it to 320 and applied the first coat of oil. I heard many good things about Danish oil and being Danish from Denmark, I just had to try it :laughing7: We don't have any Danish oil here though, I had to buy it abroad... Had it not been for the non matching screws the control cover would be almost invisible.
The black stripe fans out by the neck pocket is because this body came with the contoured heel option. So when doing the contour it fans out like this. It's a nice little detail.
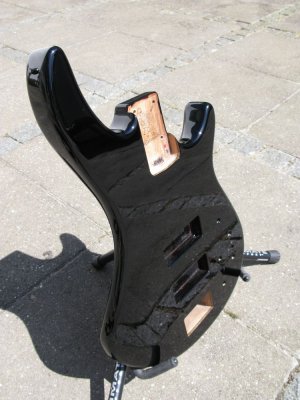
I'm not sure what an insert-type cover is, but look at this picture showing how the body was when I got it: There was a black plastic cover over the control cavity and also on of those ugly boxes for two batteries. And it was gloss black as you might remember. I would never have ordered a custom body like this, but for the money I paid it was cool. It does look totally different by now
This new cover has both the control cavity and the batteries under it. Makes sense? I like this clean looking back MUCH better, and when cutting out the cover the way I showed above there is basically no material lost and the grain matches up.
I have now sanded it to 320 and applied the first coat of oil. I heard many good things about Danish oil and being Danish from Denmark, I just had to try it :laughing7: We don't have any Danish oil here though, I had to buy it abroad... Had it not been for the non matching screws the control cover would be almost invisible.
The black stripe fans out by the neck pocket is because this body came with the contoured heel option. So when doing the contour it fans out like this. It's a nice little detail.
I'm not sure what an insert-type cover is, but look at this picture showing how the body was when I got it: There was a black plastic cover over the control cavity and also on of those ugly boxes for two batteries. And it was gloss black as you might remember. I would never have ordered a custom body like this, but for the money I paid it was cool. It does look totally different by now
This new cover has both the control cavity and the batteries under it. Makes sense? I like this clean looking back MUCH better, and when cutting out the cover the way I showed above there is basically no material lost and the grain matches up.
Attachments
Cagey
Mythical Status
- Messages
- 24,425
I said "insert-style" cover, but I probably should have said "flush mount". Anyway, I meant the type of cover you had originally, like most guitars come with. I like the panel version you created better because as you say, there's little wood loss in the cut so the grain matches up nicely. Makes for a nice clean back.
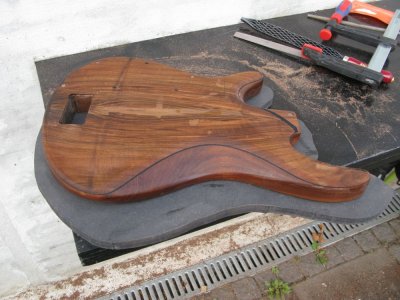
Ahh.. OK, now I understand... Yes, and no to the question then. Yes it's flush, but not in the way they are normally made.
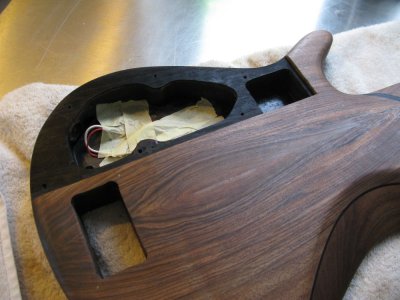
It has drying oil on it now, so I can't touch it too much, but look at this close up picture. The black veneer is glued on the body so not part of the cover. The cover is just the walnut piece.
It has drying oil on it now, so I can't touch it too much, but look at this close up picture. The black veneer is glued on the body so not part of the cover. The cover is just the walnut piece.
Attachments
Similar threads
- Replies
- 11
- Views
- 2K
- Replies
- 10
- Views
- 387