Burnishing Raw Necks

Anyone know what grit Warmoth usually finishes their raw necks to? I've heard unfinished bodies are sanded to 220, and necks to "much higher," but I don't want to waste my time starting with 440 grit sandpaper if it's already been sanded to 600 when it arrives (and I can just go straight to 800 on up from there.)

Anyway, I doubt I'll be doing this while watching a movie. I can just imagine the look my wife would give me if she saw me sanding wood on the living room sofa.  :eek: :help:
 
I've always started my burnishing with 800, then 1000, 1200, 1500, 2000, and then drumroll..... the PINK 3M 4000 grit sanding cloth.  Shines like glass.
 
Damm glasses  :glasses9:

Yep sorry meant 220  :doh:

I sent them an email ages ago when doing a custom build and asked about the raw necks then.

That started me on the burnishing  :icon_thumright:
 
Forgive me if this has been addressed. I'm on page 6 of this thread, still reading through it.

I've got a bloodwood neck on the way and would like a few pointers on 'burnishing'

I'm going to start at 600-800, move to ~1200 then ~2000 and maybe even ~2500 or higher.

I'm wondering a few things. Is it better to leave the neck 'dry' as in no mineral oil at any point, before sanding, no wet sanding? How much sandpaper should I need for each step? Does the wood gunk up the paper quickly? Assuming someone has all the time in the world, what would be the finest sand paper to use on this wood before going further would essentially be useless?

Obviously will be doing the work by hand. Will the 'burnishing' process void my warrantee?

Thanks!
 
First of all, welcome to the forum!

You're going to love how Bloodwood burnishes up. it's a very dense, hard wood, so it polishes up like glass.

As for how to progress on the abrasives, I've found that it's actually faster to move in smaller increments. You're essentially taking out surface scratches, so if you make too big a jump between grits, you have to work much harder to get rid of the previous paper's scratches. That translates into time, and this is a tedious task to begin with. No sense adding to it. I try to move in 200 grit jumps for the first few steps, then roughly 400 grit jumps forward from there. Ii haven't been able to discern much improvement past 2000 grit. Just make sure you spend enough time with each. The finer the paper, the slower it cuts, as the cuts are smaller. Because of that, overall I've found that the paper will wear out before it loads up,

Also, this is a dry process. No water or mineral spirits or anything like that, although the process does produce some very fine wood dust so wiping the neck down with naphtha cleans it up pretty good.
 
Awesome thanks for the response!

I have a Pau Ferro/Pau Ferro neck I did a few years ago. IIRC I only sanded to 800-1200 or somewhere around there, didn't realize I could get the wood to polish up so much, until after all these years of my hands polishing the wood  :laughing7:

As much as I like the Pau Ferro, I wanted to try Bloodwood on my next build due to it being seemingly harder with a similarly tight grain. I'm hoping to get this neck to look like freshly blown glass. Will definitely be going to at least 2000 grit, this time. Good tip on the stepping the grit in smaller increments.


Thanks again!  :guitarplayer2:
 
Just got my bass parts, and spent just 45 minutes burnishing the wenge neck. Looks like glass, feels like satin.
 

Attachments

  • image.jpg
    image.jpg
    1.6 MB · Views: 508
Are you burnishers burnishing the head stock, too, or just the shaft?

(Inquiring minds want to know.)
 
Glimmer said:
Are you burnishers burnishing the head stock, too, or just the shaft?

(Inquiring minds want to know.)

I do the shaft, back and sides of headstock, but not the front of the headstock.  I guess you could burnish the front if you weren't doing a decal.  Way I do it, front is sealed with zinnser shellac and then I add waterslide decal (let dry overnight), another layer of shellac, and then lacquer to bury the decal then sand.  Works well.  Burnishing is awesome.  Like having sex without a condom.  Once you do it, you'll never wanna go back.  :headbang1:
 
Sounds interesting vikingred. And this is the result?

1UUg1BS.jpg


Looks mighty nice.

I have a raw neck in the works and after reading this thread am feeling like I will burnish it. Your shellac / decal / shellac lacquer seems a great solution for otherwise leaving the headstock raw and naked. May ask you for details (never done this kind of thing before) or link to same, if you've posted them before.
 
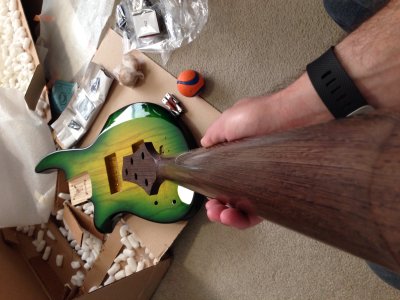
Yep, that's the result.  Your mileage may vary, especially according to the wood you're using.  The burnishing part is easy and actually I find it quite relaxing.  The headstock is another issue.  You'll read a lot of different methods here and various other places.

The shellac is a good sealer/filler but with woods like Canary you have to let it dry good and sand it down smooth (I think I actually did two initial thick layers of zinsser spray on shellac on that first Canary headstock you posted, sanding with 600 grit in between.  You've got to make it nice and flat.  Sometimes shellac can be a nasty mess, or at least it is for me.  The whole point of the shellac is to seal and "isolate" the wood, and to protect the decal from the acetone in the lacquer.  Supposedly it can melt the letters, etc.  On the current Canary neck I'm working with (not the picture above), I got pissed off at the shellac because it was bubbling, acting up, looking like shite, so I sanded it all the way bare flat and just went with Mohawk Pre-Catalyzed Clear Satin Lacquer and first shot a few light coats on the wood, let dry 10 min apart (prolly 5 light misty coats).  Then, sanded super light with Zona 3M Wet/Dry Polishing Paper, applied the waterslide decal, let it dry overnight.  Then started shooting nice medium coats of lacquer about 30 min apart, prolly 8 - 10 coats over a few days.  Let sit for a day or two.  Then took some 1500 grit and a sanding block to wet-sanded the initial hump from the decal flat, and then took back over with the green cloth polishing paper by hand while holding up to the light, and got it damn near perfect.  I rubbed a little too hard on the tiny patent numbers at the bottom,  so there is a slight melt through (have to look real close to see), but it looks awesome and it blends really well with the burnishing.  So for me, I'm not going through all that shoot-sand-shoot-sand-shoot-sand crap.  It's not necessary.  Just build up a nice thing layer of lacquer on top of the decal and then go easy and sand it all down in one shot. I had tried BLO/thinner method (exactly as described by Tonar) over my burnishing on the back of the neck but it just made it sticky, even after buffing the shite out of it, so I used mineral spirits and just brought it back to the burnished finish. 

So my latest experiment shows that the shellac is not necessary.  It's a beast to sand off, too.  The lacquer never messed up or distorted the decal lettering at all, not in the least.  And, this Mohawk pre-catalyzed satin lacquer is a better product that Deft, I believe, and dries quicker and harder than Deft.  Deft was soft and prone to checks and imprints.  Mohawk is hard.  Anyway, it's a learning process.  I tend to do my own thing and not follow rules or what other people say.  I'm sure you'll get those that'll say my way is wrong, etc.  I don't give a f***.  Wait till ya'll see the final product.  It's bad as hell.  Pics later.
 
Great – thanks for the detailed explanation. I will definitely look forward to the pics!

FWIW the neck I mentioned has a Goncalo Alves shaft. I'll look around and see if I find anything about the use of laquer or shellac on that wood, which I notice isn't mentioned a whole heck of a lot in this thread. Wonder why.

One final thing: where did you get your decal?
 
Glimmer said:
Great – thanks for the detailed explanation. I will definitely look forward to the pics!

FWIW the neck I mentioned has a Goncalo Alves shaft. I'll look around and see if I find anything about the use of laquer or shellac on that wood, which I notice isn't mentioned a whole heck of a lot in this thread. Wonder why.

One final thing: where did you get your decal?

Here:  http://www.oldfret.com/
 
Contrary to advice and thoughts given in this thread previously regarding burnishing the front of a headstock for a decal application, (it was stated that this would not work), I have now proven it DOES work, at least on 3A Birdseye Maple.  I have a solid vintage/modern neck (3A Birdseye) that I was burnishing, and I just decided to burnish the ENTIRE thing, front of headstock and all.  Took my time, and burnished it to that smooth glass shine.

THEN, my guitar building friends, I applied my Fender waterslide decal DIRECTLY TO THE BURNISHED WOOD, and it settled on just fine.  Wiped out the bubbles and air gently with a paper towel, and let dry overnight.  Then I began to shoot some very light misty coats of Mohawk pre-catalyzed satin lacquer, about 30 minutes apart, probably 6 coats.  Let dry overnight.  Next day I did 4 heavier coats about 30 minutes apart, let dry 8 hours, and then using a rubber sanding block, used the green 3M polishing (600 grit I think) paper to bring the hump of the decal down.  Sprayed 3-4 more light coats, and let sit overnight.  Next day, sanded again with the 3M green, then the grey, and the decal disappeared REALLY nicely into the finish.  I hit it one good last time with a thick coat of the lacquer and then sanded later than night, peeled the blue tape from around the edges and the back etc, and lighted smoothed the edges with the green polishing paper and it looks fabulous.  NEVER again will I f*** with nasty shellac.  Your mileage may vary, it worked fantastic for me.  May need a grain filler for something like Canary or other woods, but for the maple, it worked flawlessly.  And they said it couldn't be done.  :laughing3:

Had to rush it to my luthier with the quilted maple soloist, so I didn't take pictures, but I will shoot some in a few weeks when I get it back.  Best decal job I've done yet.  The luthier (30 years experience) was super impressed. 
 
Interesting and good to know.

I'm waiting on a GA / ME neck that I planning on burnishing, inspired by this thread, and am wondering what to do w/the headstock. This adds a new option.  :icon_smile:
 
Has anyone noticed their neck getting 'stickier' with the highly polished surface? I polished my bloodwood neck up to 2500 grit and it's so smooth, it has the same issue that a lot of gloss finished necks have, especially if my hands are moist. I'm wondering if I just have to play it in a bit, hit it with some mineral oil, or if I should sand it back down to a more satin like texture. What do some of the more veteran burnishers say?
 
Do yourself a favor and buy a can of naphtha or denatured alcohol. Use that to clean the neck every once in a while. It'll cut through the various residue you're leaving on the neck by playing it. it also helps to wash your hands before you play. It'll get rid of any dirt, skin oil, dead skin cells or other residue rather than depositing it on your neck.

While everybody leaves something on the neck, some people's hands sweat more than others. That builds up and makes the neck sticky, faster with some than others. A lot of players keep a cloth of some sort in their case or nearby to wipe the neck and strings down after a playing session. Even with that, any neck will need more aggressive cleaning once in a while. It's unavoidable if you want a smooth player.

Interesting story - a friend of mine used to have that problem until he had a heart attack. He had a tendency to sweat more than many, too. But, they found out his cholesterol levels were super-high and between that and his tendency to retain water (he loved his salty snacks) they put him on a diuretic and some statins, and now he's got the opposite problem - too dry. But, his necks stay cleaner longer!  Always a sllver lining, right? :icon_biggrin:
 
Back
Top