Building my own live mixer

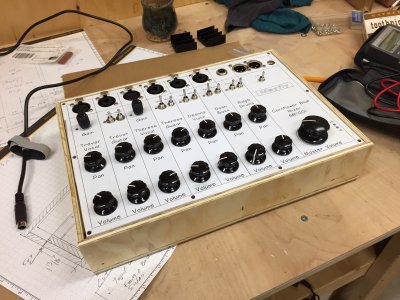
Is that a freudian slip that there is no knob on the drummer's channel?
 
As previously noted, those PCBs have not arrived yet.

But yes - is a "Drummer Knob" somewhat redundant?  :)
 
Update - had several sessions with the unit.  All inputs work as expected and the regulators are keeping their cool.  I think I will revise the lettering on the top panel and move the name/instrument legend closer to the volume control.  Finding it's distracting to look at the volume, then up at the name, then back down at the volume again.
 
Started work on other elements while waiting for the PCBs to come in.  Here's the design for the box:

The 'keepout' areas above and below are the max heights of things above and below the aluminum panel.

index.php


Here's the start on the box.  The plan is to finish the complete box, then cut it in half.  a 1/4" lip will be glued in around the interior perimeter to hold the panel.  This is the first time I've tried to make a box out of 1/4" ply.  I must say that it's a pain in the ass to work with  :)

index.php
 

Attachments

  • IMG_3720.JPG
    IMG_3720.JPG
    753.6 KB · Views: 258
  • IMG_3721.JPG
    IMG_3721.JPG
    525.1 KB · Views: 248
Nice touch on the wooden box. As a perpetual diyer, I've about decided that its cheaper/easier to shield/ground a wooden box than paying through the nose for sheet metal.
 
The box should've been made of Koa! A nice, even sounding tonewood the PCB could really work its magic with.  :laughing7:

In all seriousness, this is super cool to me. Everything about this is foreign. I don't even know how to describe it beyond "I want my volume different than his!" Good work Trevor, glad it's up and functioning. Looking forward to the finished product. Gonna make it fancy with a custom Cornflower Blue paint job or keep it simple? Maybe have Doug do some custom plate work? Then again, it's a mixer, maybe not a good reason to go all fancy.  :icon_thumright:
 
Ah, finally a step I can understand.  :icon_biggrin: I've made guitar cases out of 1/4" plywood but have always put a 1x1 triangular brace in the corners. That really strengthens it. You'll find the second layer to hold the panel will do wonders for that. Are you going to cover it with fabric like an amp? I have used convertible top material in the past for that. Slap some chrome corners and handles on and you're good to go.
 
I was thinking kind of like the old Kustom amps  :)

Just kidding.  Don't know what I'll do yet.
 
LOL, those things always looked too... 'Tijuana'. There's a 60's concept for you.  :icon_biggrin:

I'll be interested to see what you do with it.
 
Box glued up and sliced in half.

index.php


It's the only way to make a box like this with a lid that fits

index.php
 

Attachments

  • IMG_3722.JPG
    IMG_3722.JPG
    550.5 KB · Views: 293
  • IMG_3723.JPG
    IMG_3723.JPG
    565.5 KB · Views: 293
Gluing up one of those inside 'thingys'

index.php
 

Attachments

  • IMG_3724.JPG
    IMG_3724.JPG
    532.1 KB · Views: 304
Looks good so far.

Mayfly said:
Box glued up and sliced in half.

index.php


It's the only way to make a box like this with a lid that fits
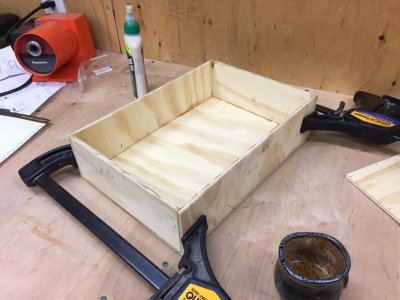
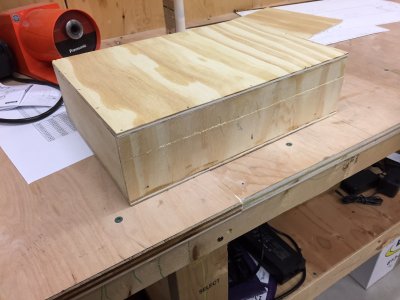
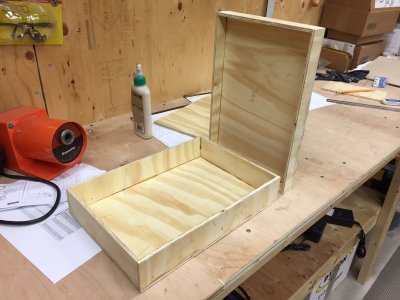
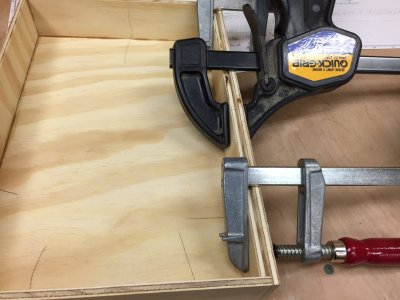
You're right, there. That's how I've done it in the past, too.
 
Got the re-designed power / output boards and the new stereo preamp boards back from the board shop.

index.php


I've stuffed them both and am in the middle of testing.  The power / output board (the red one) is great - exactly what I was hoping.  The new heatsinks work well and look good too.  The output stage works as expected (that is, sounds great)

index.php


Don't know about the stereo preamp board yet (the white one).  Will be testing today.  Those big caps to the input jack are an afterthought - I figured as these are single ended inputs any DC bias on them will cause all kinds of problems that the differential inputs are not susceptible to.  Figured I should decouple them, so I found a couple of 1uf caps for that.  They really should be on the board, but at least they are there!

But the overall thing looks good

index.php


and it fits in the box!

index.php
 

Attachments

  • IMG_3727.JPG
    IMG_3727.JPG
    768.5 KB · Views: 274
  • IMG_3728.JPG
    IMG_3728.JPG
    518.1 KB · Views: 270
  • IMG_3726.JPG
    IMG_3726.JPG
    916.5 KB · Views: 273
  • IMG_3729.JPG
    IMG_3729.JPG
    687.5 KB · Views: 269
That looks slick as pond scum. Coming together nicely. What a fine project.
 
Thanks!

Well, fired up the stereo pre board, and well - it didn't work.  :)

On the bench it was behaving really weird:  One channel worked, the other didn't and I was not getting nearly the gain I was expecting.  After some time probing and scratching my head I realized that I had hooked up the ring and sleeve reversed.  Yep, ground was hooked up to the right channel, and the right channel was hooked up to ground.  I hate it when that happens!

Fixed that up and now things are cool.  Blasted some tunes from the iPod and everything sounds good.  Lots of low end from those 1uf caps too!  More later.
 
That's pretty. Nice colors. It's almost like you should put it in a clear acrylic box.

Jokes aside, that looks awesome. Very, very impressive. :eek:ccasion14:
 
Gentlemen,

Been using the mixer for awhile.  Sounds great and works well.  I drilled several holes in the wood box to allow airflow around those heatsinks (they tend not to do so much without a bit of air movement  :) 
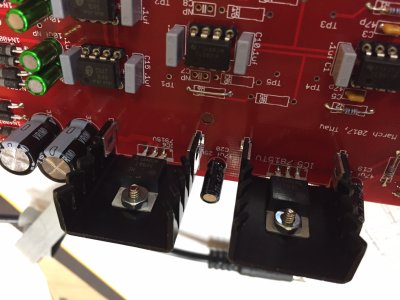
), and hooked up the rest of the strips.  Everything is cool!
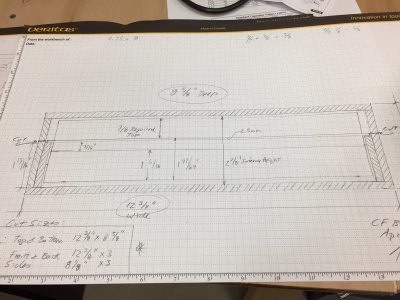
I think it's time to order that top plate from Front Panel Express.  Turns out it's the most expensive part (about $100 for a drilled, engraved, and anodized 2.5mm plate to my specs).  But as we all know, the quality of something is always judged by how it looks.  I intend to make this look great  :headbang:
 
Back
Top