

You are using an out of date browser. It may not display this or other websites correctly.
You should upgrade or use an alternative browser.
You should upgrade or use an alternative browser.
Binding an L5S
- Thread starter Cagey
- Start date
 ccasion14: Thanks for your service! :headbang1:
sixstringsamurai
Hero Member
- Messages
- 702
Except they'd be blue....DangerousR6 said:Very fitting, and as I work for the U.S. Air Force, I can totally agree with that.. :icon_thumright:Bagman67 said:Or a servicemember. Army Green. As we approach Memorial Day, that comes to mind.
I would totally rock the crap outta those, but then again I like weird shoes...
TBurst Std
Hero Member
- Messages
- 3,705
Bump for an update
Perry Combover
Senior Member
- Messages
- 307
Subscribed.
Cagey
Mythical Status
- Messages
- 24,425
Ok, boys 'n' berries! Time for an update! Sorry it's taken so long, but the longer I put it off the bigger it got and the easier to put off due to... ok, laziness.
In our last episode, we were installing binding.
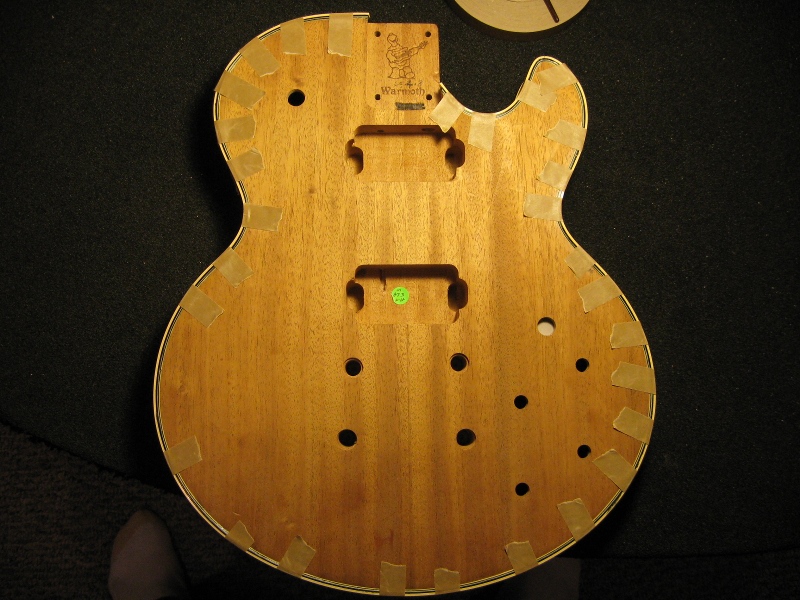
Last layer glued in place and taped
Once that was done, it was time to plug all those holes. I don't appreciate a million knobs, the pickup selector got moved to the upper bout, and the tailpiece is being changed to a surface-mount Bigsby B5, so the stop tailpiece bushing mounting holes had to be filled as well...
Holes plugged with birch dowel
I cut them slightly taller than the hole and put tape behind the holes in the control cavity to hold them in place while the epoxy cured. Once that was done and they'd had enough time to set up, I cut them off flush with the top using a flush cut saw I got from StewMac...


Thing works amazingly well. Took the nubs left from the dowels being cut slightly too tall right down to the surface without marring the surface, as the saw blade teeth have no set to them.
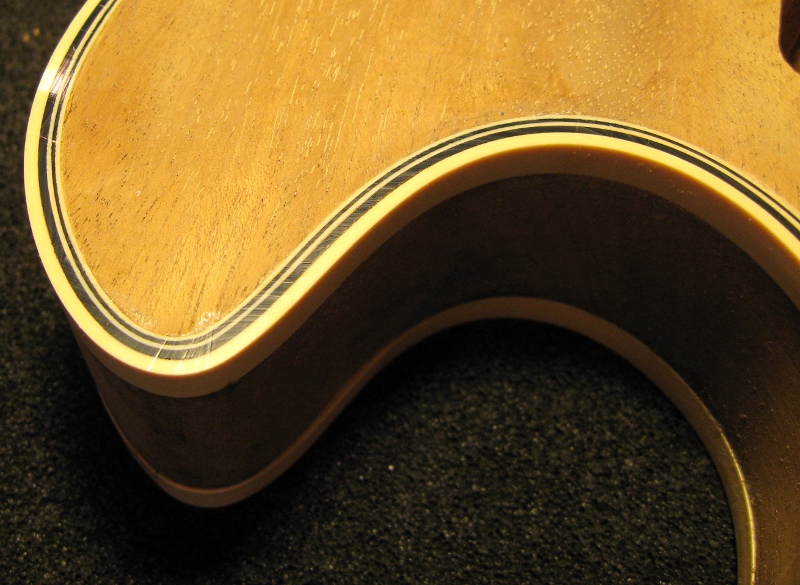
Then, it was time to start the dreaded scraping and sanding. As good as the flush cut saw is, it doesn't leave a finish-ready surface. Plus, the binding was deliberately installed slightly proud to allow for scraping smooth...
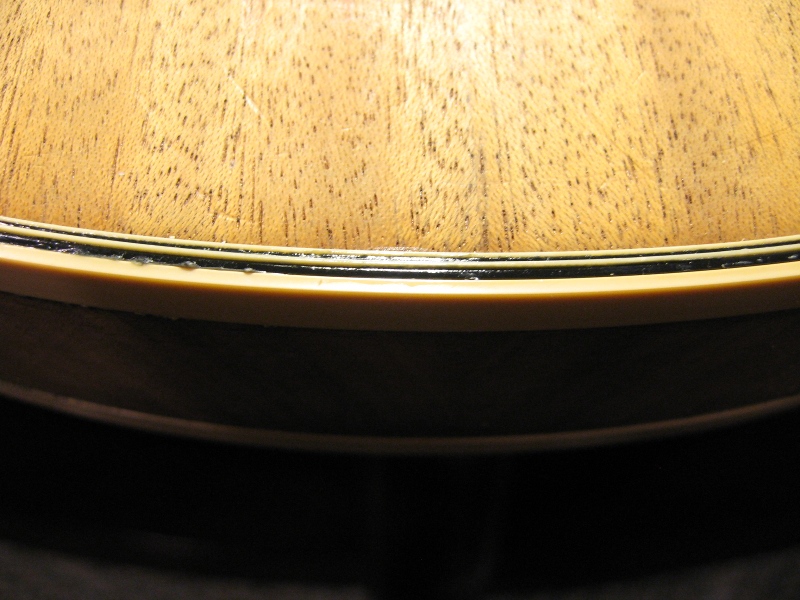
Binding before scraping
Scraping is done with a really simple tool called, oddly enough, a scraper. Basically, it's just a piece of spring steel with a machined edge that you pull a burr over on using a a scraper burnishing tool. Scrapers come in a variety of sizes and shapes...

Scrapers


Burnishing tool
Basically, you run the burnisher along the edge of the scraper to sort of "mushroom" it out, then turn the tool and run it past the edge on an angle to "turn" the mushroom back a bit. You can't really see what you've done, but you can feel it, and the workpiece definitely feels it. Cuts like a razor, but very thin. Cabinet makers use them to smooth out rough hardwood surfaces before sanding.
And this is how it looks scraped...
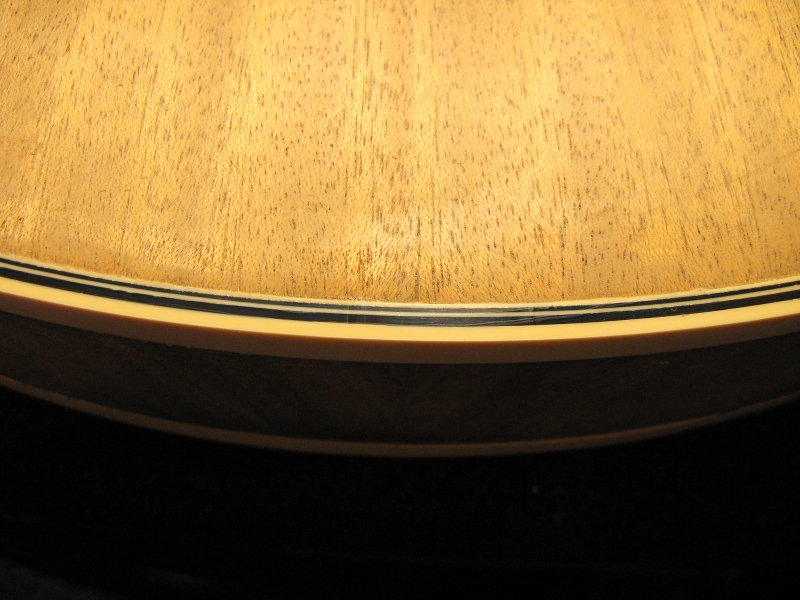
Binding after scraping
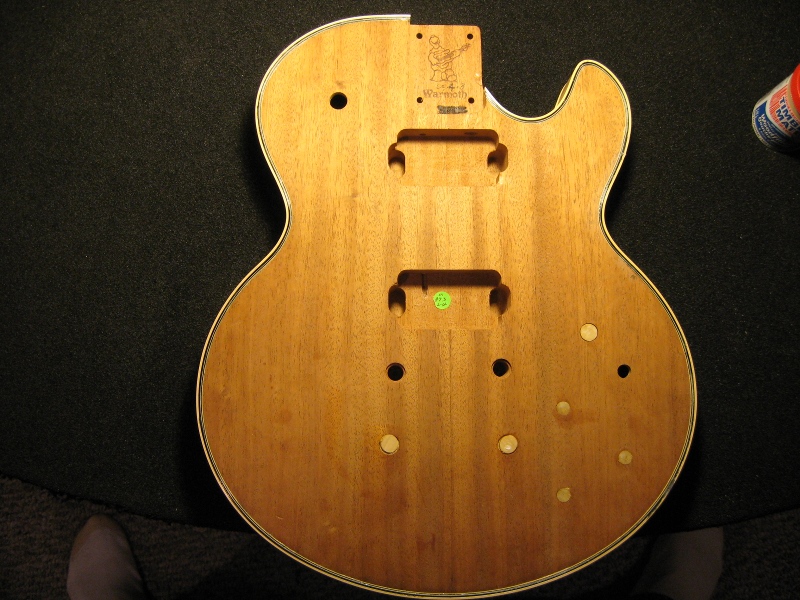
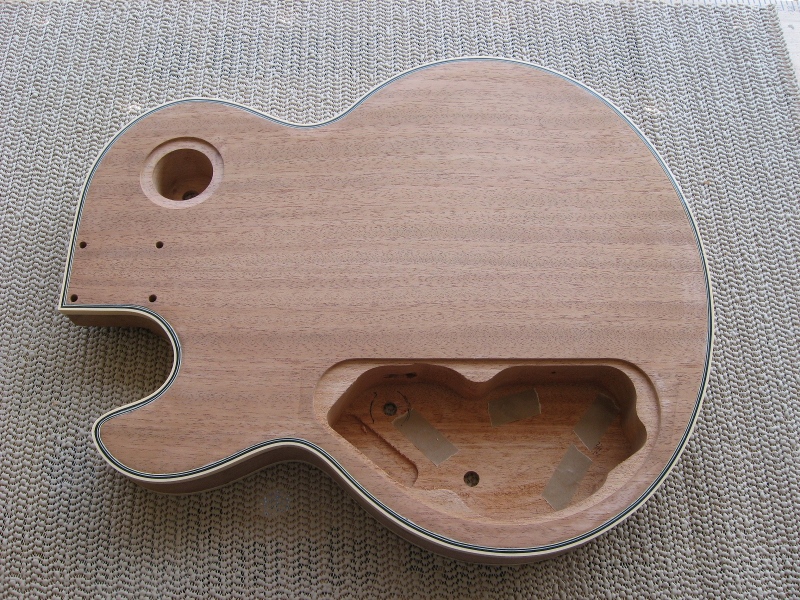
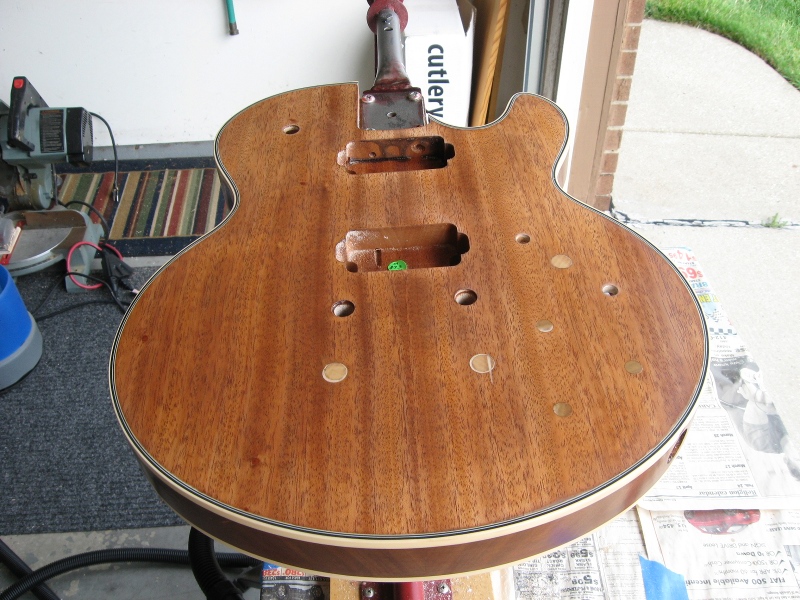
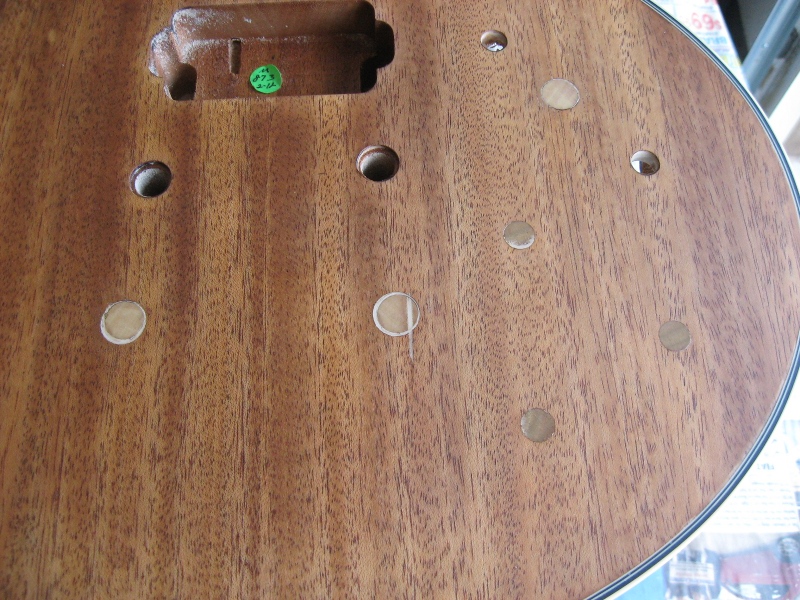
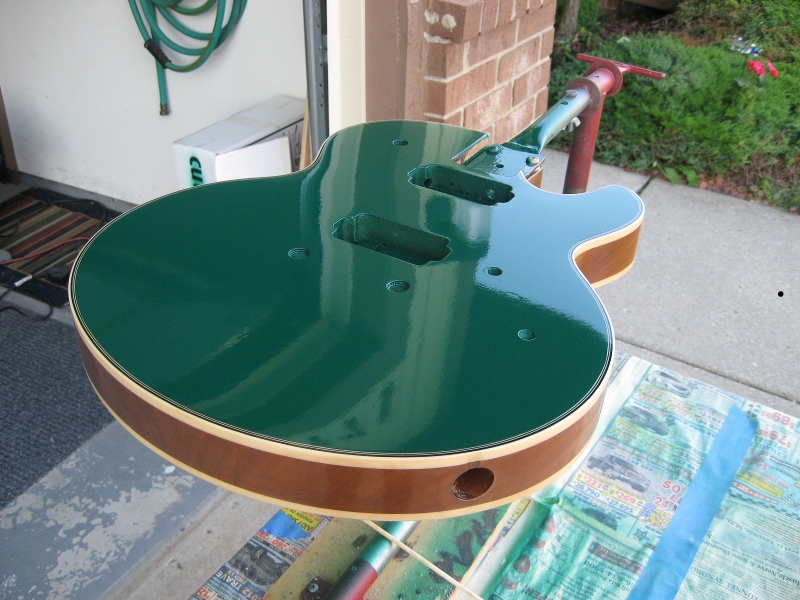
Here's a shot of the back, since it's cleaner. You can also see where I blocked the holes, and drilled a new hole for the volume knob...
Next, we find an unexpected turn of events. This binding is made of ABS plastic, and as I mentioned earlier in the thread it's not really glued together as much as melted together using acetone (lacquer thinner). For some reason, acetone makes ABS expand, so you have to compensate when you route the channel you're installing it into. In other words, if your binding stackup measures .120" dry, you'll probably need .135" (or more) of relief for it to set into. I did that, but apparently not enough. So, I ended up with some overhang on the sides...
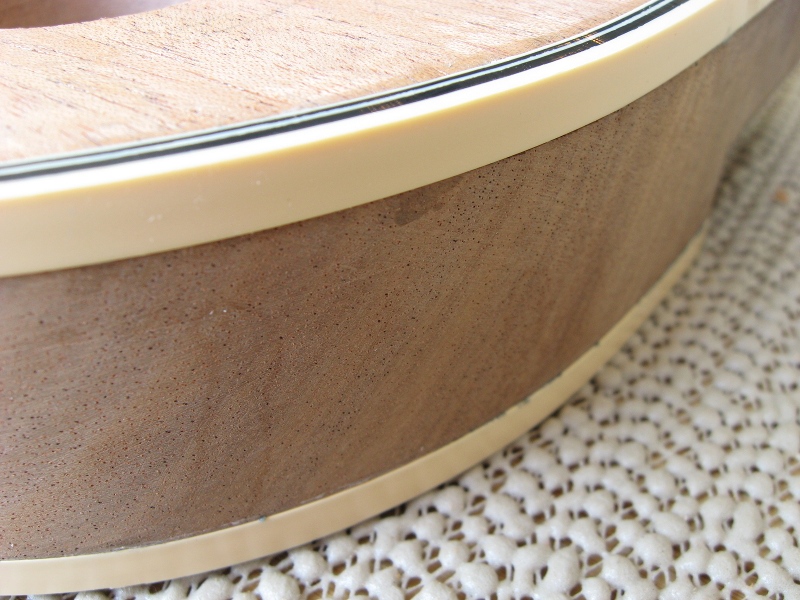
Binding overhang
I didn't measure it, but it looked like about .015", which was more than I wanted to scrape. Between that thickness and all the curves, etc., I'd be at it for the rest of my life and I considered the chances of making a mess of it fairly high. So, I got out mean ol' Mr. Router and the trusty Laminate Trimmer Bit of Fastidiousness, and set 'er up...
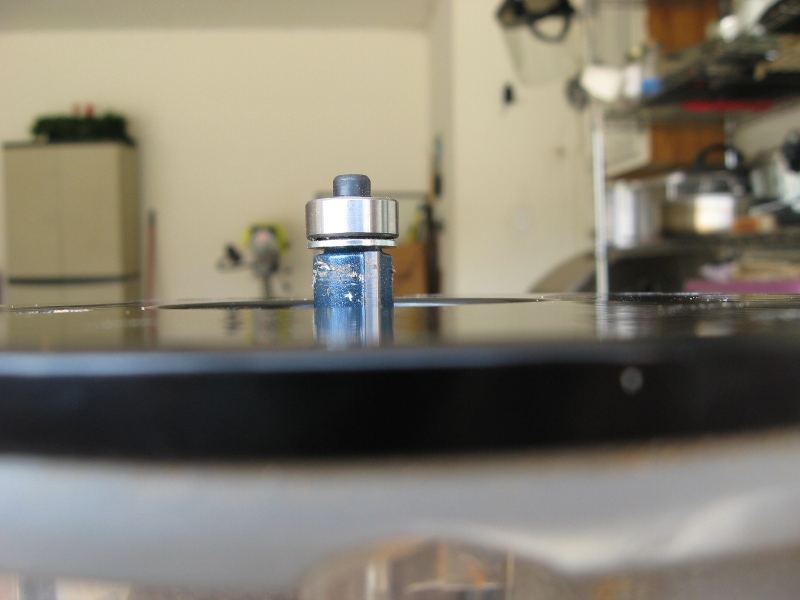
Ready... set...
GO!
Scary stuff, really. Lotta time into this thing now, and mean ol' Mr. Router didn't get his name by mistake. Screw it up and you may as well toss the whole thing in the fireplace. But, a few short cuts to make sure the idea was going to work, then it's off to the races. All's going well until...
SON. OF. A. BITCH!!!
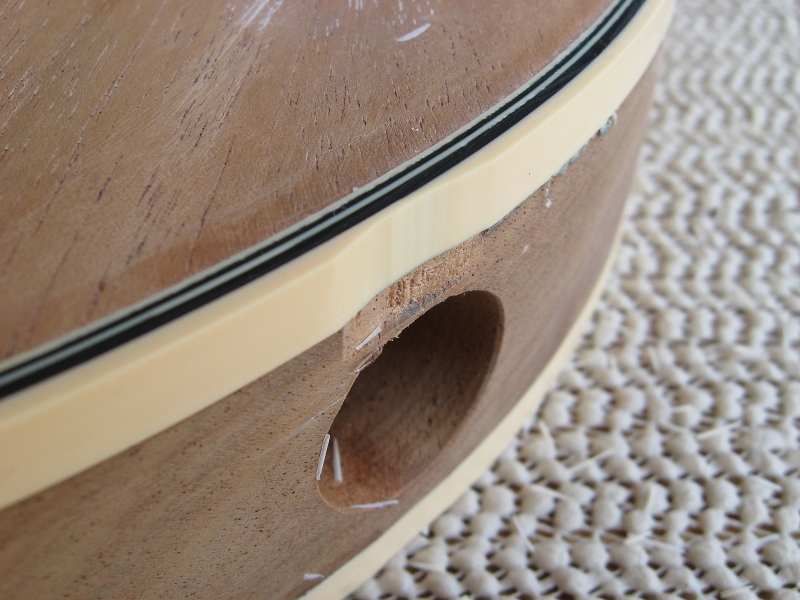
I didn't see it coming. The pilot bearing of the trimmer fell into the output jack hole, and with nothing to hold the cutting edges of the bit back, it wanted to drive into the body. Luckily, I felt it happening right way and got off the body, but the damage was done. Ugh. What a disappointment. But, whaddaya gonna do? As it worked out, most of that gets covered up by the jack mounting plate, so it wasn't the end of the world.
Anyway... skip ahead a few steps and we're all scraped, sanded, filled, and we're doing sanding sealer...
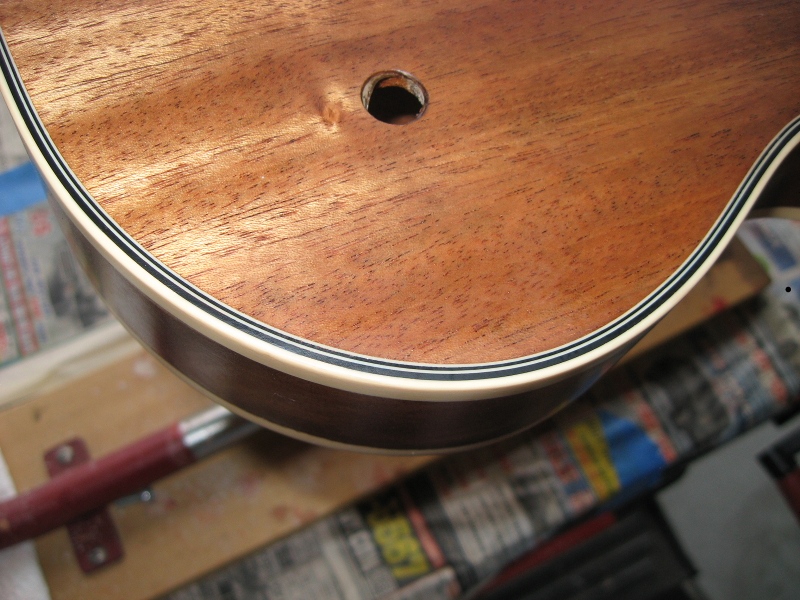
You can see where that flush cut saw was not without sin on the right hand bushing hole. Put a bit of a cut in the top. But, it got filled along with the outside edge of the bushing hole. All is smooth, and ready start in on color.
Stay tuned!
In our last episode, we were installing binding.
Last layer glued in place and taped
Once that was done, it was time to plug all those holes. I don't appreciate a million knobs, the pickup selector got moved to the upper bout, and the tailpiece is being changed to a surface-mount Bigsby B5, so the stop tailpiece bushing mounting holes had to be filled as well...
Holes plugged with birch dowel
I cut them slightly taller than the hole and put tape behind the holes in the control cavity to hold them in place while the epoxy cured. Once that was done and they'd had enough time to set up, I cut them off flush with the top using a flush cut saw I got from StewMac...
Thing works amazingly well. Took the nubs left from the dowels being cut slightly too tall right down to the surface without marring the surface, as the saw blade teeth have no set to them.
Then, it was time to start the dreaded scraping and sanding. As good as the flush cut saw is, it doesn't leave a finish-ready surface. Plus, the binding was deliberately installed slightly proud to allow for scraping smooth...
Binding before scraping
Scraping is done with a really simple tool called, oddly enough, a scraper. Basically, it's just a piece of spring steel with a machined edge that you pull a burr over on using a a scraper burnishing tool. Scrapers come in a variety of sizes and shapes...
Scrapers
Burnishing tool
Basically, you run the burnisher along the edge of the scraper to sort of "mushroom" it out, then turn the tool and run it past the edge on an angle to "turn" the mushroom back a bit. You can't really see what you've done, but you can feel it, and the workpiece definitely feels it. Cuts like a razor, but very thin. Cabinet makers use them to smooth out rough hardwood surfaces before sanding.
And this is how it looks scraped...
Binding after scraping
Here's a shot of the back, since it's cleaner. You can also see where I blocked the holes, and drilled a new hole for the volume knob...
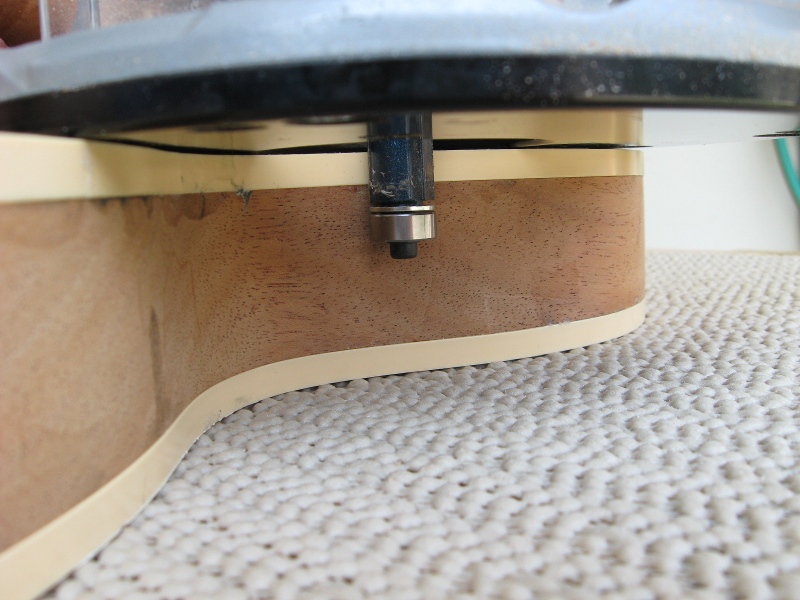
Next, we find an unexpected turn of events. This binding is made of ABS plastic, and as I mentioned earlier in the thread it's not really glued together as much as melted together using acetone (lacquer thinner). For some reason, acetone makes ABS expand, so you have to compensate when you route the channel you're installing it into. In other words, if your binding stackup measures .120" dry, you'll probably need .135" (or more) of relief for it to set into. I did that, but apparently not enough. So, I ended up with some overhang on the sides...
Binding overhang
I didn't measure it, but it looked like about .015", which was more than I wanted to scrape. Between that thickness and all the curves, etc., I'd be at it for the rest of my life and I considered the chances of making a mess of it fairly high. So, I got out mean ol' Mr. Router and the trusty Laminate Trimmer Bit of Fastidiousness, and set 'er up...
Ready... set...
GO!
Scary stuff, really. Lotta time into this thing now, and mean ol' Mr. Router didn't get his name by mistake. Screw it up and you may as well toss the whole thing in the fireplace. But, a few short cuts to make sure the idea was going to work, then it's off to the races. All's going well until...
SON. OF. A. BITCH!!!
I didn't see it coming. The pilot bearing of the trimmer fell into the output jack hole, and with nothing to hold the cutting edges of the bit back, it wanted to drive into the body. Luckily, I felt it happening right way and got off the body, but the damage was done. Ugh. What a disappointment. But, whaddaya gonna do? As it worked out, most of that gets covered up by the jack mounting plate, so it wasn't the end of the world.
Anyway... skip ahead a few steps and we're all scraped, sanded, filled, and we're doing sanding sealer...
You can see where that flush cut saw was not without sin on the right hand bushing hole. Put a bit of a cut in the top. But, it got filled along with the outside edge of the bushing hole. All is smooth, and ready start in on color.
Stay tuned!
ihavenothingprofoundtosay
Hero Member
- Messages
- 591
Neato-burrito! Well done, Cagey! I see the stop tail holes will probably be covered by the Bigsby, but is there any plan for further hiding the other holes? Or will this get a solid color over it? It would be a shame to cover up that pretty grain.
Perry Combover
Senior Member
- Messages
- 307
Outstanding Cagey. :icon_thumright:
Cagey
Mythical Status
- Messages
- 24,425
Mayfly said:Very nice! Actually I was thinking that wood would look great as a clear finish. Not so great with the plugs mind you.
Sorry about your router mishap. Happened to me just recently as I was making a pair of powered airplay HiFi speakers.
It is a fine piece of Mahogany. We'll see about all that later.
I did the same thing a few years back when I was making those amp head cabinets for you. On the first Oak unit, I was routing the roundover on the top sides, then decided as long as I was at it I'd run it along the back. Problem was, there was no back for the pilot bearing to bear against, and I ate into that top like you wouldn't believe before I realized what was happening. Absolutely ruined the whole thing beyond repair. The Oak cab you got was actually the second one. Luckily, I was smarter on the Walnut unit.
dmraco
Master Member
- Messages
- 4,655
Cagey. Looks great. Turned out great. I feel your pain with the router. I was cutting out the pickups on a 1/4 lam top and the router bit fell into the toggle wire tool. Luckily if was covered by the pickup ring
Can you cut and glue a small section into that binding area ?
Can you cut and glue a small section into that binding area ?
Cagey
Mythical Status
- Messages
- 24,425
So, now we're ready start finishing. It's a very nice piece of Mahogany, but we certainly can't have all those plugs showing so we're going to have to put a solid color on the top. I was originally going to do a blood red, but Bagman said "DO GREEN, DAMMIT!" and I'm not one to argue with him, so <spoiler alert!> that's where we're going here.
First we've got to mask off all that binding. 3M makes a wide variety of coated films for doing different things, many of them highly specialized. I managed to find some stuff they identify as "218 Fine Line Tape". It's designed specifically for paint masking when you need to have complex curves, fine edges, a tight seal, high solvent resistance, high temperature tolerance and easy release. Quite a spec, eh? It's like a wish list.
I didn't want to take any chances with the binding, so that was the stuff to have. Unfortunately, I had a brain fart when ordering and spec'd 3/32" wide roll. Pretty narrow stuff, but still usable. I was too impatient to wait on another order, plus the stuff ain't cheap, so it just forced me to add a masking step to completely cover the binding.
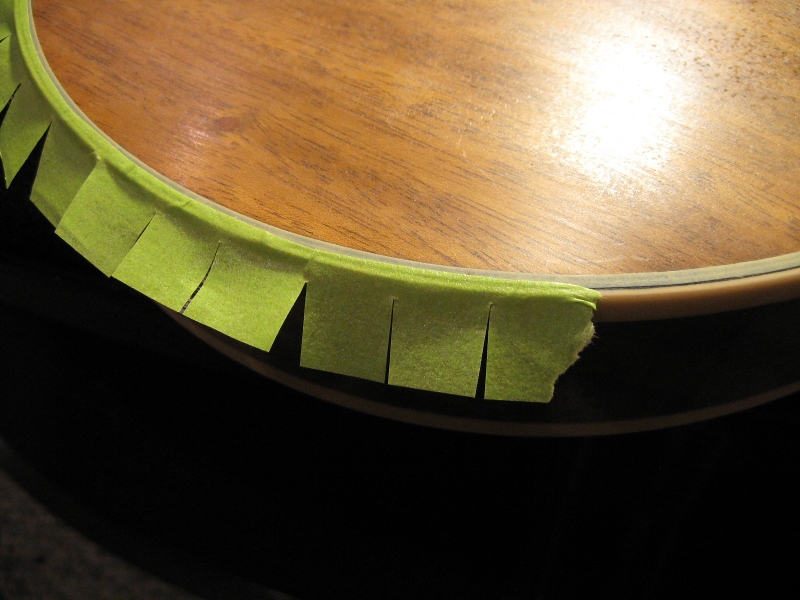
1st two steps of masking
I used the 218 stuff to get the edge, then their green paper mask to extend the cover. The slices are to allow it to go around the curves without wrinkling up and possibly not sealing.
Of course, that's not gonna be enough. The top isn't a showpiece anymore, but the sides and back are, so they're going to be clear finished. So... moar masking!
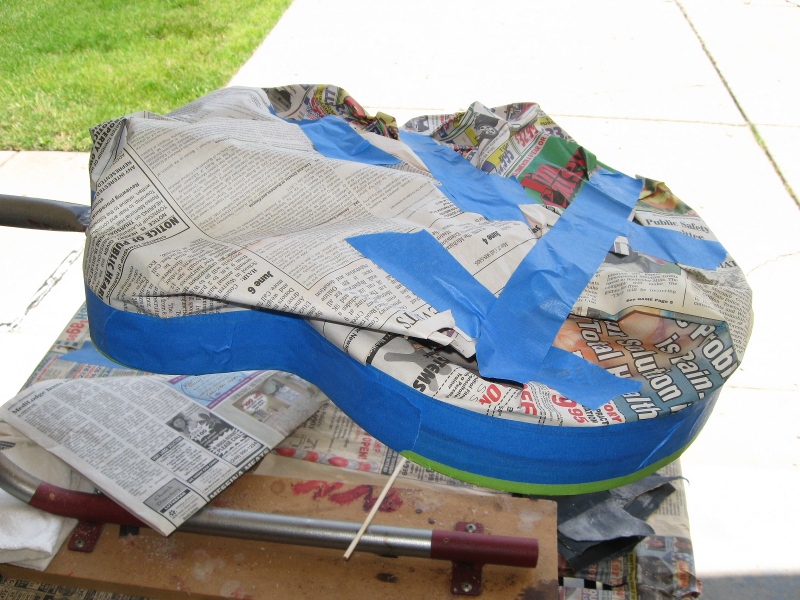
Last two steps of masking
We're pretty well covered up now. so it's time to shoot some Cagey Green. Special formula. State secret, shared only with one spider, who's dead now...
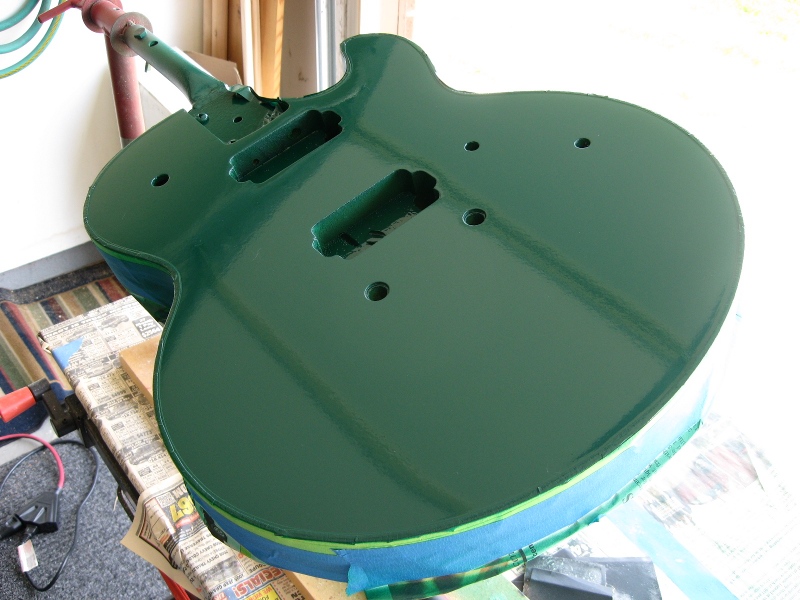
Then we remove all the mask and we see...
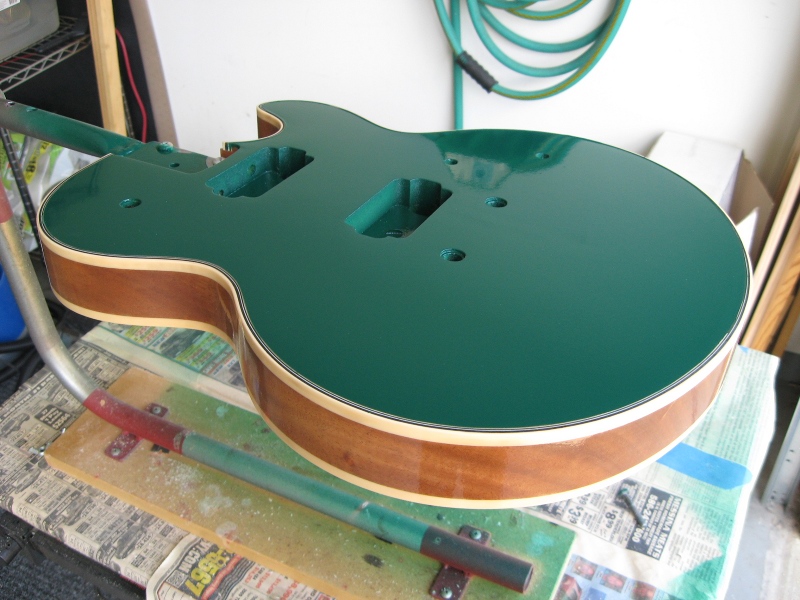
It's alive!
First we've got to mask off all that binding. 3M makes a wide variety of coated films for doing different things, many of them highly specialized. I managed to find some stuff they identify as "218 Fine Line Tape". It's designed specifically for paint masking when you need to have complex curves, fine edges, a tight seal, high solvent resistance, high temperature tolerance and easy release. Quite a spec, eh? It's like a wish list.
I didn't want to take any chances with the binding, so that was the stuff to have. Unfortunately, I had a brain fart when ordering and spec'd 3/32" wide roll. Pretty narrow stuff, but still usable. I was too impatient to wait on another order, plus the stuff ain't cheap, so it just forced me to add a masking step to completely cover the binding.
1st two steps of masking
I used the 218 stuff to get the edge, then their green paper mask to extend the cover. The slices are to allow it to go around the curves without wrinkling up and possibly not sealing.
Of course, that's not gonna be enough. The top isn't a showpiece anymore, but the sides and back are, so they're going to be clear finished. So... moar masking!
Last two steps of masking
We're pretty well covered up now. so it's time to shoot some Cagey Green. Special formula. State secret, shared only with one spider, who's dead now...
Then we remove all the mask and we see...
It's alive!
Cagey
Mythical Status
- Messages
- 24,425
DMRACO said:Cagey. Looks great. Turned out great. I feel your pain with the router. I was cutting out the pickups on a 1/4 lam top and the router bit fell into the toggle wire tool. Luckily if was covered by the pickup ring
Can you cut and glue a small section into that binding area ?
Thanks. And no, you can't piece in binding. It was either rip it all off and start over, or live with it. Starting over would have been a nightmare, as the first piece installed is glued on with some sort of cement, so the slot would have had to be re-routed to clean it up. Chances of failure there are high. Not gun doit. Wouldn't be prudent.
Cagey
Mythical Status
- Messages
- 24,425
Onward.
Another characteristic of that 3M 218 tape is that lacquer doesn't stick to it. So, when you remove the masking, you end up with some paint overhang where it releases from the tape. Makes it look like you don't have a fine edge when really you do. It's just that there's a feather edge of paint that's attached to nothing and hanging out in the breeze. That means you gotta trim it.
So, I took a lesson from Ron Kirn, a fantastic builder you folks may have heard of (he normally hangs out on TDPRI), and built a little trimming tool out of a piece of dowel and some razor blade. I improved on his design slightly by using a breakaway blade, so I could easily maintain a fine edge without changing blades.
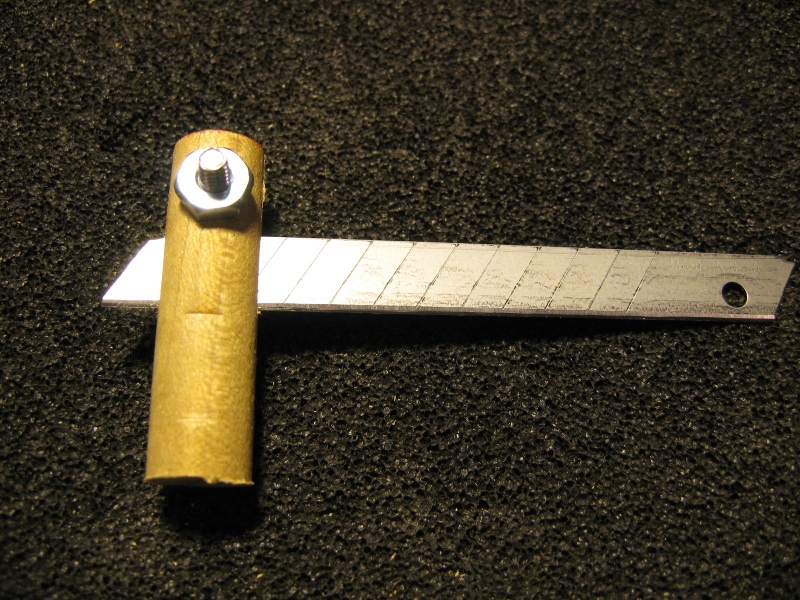
Scraper innovation gone wild
Basically, it's just a piece of dowel with a slot cut in it to hold the blade, then a hole drilled perpendicular to that for a nut/bolt to hold the blade in place. You adjust the blade to the depth you want to scrape, tighten the nut, and the dowel holds your depth as you scrape...
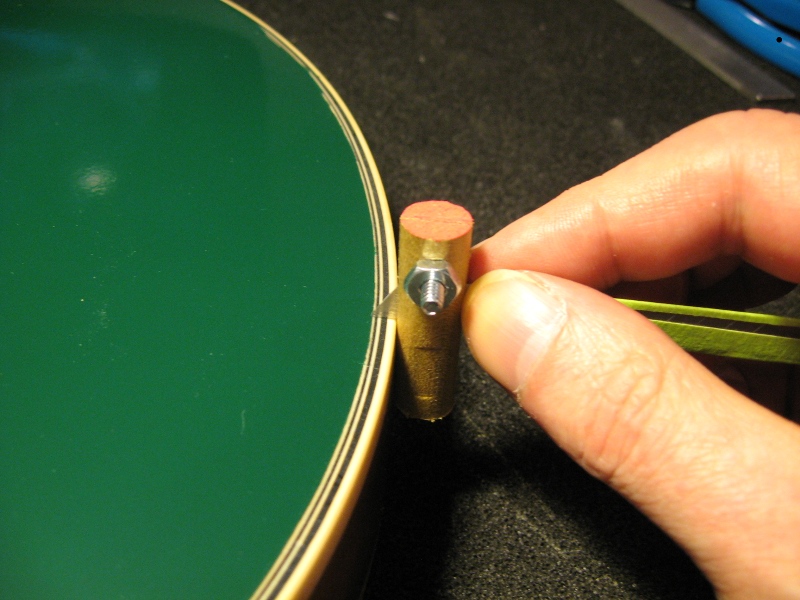
See?
I put some tape over the exposed blade to keep from cutting my fingers up. When the blade starts to act like it doesn't want to scrape, you break off the end and move it forward. Yeah, I'm an innovator. Not really. Standing on the shoulders of giants, is all.
And here is it cleaned up...
Long way from a proper finish, but I'm not sure how many pics I have of the interim steps. Lemme look around.
Another characteristic of that 3M 218 tape is that lacquer doesn't stick to it. So, when you remove the masking, you end up with some paint overhang where it releases from the tape. Makes it look like you don't have a fine edge when really you do. It's just that there's a feather edge of paint that's attached to nothing and hanging out in the breeze. That means you gotta trim it.
So, I took a lesson from Ron Kirn, a fantastic builder you folks may have heard of (he normally hangs out on TDPRI), and built a little trimming tool out of a piece of dowel and some razor blade. I improved on his design slightly by using a breakaway blade, so I could easily maintain a fine edge without changing blades.
Scraper innovation gone wild
Basically, it's just a piece of dowel with a slot cut in it to hold the blade, then a hole drilled perpendicular to that for a nut/bolt to hold the blade in place. You adjust the blade to the depth you want to scrape, tighten the nut, and the dowel holds your depth as you scrape...
See?
I put some tape over the exposed blade to keep from cutting my fingers up. When the blade starts to act like it doesn't want to scrape, you break off the end and move it forward. Yeah, I'm an innovator. Not really. Standing on the shoulders of giants, is all.
And here is it cleaned up...
Long way from a proper finish, but I'm not sure how many pics I have of the interim steps. Lemme look around.