VIP build - Dragon's breath glow

For the fingerboard I use a nut shaping file from stewmac to do a rough bevel. I sometimes then sand the fret ends flush with those bevelled edges using either the file or a flat fret leveling metal block with rough sand paper. Then sandpaper to round the bevel.

Then for the fret ends I use the same nut shaping file followed by a crowning fret.

Overall it's neither a fun nor fast process.
Ideally I'd order my necks w/o frets, roll the edges, and then install frets. That'd be much easier and clear, and probably still much faster.
 
docteurseb said:
Ideally I'd order my necks w/o frets, roll the edges, and then install frets. That'd be much easier and clear, and probably still much faster.

I haven't tried it that way yet. My concern would be the difficulty in beveling the frets in such a way as to prevent there being any space under the frets where the ends didn't follow the round-over radius on the edges of the fretboard. Doing it with frets already installed guarantees there's wood under the frets all the way to the end. I agree; it's tedious as hell doing it that way, but thankfully it's a rarely requested treatment.
 
Thanks, docteurseb, yes agreed it is a tedious process however you do it...

Cagey, if it is done without the frets there you would not any metal where there is no wood underneath as it would end up similar to fret sprout I think.


I was looking at an ebony PRS fingerboard, and they seem to be doing some interesting treatment to it.
It looks rather glossy but doesn't feel sticky at all.
I can't tell if they waxed/oiled the fingerboard or sanded it to extra fine grit...

I usually leave ebony alone but that got me curious and I tried to go up to 1500 or 2000 grit on the Warmoth neck. That looks nowhere as glossy as that PRS fingerboard.
 

Attachments

  • IMG_3458 - Copy.jpg
    IMG_3458 - Copy.jpg
    670.3 KB · Views: 30
  • IMG_3459 - Copy.jpg
    IMG_3459 - Copy.jpg
    635.2 KB · Views: 20
First, you have to work your way up to high grits gradually. You need to gradually and progressively remove scratches. Starting with high grits won't do it. Then, once you get up to the high grits, it takes a while to have a visible effect. That said, they probably just put that on a buffer wheel.

16_Larrivee_repair_loose_frets_glue_level_crown_and_polish.jpg

You can get a lot done in a hurry with one of those, but most guys don't like to do it because it makes a mess of your buffs that might transfer to a body finish.

I get fretboards like that by burnishing them before I fret them.
 
Interesting, do they use the usual wax for hard finishes ?

Would using a Dremel with those mini buffing wheels on lower speed be a terrible idea (sanding through the wood unevenly, etc... ) ?
I have quite a few of those around so it's a bit tempting...
 
I doubt there's any wax involved. I suspect there's either a dedicated buffer w/ two wheels that'll they'll run medium and fine compounds on, or they have dedicated buffs that they put on when there's a pile of necks that need the attention.

I wouldn't try it with a dremel, even at slow speed - they're way too fast. But, you could get a couple smaller buffs like they use on polishers along with some rubbing compound, chuck those into a variable speed drill motor and do it that way. Be sure you have the guitar or neck clamped or somehow restrained, or you'll throw it as soon as you touch it.
61eU2aStzAL._SL1000_.jpg
Something like pictured above is only $11 at Amazon, and you'll have enough to be able to dedicate one to each of several grades of compound.
 
Thanks Cagey.
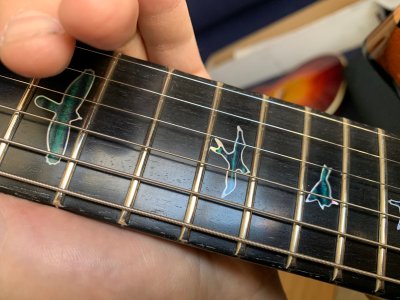
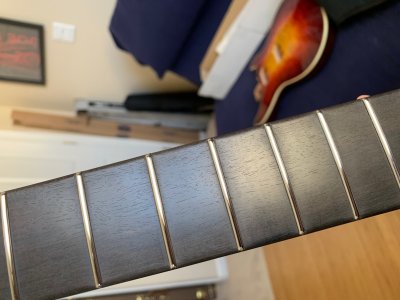
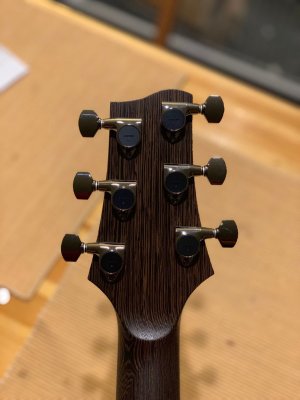
Curiosity and impatience got the better of me and I tried polishing with a Dremel yesterday, first testing on the underside of the fretboard extension.
It seemed to work nicely and I proceeded with the entire fingerboard. Overall the Dremel seemed slow enough, but not particularly effective, it really wasn't removing scratches very much.

While it looked glossier at first, it reverted to its duller look by the time I applied lemon oil to clean it up.
Looks good as it is though so I'll leave it alone.

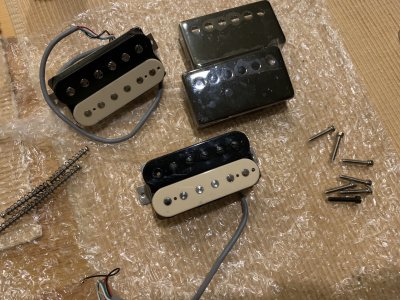
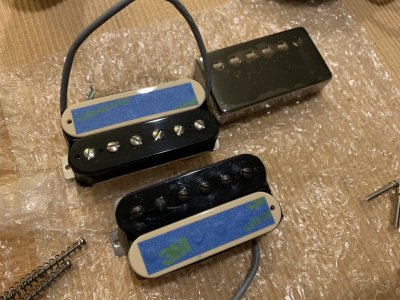
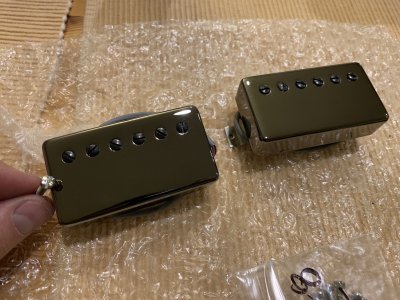
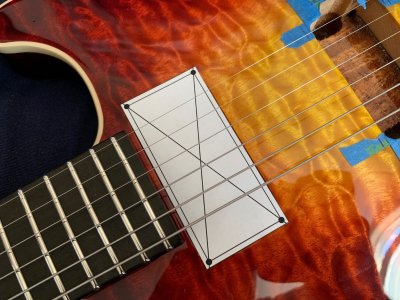
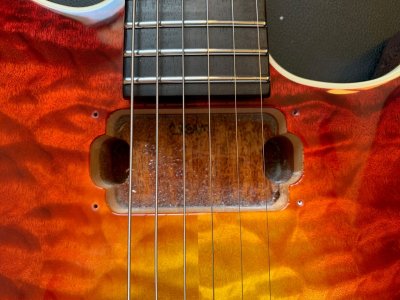
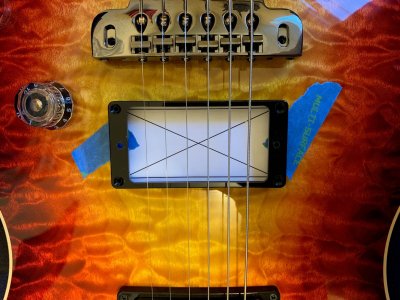
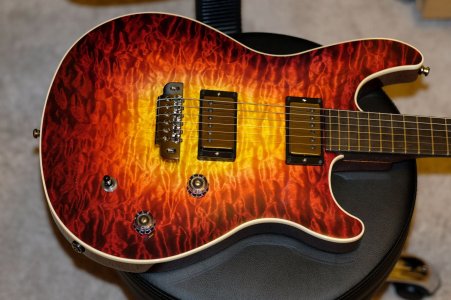
Today I received the cosmo black covers and black poles pieces and just finished installing them.
I followed the steps here:
[youtube]https://www.youtube.com/watch?v=1eZMJl7rHg0&t=355s[/youtube]

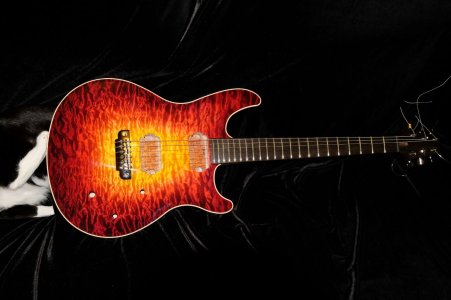
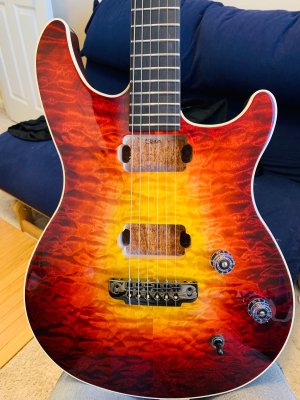
The pickups appear to have survived the cosmetic surgery, see attachments.
 

Attachments

  • covers1.jpg
    covers1.jpg
    1 MB · Views: 17
  • covers2.jpg
    covers2.jpg
    696 KB · Views: 20
  • covers3.jpg
    covers3.jpg
    826.2 KB · Views: 28
They look great. Nice job. That was a good video, too. I'll be putting a cover on one for my next build. Thanks for the link.
 
BTW, a regular hair dryer worked great.
At first I blew directly at the wax which of course sent it flying...
Instead I ended up blowing onto the side and using a metal cup to reflect the heat back to the inside of the cover (otherwise it looked liked the wax would not melt evenly, or it'd have taken a much longer time).

I might redo one of the covers tonight though, I looks ever so slightly slanted and I'm not sure my OCD will tolerate it...
 
Not much progress besides installing the tuners and mounting the neck.
I sure hate installing those 3+3 tuners...
 

Attachments

  • vip1.JPG
    vip1.JPG
    382.1 KB · Views: 43
  • vip0.jpg
    vip0.jpg
    163.9 KB · Views: 21
Slow progress but I did fit the pots, switch and audio jack. It's getting there!
Pot holes has to be sanded to allow pots to fit, there was a bit of drama in the process but it's all good and patched up now :)

The tone pot doesn't have enough clearance for the push pull pots I have (full size CTS), that's OK a single push-pull volume pot to split both pickups at the same time will be just fine.
Also the PRS mounting rings I was planning to use are a poor fit for a VIP body (angled neck). I'd rather use taller and tapered rings instead, if I can find those locally I should be able to finish this guitar today.
 

Attachments

  • VIP.jpg
    VIP.jpg
    929.7 KB · Views: 22
Everything is in, electronics aren't wired yet though.

This time I created paper templates to precisely drill the mounting holes, if anyone wants it I'm happy to share it (it's an Adobe Illustrator file and is only good for Warmoth cavities with Gibson USA mounting rings).


Attachments

  • VIP2.jpg
    VIP2.jpg
    313.8 KB · Views: 21
  • VIP3.jpg
    VIP3.jpg
    302.8 KB · Views: 12
  • VIP4.jpg
    VIP4.jpg
    343 KB · Views: 15
  • VIP5.JPG
    VIP5.JPG
    299.8 KB · Views: 34
Back
Top