Leaderboard

Using Routing Patterns

Bagman67 said:
Dunno if you're doing your own fretwork on your necks yet, but the sanding beam for fret leveling can be a pricey purpose-built tool, considering its simplicity. I solved the sanding beam problem by going to a stone countertop business and picking up a piece of scrap marble of an appropriate width and length.  The guy gave it to me for nothing.  Even trimmed the rough end so it was square.  I tried a headstone shop first, but they didn't actually do their own stonecutting - they were just the storefront near the cemetery, and the cutting took place elsewhere.  So call ahead!
Thanks for this. I'm not doing the neck on this one but that is my next step to a complete scratch build. I'll use a Warmoth neck that's already leveled on this one.
 
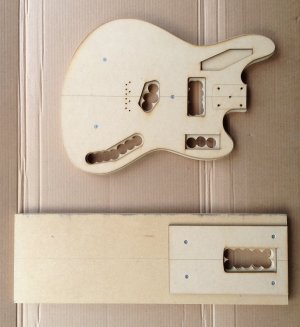
Thanks for all the great help on this. In the end, I screwed the templates onto the MDX. Since I'm only making another template out of thicker material, screws can be anywhere.

For the neck pocket, I'm making a working template that's wider and a lot longer. After I cut the pocket in it, I'll then cut the pickup routes into it so it'll be easier to position on the body.

I removed excess material from the pickup and control route areas with my (only) 1" Forstner bit. The upper control route doesn't get cut into the body. For the body, I may break down and get a set of them so I can do a more complete job before routing.

I got the working patterns ready to route. When it comes to the actual body routing, I may have to use double stick tape and clamps although I could put screws into the body under the pickguard area, and in the neck pocket if I route that last.


Attachments

  • IMG_1328sm.JPG
    IMG_1328sm.JPG
    608.7 KB · Views: 320
Looks like it's coming along nicely.

When you get ready to drill for the bridge and string holes, we should talk again. It's not as simple as it looks. There are a couple tricks you'll probably want to be aware of.
 
Cagey said:
Looks like it's coming along nicely.

When you get ready to drill for the bridge and string holes, we should talk again. It's not as simple as it looks. There are a couple tricks you'll probably want to be aware of.
Thanks for that. I assume by your reply that the holes in the pattern will not be sufficient for that, then. I expect the bridge mounting will be after the body is routed including the control and pickup routes, and the neck pocket. Once I get working with the swamp Ash, I'll start a build thread and will certainly welcome any help you all can offer.
 
Right.

It's no biggie, it just has to do with making another simple jig because you can't drill straight through the body. You're going to need a board about 18" - 20" x 10" - 12", if you wanna start looking for something like that now.
 
Cagey said:
Right.

It's no biggie, it just has to do with making another simple jig because you can't drill straight through the body. You're going to need a board about 18" - 20" x 10" - 12", if you wanna start looking for something like that now.
Will do. How thick?
 
About 1/2" should do. It's going to become a secondary stage for the drill press. Don't need the strength so much as the thickness, because we have to mount a locator pin in it.
 
Actually, I went looking for a video I saw on this technique a couple years ago and found one even better here.

There are two problems you need to solve for. One, drilling all the way through the body invariably causes bit drift, so your holes don't line up on the other side. That video shows how to avoid that without the jig, but you still need it because the second problem is accurately locating for drilling the ferrule recesses. It'll be obvious when you see the video.
 
Shows practice makes perfect. Same guy, same procedure, better video  :laughing7:
 
Cagey said:
Shows practice makes perfect. Same guy, same procedure, better video  :laughing7:

Yes, I just happened to watch it the other day and thought the same thing.
 
I tried making a video of how I install threaded inserts. Nobody has ever seen it, and nobody ever will. I found out it's not as easy as it looks to make a decent video, even when you're confident and well-rehearsed in what you're about to do. Editing can help, but turd polishing still leaves you with a turd, assuming there's anything left of it by the time you're done polishing :laughing7:
 
video editing or film editing , can be a major in collages can take 3 ~5 years , and many people said the academy education editing one may have a lot of theories but not much real world practice skills to made theories into finish film/video , and others may have a lot software practice skills to made some fancy dazzled cut , but without theories , it not a good storytelling to made a impact into audience minds.

so it a kind of lift time learning process and practice skills , really not easy for someone don't have much time to diving to it .

to made a basic good video . at least need  3 cam set up , one wide shoot for over all pictures, one mid shoot for focus talking, and one close up ( changed angel many time ) to show what happens in you hand , then there are lighting and mic recording  , which can both be a different profession to made the whole video good or dead , that already a lot work and planning and quite expensive equipment before you even save all you raw footage in computer to start editing. then there are Color Correction, different cam RAW formats................
 
Absolutely dynamite information in those videos. Thanks to you both for posting the links. I often have noticed that some cheap guitars have the ferrules out of perfect alignment and this explains it. They just punch all the way through the body and call it good.

I need to make a table for my router so I'll just go get a sheet of 3/4" plywood and use that for both purposes. Also, I get to lower the @%&# table on my drill press. :icon_biggrin:

I can see I should get a set of Forstner bits, as well. Been looking for an excuse to do that, anyway.
 
Rgand said:
I can see I should get a set of Forstner bits, as well. Been looking for an excuse to do that, anyway.

There are 4 sizes you should have around the shop for guitar work: 1/4" (mini switches, threaded inserts) 3/8" (pots, insert relief shoulder) 1/2" (Switchcraft toggles) and 7/8" (side output jacks). For what 4 individual bits will cost, you can probably buy a set. If you can swing it, get the carbide bits or you'll be replacing them too soon. Freud and Bosch are well-regarded brands.
 
stratamania said:
Thanks and even bigger thanks are in order to Mr. Fletcher.
Yes, that's for sure.

Cagey said:
Rgand said:
I can see I should get a set of Forstner bits, as well. Been looking for an excuse to do that, anyway.

There are 4 sizes you should have around the shop for guitar work: 1/4" (mini switches, threaded inserts) 3/8" (pots, insert relief shoulder) 1/2" (Switchcraft toggles) and 7/8" (side output jacks). For what 4 individual bits will cost, you can probably buy a set. If you can swing it, get the carbide bits or you'll be replacing them too soon. Freud and Bosch are well-regarded brands.
Thanks for that information. It also looks like I will need a 5/16" one for the ferrules, too. I haven't seen a set with that one included so it will probably need to be purchased separately.
 
Back
Top