Superstrat refinish

xntrick

Newbie
Messages
19
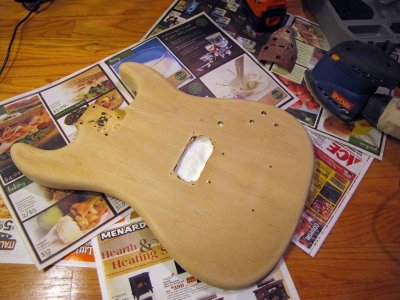
A few months ago I saw a refinish project where the guy used shoe polish on bare wood and then brought out the grain structure with sanding and staining. It was very impressive and I finally decided to try it myself. Not sure if it will have the same effect on a maple body. This could be a big waste of time so I am keeping my fingers crossed. I also want to contour the neck heel and make the lower horn deeper, 2 things that I have never done before. I figure if I take my time I should be ok. This is a shot just before I took the guitar apart.


ajDVpfm.jpg
 
I made a run to the hardware store and picked up a 10 piece file set, a small drum sander and a rasp bit. Both the sander and bit are too larger to use with my roto-zip which is really a shame. That thing has some serious rpm's which makes it a delight to use. I'll have to use a battery powered drill which is very slow by comparison. I have a hand held sander which made quick work removing the finish with 120 grit sandpaper. The body only had a few light coats of tung-oil. If I had to do that by hand it would've taken a very long time and I'd much rather be playing the thing than making saw dust.

xwKsRtv.jpg
 
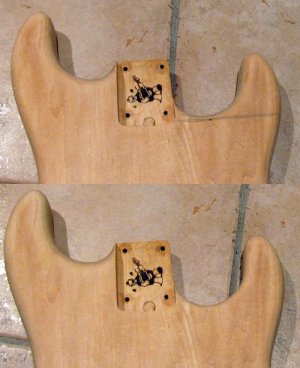
These are the measurements for the neck heel. Mine is different as I am reducing the side of the heel as opposed to the top as Warmoth does. I find that is more suited to my style. It's only a 1/4 of an inch but a dry run reveals just how much this improves the reach. It's very time consuming as well, the price for this extra is well worth the money and my next build will certainly have this option. Just be sure to cut down the screws for that side of the heel.


yfOjSjg.jpg
 
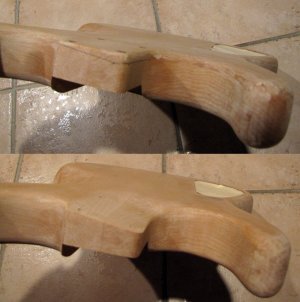
I marked the lower horn to be a 1/4' deeper, doesn't seem like much but i figured I could always go deeper. This was rather tedious work with a drum sander on a slow speed drill and you can see it's not perfect. A deeper cut would be ideal but I just don't have the patience at the moment. I want to finish this and get back to playing.

xJOhU94.jpg
 
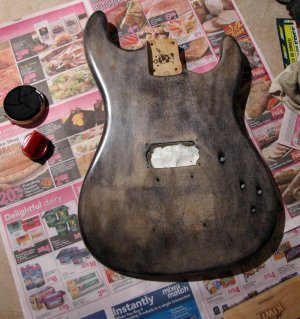
This is with the black shoe polish applied and I'm not sure this will look very good. I'm hoping that sanding it will improve it in a big way as the polish is not bringing out the detail in the wood grain.

T70jl9G.jpg

 
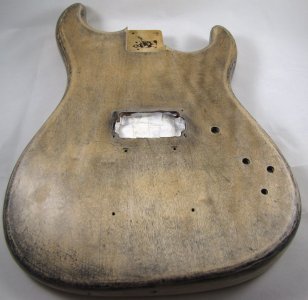
This is after buffing and sanding the polish and it's terrible unless you like that dirty rustic grainy sort of look.
You can hardly see the wavy grain from the very first photo, even if it were the brown polish I don't think i'd keep it. It certainly is useful if you want to check your sanding work as any imperfection is clearly evident. I am going to get small can of stain and try that on the back, hopefully that gives me a better finish.

Xvzn4dH.jpg
 
That's too bad. What's worse is I'm not sure it's recoverable. Worse yet, I understand shoe polish isn't supposed to come into contact with bare skin due to cancer-causing agents, but that may be a California thing. They're a little bonked out there. I'm waiting for them to declare distilled water as cancerous. Shouldn't be long now...

But, it's possible shellac will stick to it. That stuff's pretty forgiving. Be worth a test anyway. If it works, then you get a second chance as you can put just about anything on top of shellac, too. You'll be able to shoot some lacquer on there or use a wipe-on polyurethane and end up with something attractive.

 
Usually when people use shoe polish, it's over a poly finish. If you've sanded a finish away, or are sanding after applying shoe polish, it's not going to turn out well.

Also, my old guitar tech told me that all of his clients that shoe polish their necks end up with the color wearing away and looking terrible, in time.

I would just finish that body a normal way.
 
line6man said:
Usually when people use shoe polish, it's over a poly finish. If you've sanded a finish away, or are sanding after applying shoe polish, it's not going to turn out well.

Also, my old guitar tech told me that all of his clients that shoe polish their necks end up with the color wearing away and looking terrible, in time.

I would just finish that body a normal way.

I was not aware of that, my search didn't come up with that information. This was certainly trial and error on my part.
 
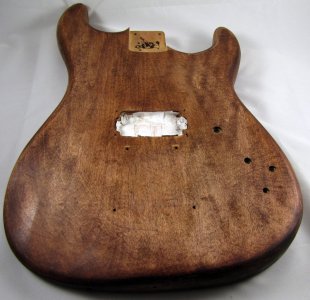
So I got some stain called "red oak" and within 5 minutes of covering the back of the guitar I knew this was going to look much better. Once the back dried I took the hand held sander and went to work removing the shoe polish. It was a bit stubborn at first but eventually I was back to unfinished wood. It didn't take much stain to cover the front. Before it dried, I used a towel and removed the excess stain, the longer I buffed it the more detail came through. I spent close to an hour buffing and the results were amazing, this photo does not do it justice. Very happy with the results so far. I might even get a lighter shade of red or yellow stain and experiment further before finishing with tung oil.

0ghhvUK.jpg
 
I don't know why no one has mentioned that maple and ash bear no resemblance to each other in terms of grain porosity and density. The reaction(s) to various coloring mediums is totally different....also; SHOE POLISH?!? Seriously? Black dye seems a much more rational choice to slather onto a (previously) valuable guitar body. Anyway, you seem to be salvaging the job to your satisfaction, and that's all that matters...best of luck with it!
 
I didn't see this earlier but shoe Polish removal tips from a household tips site for wood are:-

Follow these steps to remove shoe polish stains from Wood:
Wipe the stain with a cloth dipped in warm sudsy water to which a few drops of ammonia have been added.
Rinse well with a cloth moistened with clear water and wipe dry.
Polish or wax the wood as usual.

Of course now as it has been sanded and stained with other  stuff the above may not work. I add this to the thread just in case someone is looking for similar information in the future.
 
Here are your options moving fwd:
Shake the hardware in a box of gravel, throw on a mint green pick guard, and call it a relic.  Don't become irate when it falls over, and don't fear exposure to cigarette smoke and spilled beer.  Freely swing it like Keef at stage on-rushers.  Relax... Everyone needs a beater guitar!

Oh yeah, one more thing.... Always, always, always test stuff you don't have first-hand knowledge of on scrap wood before applying to the guitar body.
 
telecutie said:
Here are your options moving fwd:
Shake the hardware in a box of gravel, throw on a mint green pick guard, and call it a relic.  Don't become irate when it falls over, and don't fear exposure to cigarette smoke and spilled beer.  Freely swing it like Keef at stage on-rushers.  Relax... Everyone needs a beater guitar!

Oh yeah, one more thing.... Always, always, always test stuff you don't have first-hand knowledge of on scrap wood before applying to the guitar body.

I hear ya, lesson learned. Luckily I was able to start over, the results look good so far.
 
Shoe polish is like wax, isn't it? Lanolin and stuff. That sounds like an emergency waterproofing for your gun stock in the trenches of World War I (and you know you're giving the gun back to the government after :laughing3: :laughing7: :laughing3:) You learn something every day... where do people find this stuff? Wax goes in polish that goes on top of the finishes.
 
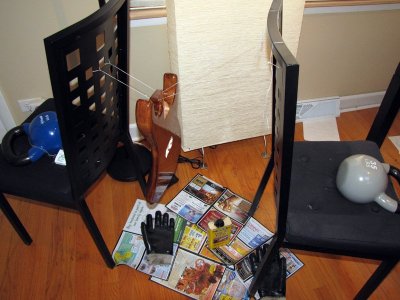
After buffing the reddish stain, I Picked up a sample of a stain called "golden pecan". I was hoping to get some gold color in amongst the reds and browns, not sure if it did much good but it certainly didn't hurt. Buffed it a bit more and followed up with 3 coats of tung oil and it was looking very good. The surface wasn't completely smooth so I finished it off with some 2000 grit sandpaper, it dulled the high spots a bit but you can only see that up close. As you can see from my makeshift drying rig, I don't exactly have an ideal work station or even work area, but it did the job.

Gz0NfVg.jpg
 
That's a very nice turn around  :icon_thumright:
From the shoe polish !!

Looks like you went overboard and did your floor as well  :icon_biggrin:

Nice save  :headbang:
 
Definitely a nice recovery, and I admire your jury-rigged drying station.  Pure class!

 
Back
Top