Inserting ferrules into BLO finished body

JD0x0

Junior Member
Messages
82
I'm wondering if there's any tricks to this. The body is finished with BLO. I know that ferrules press right in using a soldering iron w/ poly finish, but what about a finish that's essentially bare wood? Do you just press fit them? Should I consider opening the holes very slightly with sand paper to accommodate the ferrules?

I know with poly, it melts and lets the ferules slide in, but I am not convinced this will work with a BLO finish, and this is a friend's guitar I'm building for him, so I'd prefer not to mess it up, if possible...
 
oh.

Well, given that it's not your guitar I'd take extra care.  I'd use sandpaper wrapped around a pencil and open up those holes a bit.
 
Thanks. I went through with it. I hit it with 220 grain paper wrapped around a needle nose pliers and then tapped them in with a mallet and screwdriver. luckily, you dont really need to worry about finish cracks with BLO, so long as you dont crack the wood you should be okay.
 
If you have a drill press, you can use that to press them in. Less chance of whacking the body with whatever you're using as a whacker thingy. Plus, it's a more controlled, slow pressing so you don't have to worry much about them starting crooked or flying off at an angle and heading for the tiddlywads.
 
Kevin's right about pressing them in. I gently used a tapered reamer to slightly open the finish on mine then pressed mine in with a drill press using one of these installation tools from StewMac.
 
I'd also consider using a counter-sink bit to clean up the edge where the holes meet the surface just prior to pressing in the ferrules. 

I'm always cautious about "chip-out".
 
Rgand said:
Kevin's right about pressing them in. I gently used a tapered reamer to slightly open the finish on mine then pressed mine in with a drill press using one of these installation tools from StewMac.

I don't even bother with that installation tool. Just adjust the chuck until the three bit gripper fingers are about the same diameter as the top of the ferrule, line things up and crank 'em in.
 
Cagey said:
Rgand said:
Kevin's right about pressing them in. I gently used a tapered reamer to slightly open the finish on mine then pressed mine in with a drill press using one of these installation tools from StewMac.

I don't even bother with that installation tool. Just adjust the chuck until the three bit gripper fingers are about the same diameter as the top of the ferrule, line things up and crank 'em in.
That's a good idea. I'll try that on the next one. You could even chuck up an alignment pin in them but it sounds like it isn't necessary. Thanks for that.
 
If you get the chuck adjusted right, you don't need any alignment help. I also raise the stage so the body is sitting just about 3/8" or so below the chuck - just enough to sneak a ferrule between the chuck and the body. Makes it easier to slightly lower the chuck down to where it just touches the ferrule, make sure it's aligned, then press it in.

Also, I've never cleared the holes of paint, nor had any chips as a result. Maybe I lead a charmed life, but I've done this countless times without issue pushing past both old/new lacquer and poly.
 
It's a good idea to bring the work surface up closer. It's a real bitch on my drill press but I get someone to release the lock while I hang onto it and lift it to the desired height then re-lock it. I've been lowering the chuck and temporarily locking it just above the project.
 
Sounds like a real pain in the shorts. Is that the way it's supposed to work, or is it broken, or what? I adjust my stage height all the time. If I had to go through that rigmarole, I'd have to be making some changes.
 
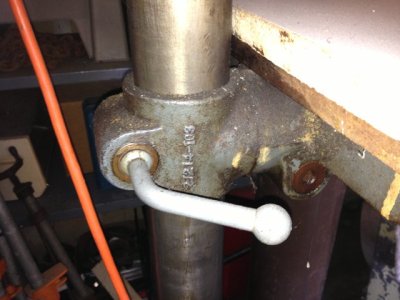
I have an ancient drill press from the 1930's. It works good but it's probably the one they learned on. The adjustment is just a clamp around the main stand. Loosen the lever and it's headed for the floor if you don't have a good hold on it.
 

Attachments

  • IMG_1326.JPG
    IMG_1326.JPG
    57.3 KB · Views: 308
I see. Well, it beats the snot outa nothing. Probably hard to justify replacing it as long as it works. I have the same problem with my ancient 46" HD TV. I want a 60" 4K unit, but this one works perfectly and I rarely watch it anyway. In fact, I've been in the new place for 6 weeks now, and I still haven't even mounted the thing and plugged it in. Beginning to wonder why I ever paid for cable TV at the last place. Could've saved a ton of money.
 
Cagey said:
I see. Well, it beats the snot outa nothing. Probably hard to justify replacing it as long as it works. I have the same problem with my ancient 46" HD TV. I want a 60" 4K unit, but this one works perfectly and I rarely watch it anyway. In fact, I've been in the new place for 6 weeks now, and I still haven't even mounted the thing and plugged it in. Beginning to wonder why I ever paid for cable TV at the last place. Could've saved a ton of money.
That's for sure. I used it to do my first scratch build (an electric mandolin) when I was a kid. Didn't have a router but I did have end mill bits to cut out for the pickup and controls. I inherited it and it just works.
Today I used my inherited two-speed Delta bandsaw to rough cut my MDX routing pattern. I have a question about that but will start a thread on it elsewhere.

EDIT: Here's the thread
 
Rgand said:
I have an ancient drill press from the 1930's. It works good but it's probably the one they learned on. The adjustment is just a clamp around the main stand. Loosen the lever and it's headed for the floor if you don't have a good hold on it.
Damn, that is an old design. Haven't seen one without a sliding rack and pinion in a long time.
Cagey said:
......hard to justify replacing it as long as it works.
I know exactly what you mean. Mine's a 30 year Harbor Freight special, but it's still going strong. Changed spindle speed a few weeks ago, and the original belts are still in good shape. Guess I'll be passing it along to my kids some day....  :icon_thumright:
 
I put the ferrules in by putting them on the end of a soldering iron, heat them up a bit and let them melt their way into the body. I warn you, however, if you choose to do this they will never come out without non trivial levels of brute force.

No idea how that works with boiled linseed oil. I don't even know what that is. I assume that it is oil squeezed from something called a linseed which is then boiled.

 
DarkPenguin said:
...I assume that it is oil squeezed from something called a linseed which is then boiled.

Kirk, Spock and the gang would be wasting their time trying to overload your logic circuits.
 
Fat Pete said:
DarkPenguin said:
...I assume that it is oil squeezed from something called a linseed which is then boiled.

Kirk, Spock and the gang would be wasting their time trying to overload your logic circuits.
I have some carnubas that need polishing but I'm not sure what to use on them.
 
Back
Top