Shooting a new video on DIY Nitro finish.....advice sought!

aarontunes

Somewhere in the middle of nowhere.
Staff member
Messages
2,964
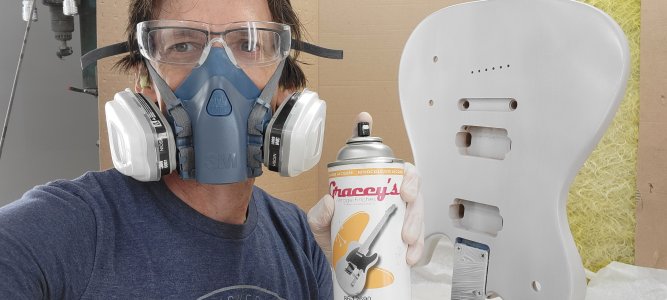
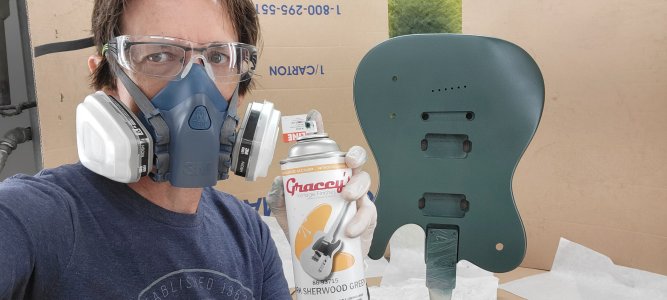
I am shooting a new vid for the Warmoth YouTube channel. I am gonna try to finish a guitar all by my own self using rattle-can nitro. The point of the video isn't a step-by-step guide. It's more of a "these are the results you can expect as a first-timer".


I'm not using any fancy Warmoth equipment or tools, other than a few things out of convenience, and few things to comply with OSHA rules.


So I'm turning to the seasoned nitro-finishing pros here on UW: let's hear your best advice and tips for a first-timer!
 
Spud said:
Wear a quality charcoal respirator with new cartridges!


Yup, done. That's one of the OSHA things I was talking about.
 
Get a cheap-ass paint booth thing.  Like this one:

03K0311-large-portable-spray-shelter-8-1-2-x-6-x-5-1-2-u-01-r.jpg


They make smaller ones as well.
 
Thanks....I didn't even know there was such thing. I'll have to remember that for home projects. For this video I am actually using an old retired paint booth we've had sitting around for years.


It's not in the sanitized, dust-controlled environment that is our paint department. It's just sitting in some warehouse space, so I'll still be dealing with dust and stuff.
 
My personal rattlecan finishing schedule? Similar to Stew mac. Maybe there is something here to pull out.

For Ash/open pore wood (skip steps 4 and 5 for Alder and closed pore wood)...
  • Sand body to 320 (if not done already)
  • Clean body with naptha
  • Sealer coat of Bullseye aerosol shellac. Shellac is the rosetta stone of finishes, it sticks to just about everything and everything sticks to it. It can be a lifesaver if the body got contaminated by silicone, oil, etc.
  • Pore fill (open pore wood). I use a water based filler these days, more work than oil base, but no brain-melting fumes and no spontaneous composition of the rags
  • Clean off excess filler with damp cloth...remember the shellac seale coat? That protects the wood from the water
  • Mohawk vinyl sealer, this is nitro with vinyl solids for a fast building sealer coat that won't shrink back. 3 spray passes equals a coat, 3 coats. If using a opaque color, you may prefer to use Mohawk primer to get a uniform final color
  • Level sand. You will sand through the first couple of times. You are looking for no shiny spots that indicate low areas
  • Repeat last two steps (6 and 7) until you have a level finish without sanding through
  • Color coat, 3 spray passes is a coat, 3 coats a day until you have the coverage you want. Pick you product here...Mohawk, Gracey, etc. I think Reranch may be gone for good
  • Mohawk clear coat, 3 spray passes is a coat, 3 coats a day until 10-12 coats
  • Let dry or off-gas for weeks. Watco says you can spray in ~7 days, but I usually forget about it for a month and do other work
  • Wetsand with mineral spirits, 800 through 2000
  • Buff and polish by hand with Meguiars 105, then 205
Some tips...
  • I nail my body to a stick and hang it to finish. I handle it buy the stick, not the body. I am envious of those with a rotating mount and I've also always wanted to try the old Fender way of nails into the front and placed on a lazy susan
  • Tack cloth is great for getting dust up before the next step, but use it on dry to touch pieces only. I use naptha to get my fingerprints back off
  • Stew Mac charges $10 for 6 Art Primo calligraphy spray nozzles, you can buy 10 for $3 from Art Primo directly, I prefer the wider red nozzles
  • If you lucky, you only have to sand three times...once before any finishing, when you level-sand the sealer/primer, and the final level sand/polish of the clear coat. YOu may have to sand off a pore filler and there may be mistakes you have to sand inbetween coats
  • You can't shoot a truly wet flat coat with aerosol cans, you'll get a little orange peel no matter what, which is why I usually give 12 clear coats before wetsanding
 
Last edited:
I was going to take the time to do a more thorough reply, but I see DuckBaloo got there first!

BTW, can I call you CanardBaloo?  (<- trojan horse about my latest pedal-in-development)
 
Wow...thanks DuckBaloo!


Step #7 is a for-sure....I WILL sand through!


As far as the brands, all the paint is being supplied by Gracy's finishes.
 
The Aaron said:
Wow...thanks DuckBaloo!

Step #7 is a for-sure....I WILL sand through!

That's the point. If you sand through you know you need more sealer/primer to reach a uniform level. You apply more, sand more. Took a total of 9 coats for my last build, sanding back every 3 coats. It's a tedious process with rattlecans (easier to build up faster and flatter with a spray gun), but is needed to insure you have a mirror flat final process.

The Aaron said:
As far as the brands, all the paint is being supplied by Gracy's finishes.

I used Gracey's Mary Kaye on a Tele last year, worked fine (I, on the other hand, oversprayed and area, got bad runs, and had to sand back down to sealer once), I thought it was easier to manage than the much thinner Mohawk Toner I tested. But I did swap out to the Art Primo nozzles.


ac7phfg.jpg
 
Cool finish DuckBaloo  :icon_thumright:

More on step 7. Agreed the sand through is indeed the point as it is better to get level with primer than continue on to finishing coats beforehand. 

Another thing to explore is the use of a contrasting colour primer to do towards the end of this stage a thin guide coat. The contrast allows to see imperfections quicker. This is used by auto sprayers for example.
 
Well, the first can of sealer is on. Honestly, I learned a lot from just that one can about how to position the can to get the paint to apply more evenly. I had one spot that sagged a little near the heel, but overall things went pretty well.
 
DuckBaloo said:
The Aaron said:
Wow...thanks DuckBaloo!

Step #7 is a for-sure....I WILL sand through!

That's the point. If you sand through you know you need more sealer/primer to reach a uniform level. You apply more, sand more. Took a total of 9 coats for my last build, sanding back every 3 coats. It's a tedious process with rattlecans (easier to build up faster and flatter with a spray gun), but is needed to insure you have a mirror flat final process.

The Aaron said:
As far as the brands, all the paint is being supplied by Gracy's finishes.

I used Gracey's Mary Kaye on a Tele last year, worked fine (I, on the other hand, oversprayed and area, got bad runs, and had to sand back down to sealer once), I thought it was easier to manage than the much thinner Mohawk Toner I tested. But I did swap out to the Art Primo nozzles.


ac7phfg.jpg

Wow!  That is fantastic!
 
Second can of sealer today.
 

Attachments

  • 20220627_100006.jpg
    20220627_100006.jpg
    1.9 MB · Views: 65
Reminds me of a Fender custom shop Mary Kay finish Strat I used to have, only nicer!
 
Well, kind of late for my suggestion. I would use finishes all from the same source to minimize incompatibility issues.
 
Olympic White undercoat today. So far so good!
 

Attachments

  • 20220708_093214.jpg
    20220708_093214.jpg
    1.4 MB · Views: 58
Color coats start today.
 

Attachments

  • 20220711_102256.jpg
    20220711_102256.jpg
    1.3 MB · Views: 48
I am not sure, but I think you look better in the protective garb. You may have just found a new look!
 
Spud said:
I am not sure, but I think you look better in the protective garb. You may have just found a new look!


Why does everyone keep telling me that?
 
Spray booth made out cardboard, that's great!  Remember to smile!  :toothy12:
 
Back
Top