Routed Body Blank :: "Geosymmetrical" Guitar Body Project

swipesy

Junior Member
Messages
27
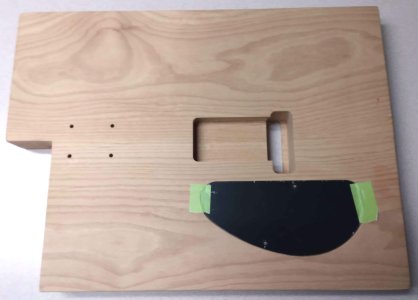
Hi everyone. Well, I've decided to try my hand at shaping my own symmetrical body out of a Warmoth routed body blank. The first guitar I ever bought new was a 1981 Vantage VS696. I was about 18-19 then and basically played the frets off it over the years. Finally gave up the ghost around Y2K, my brother damaged it beyond repair. Anyway, I came to really love that body shape (similar to the current Ibanez AX or 80s Carvin DC150 series). Warmoth and other body suppliers don't offer that body shape though, and I want a Floyd on it, so my only real option is to try to make one.

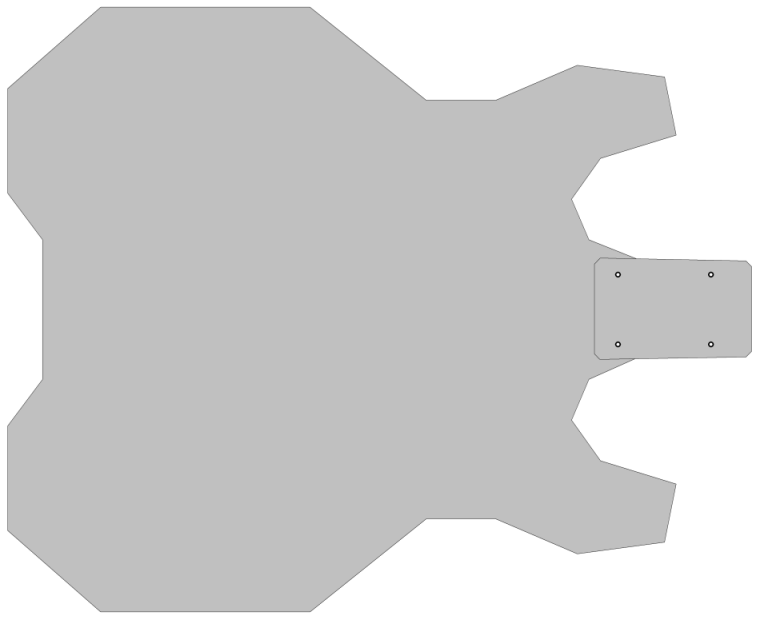
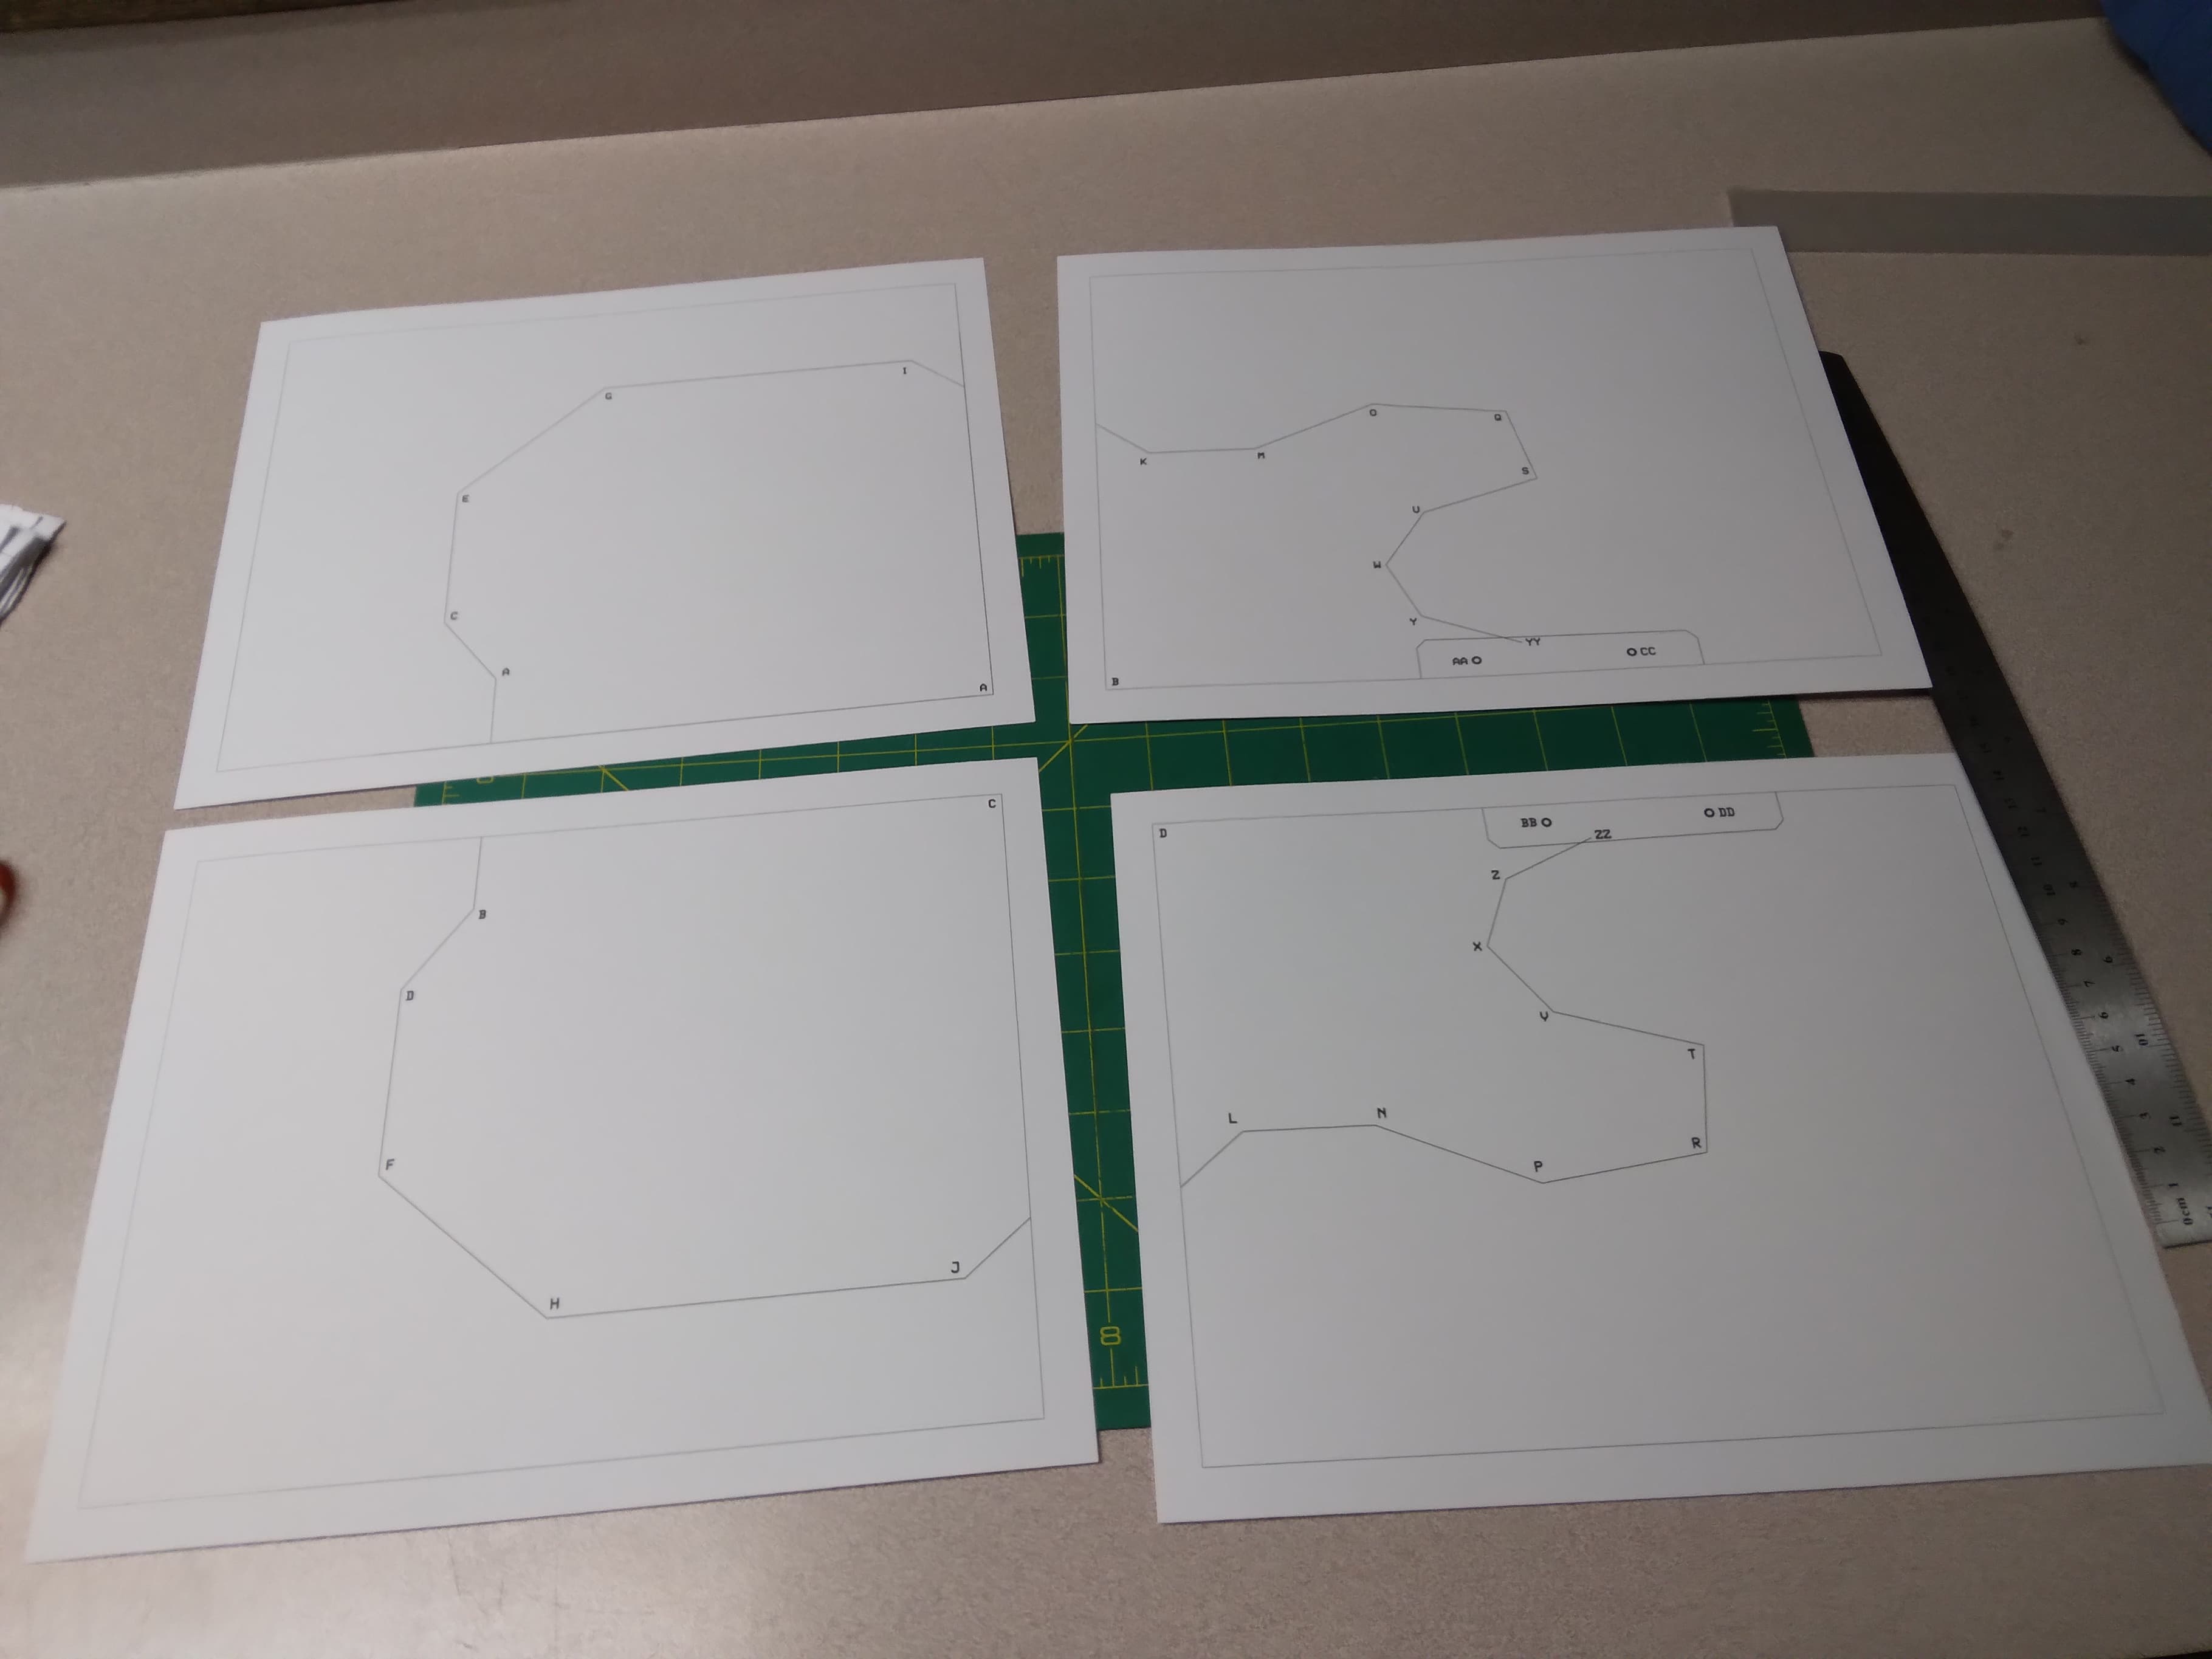
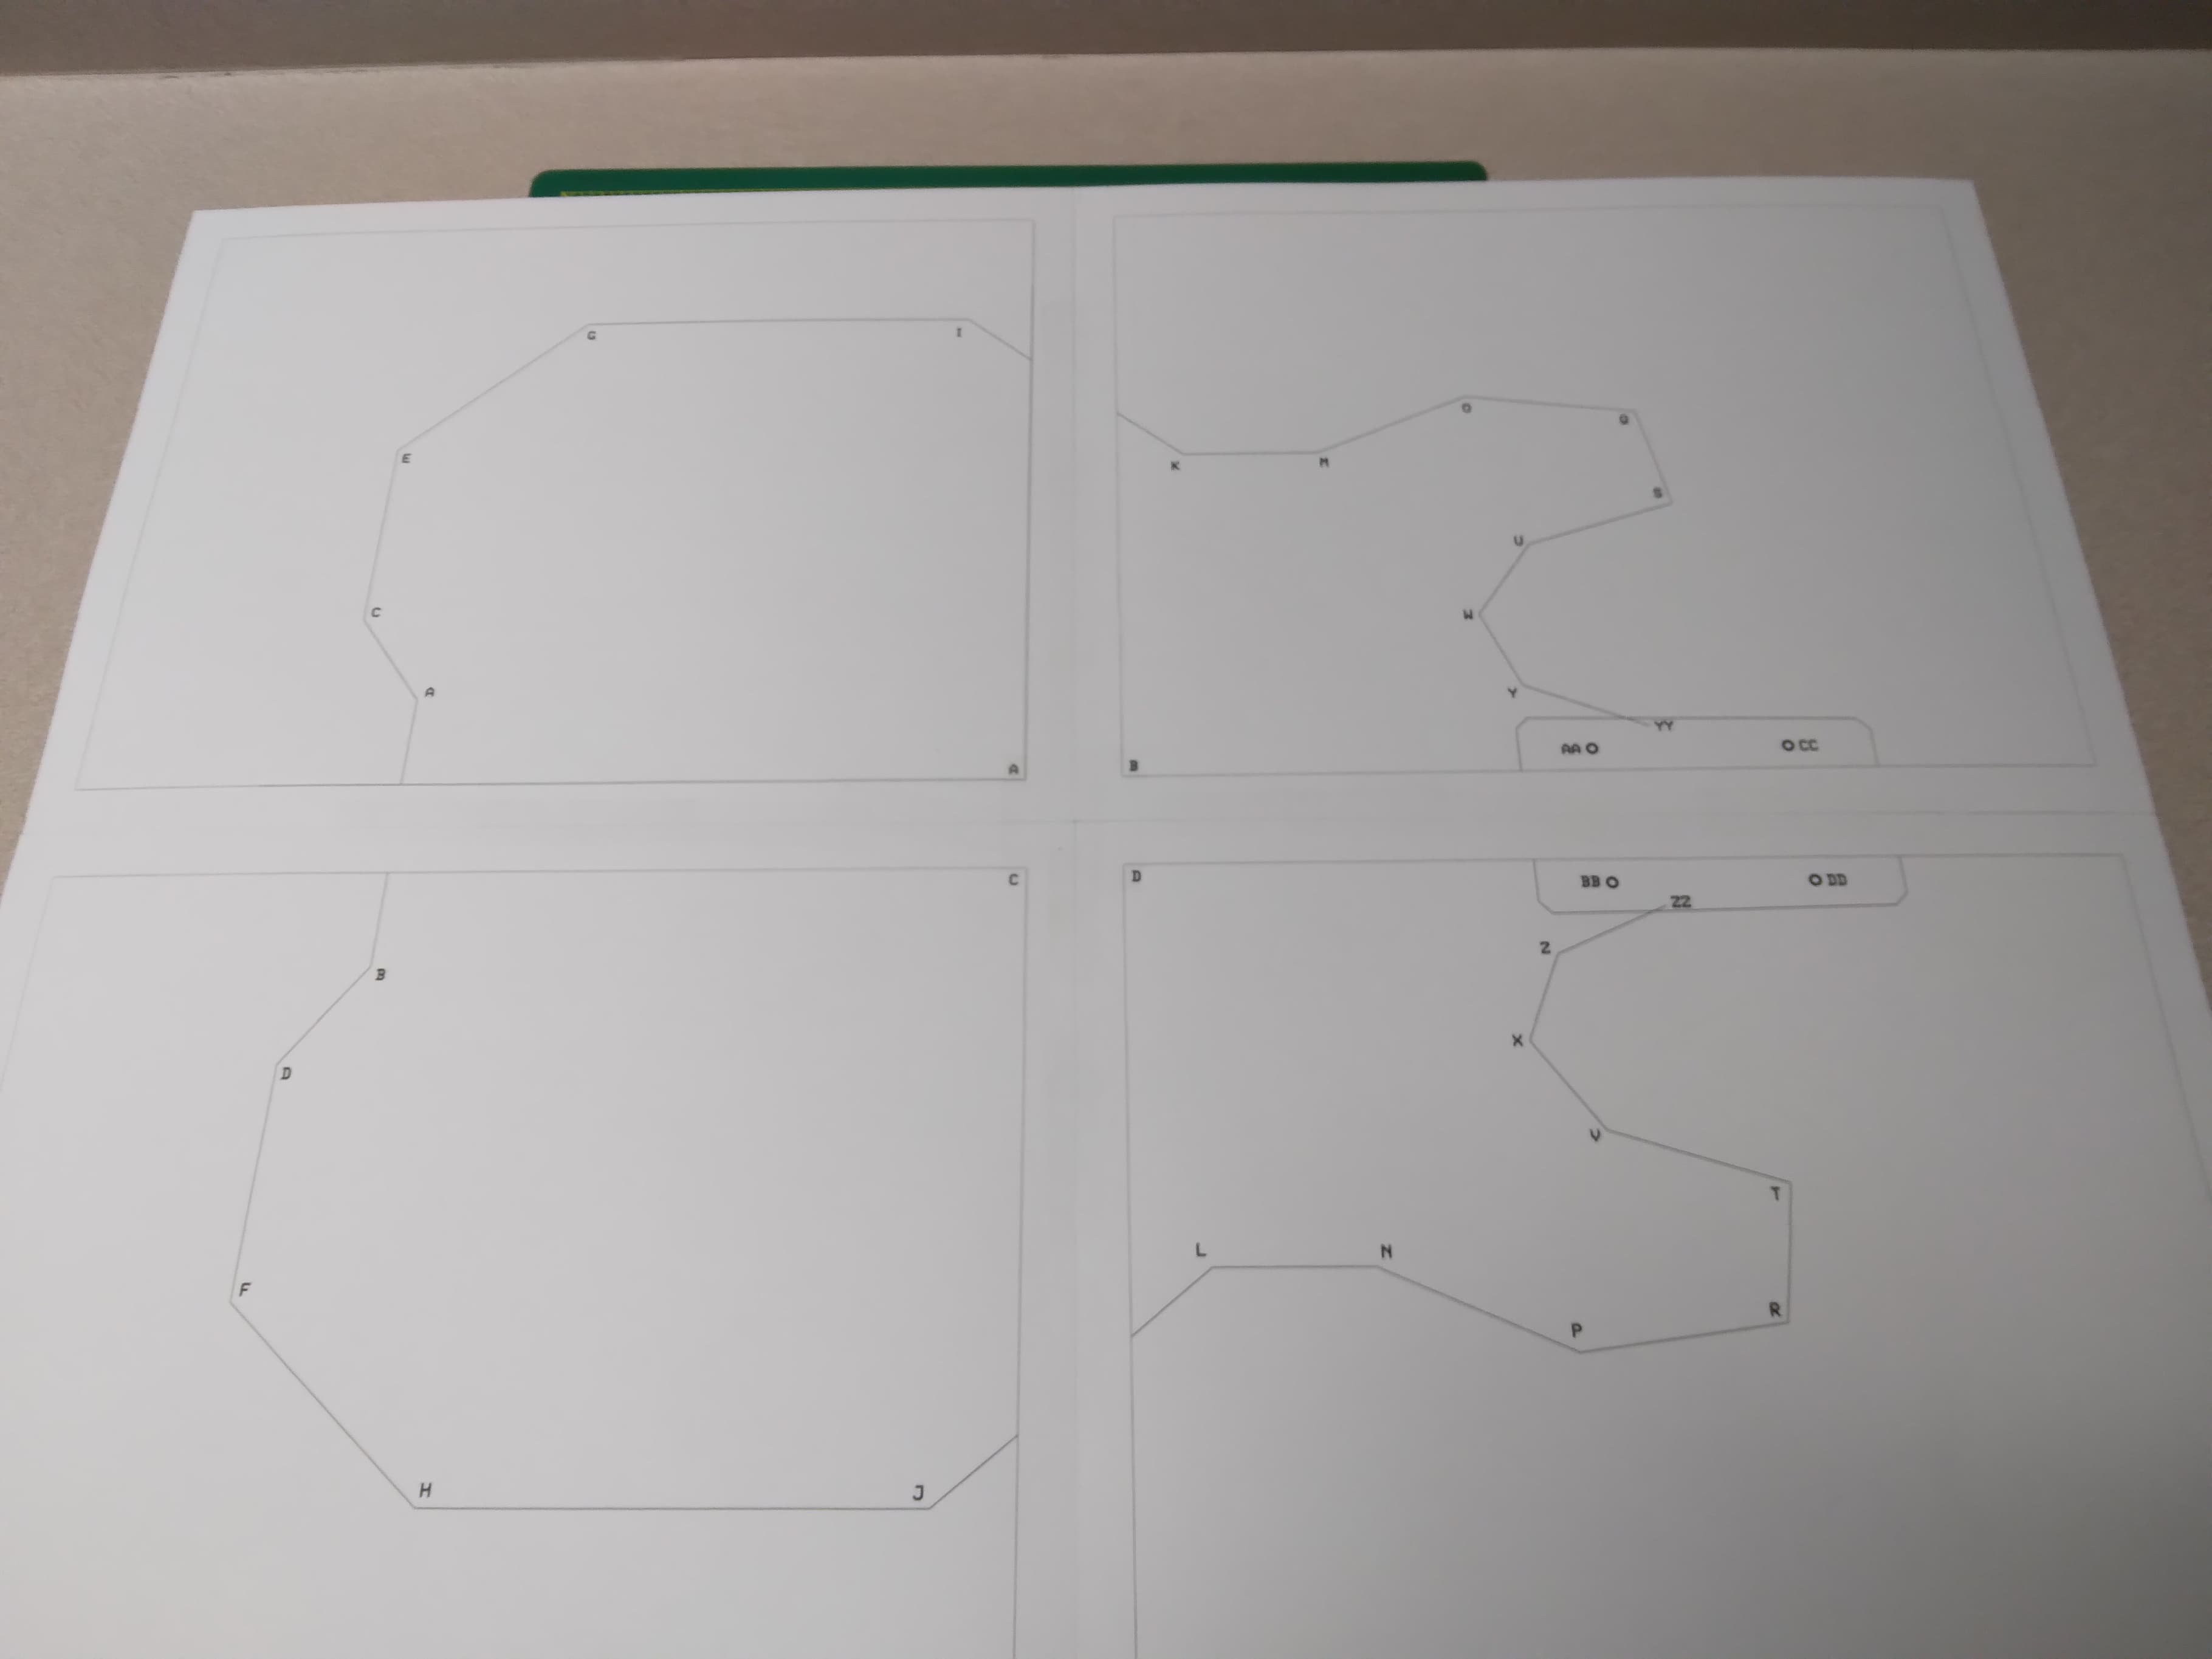
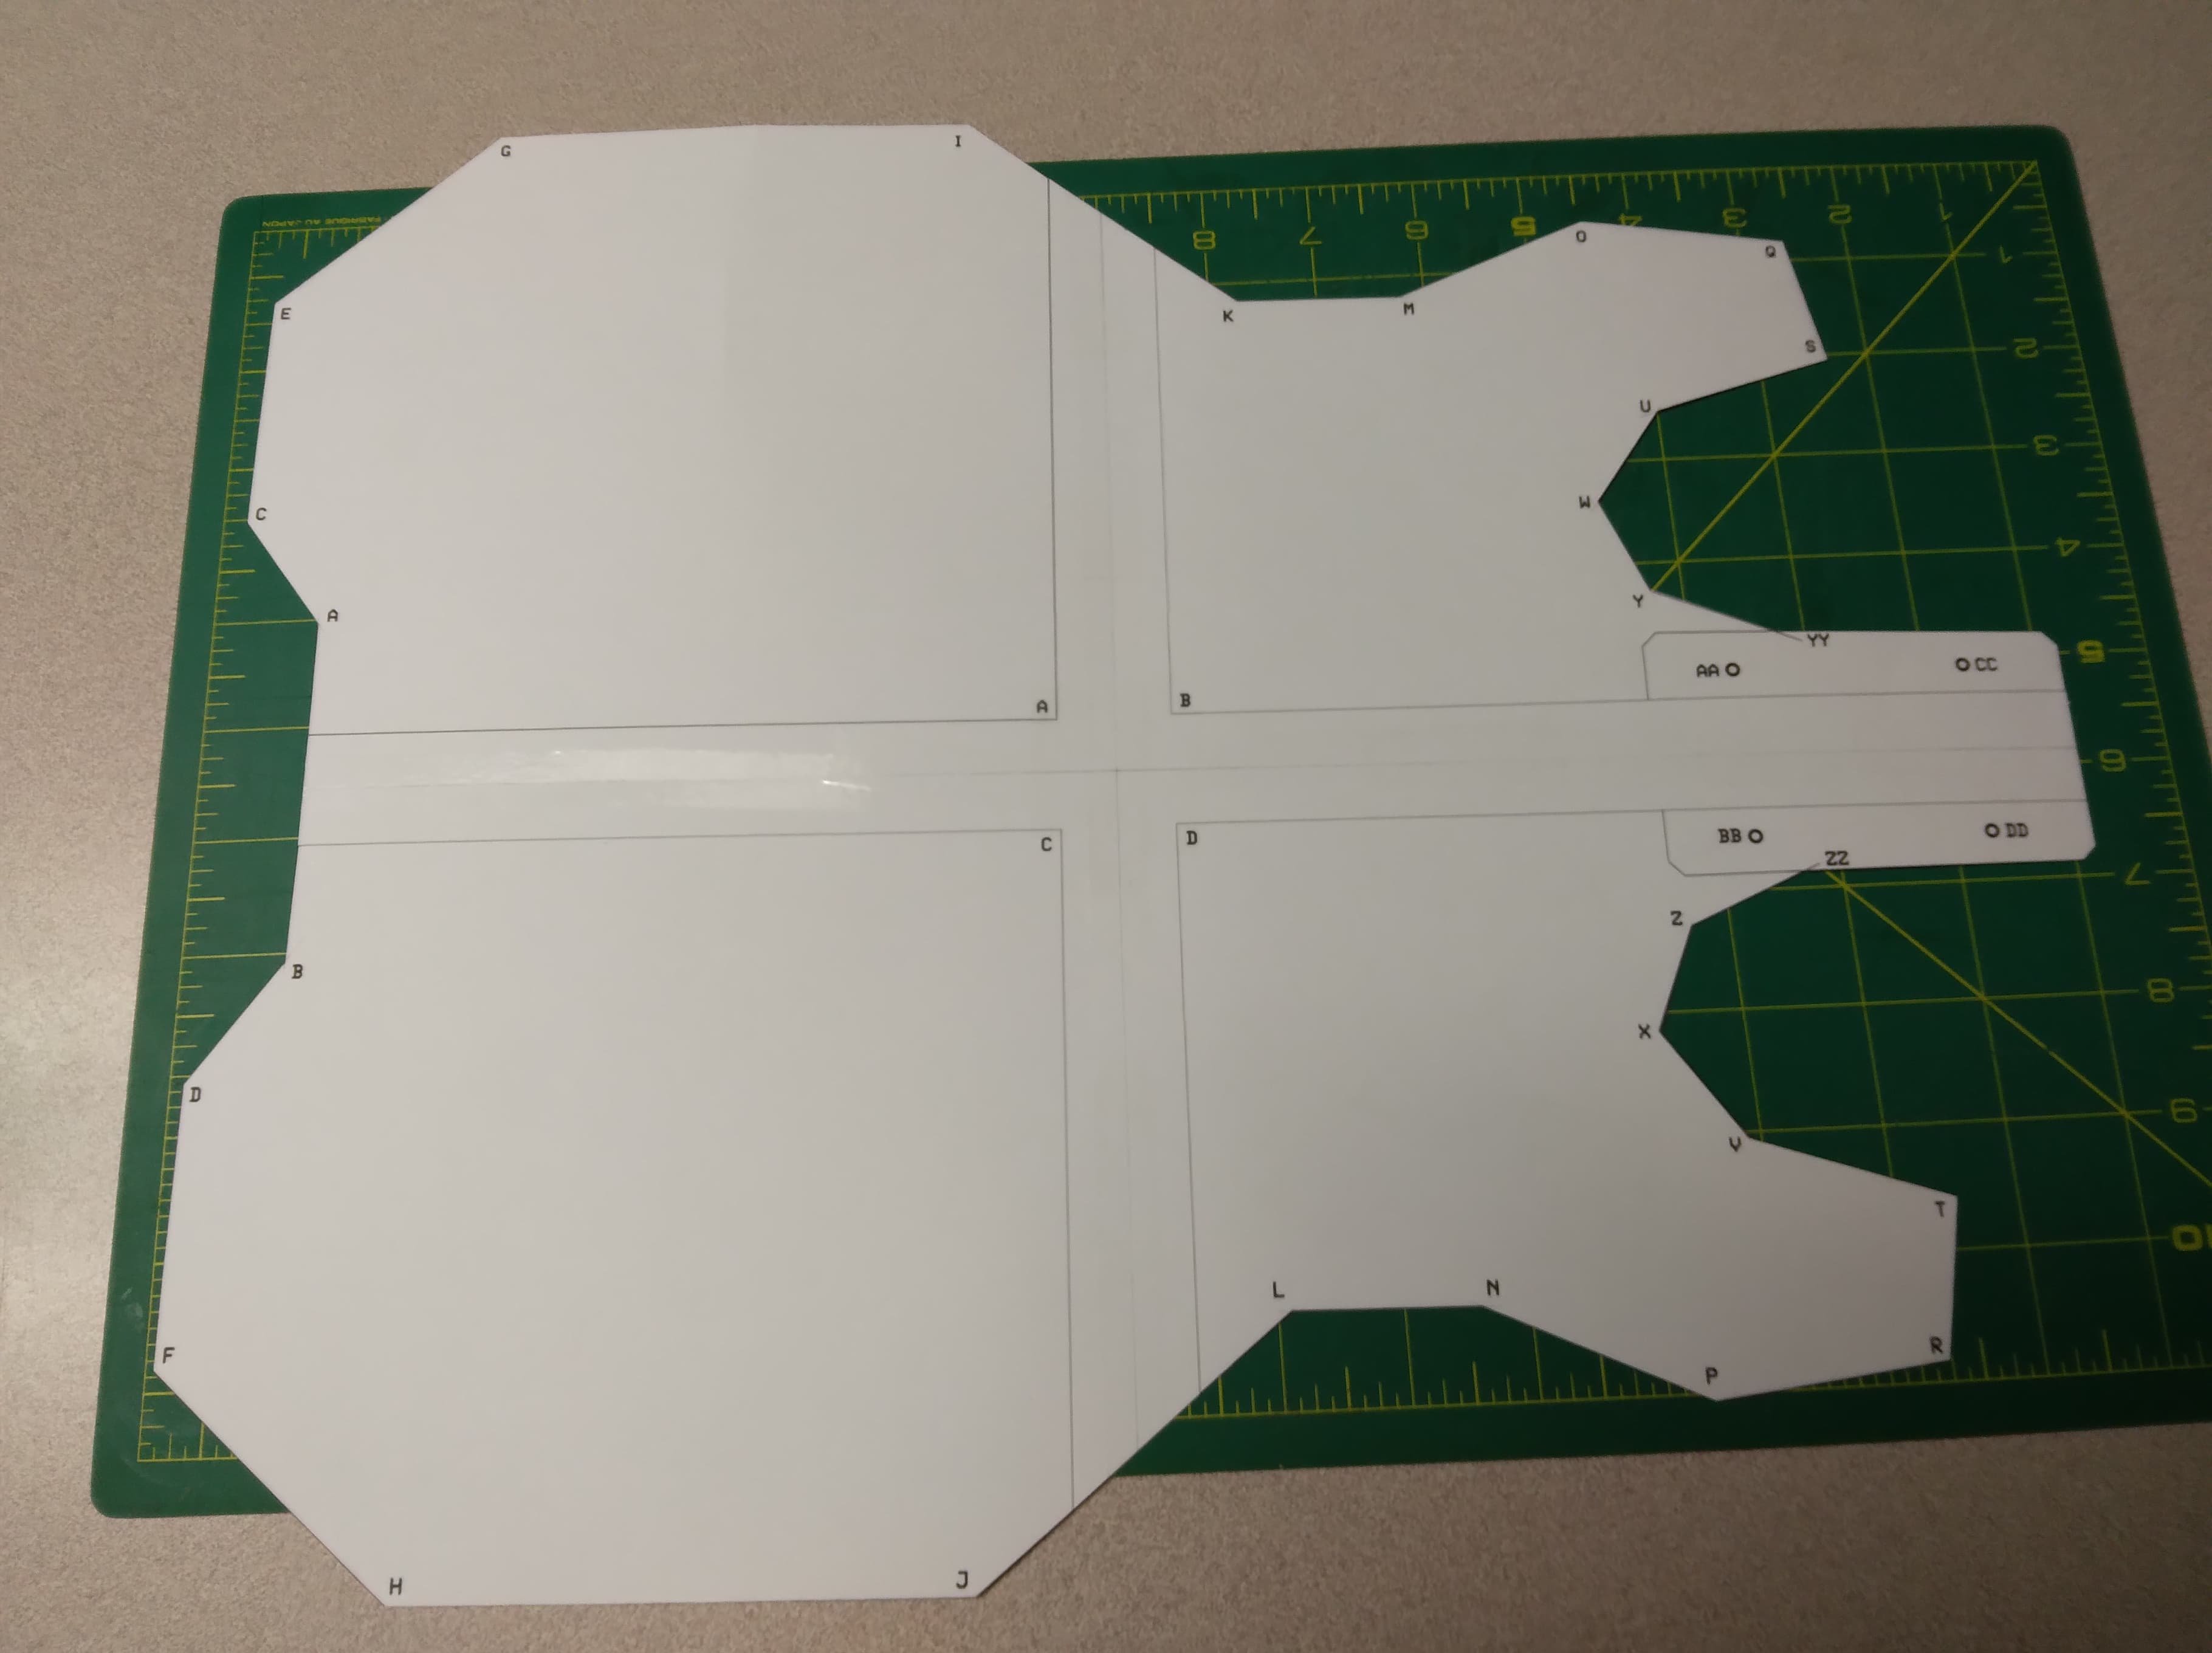
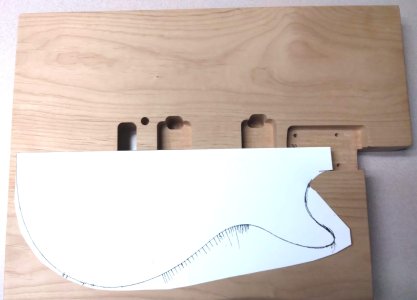
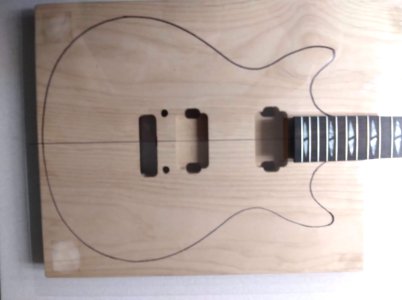
I ordered and recently received a routed body blank from Warmoth. I do have an 80s Carvin DC160 and traced that body onto some paper. It's not a perfect tracing but it doesn't need to be either, I'm not trying to make an exact copy anyway. I'll be making some minor changes to it but it is the basic style I'm looking for.

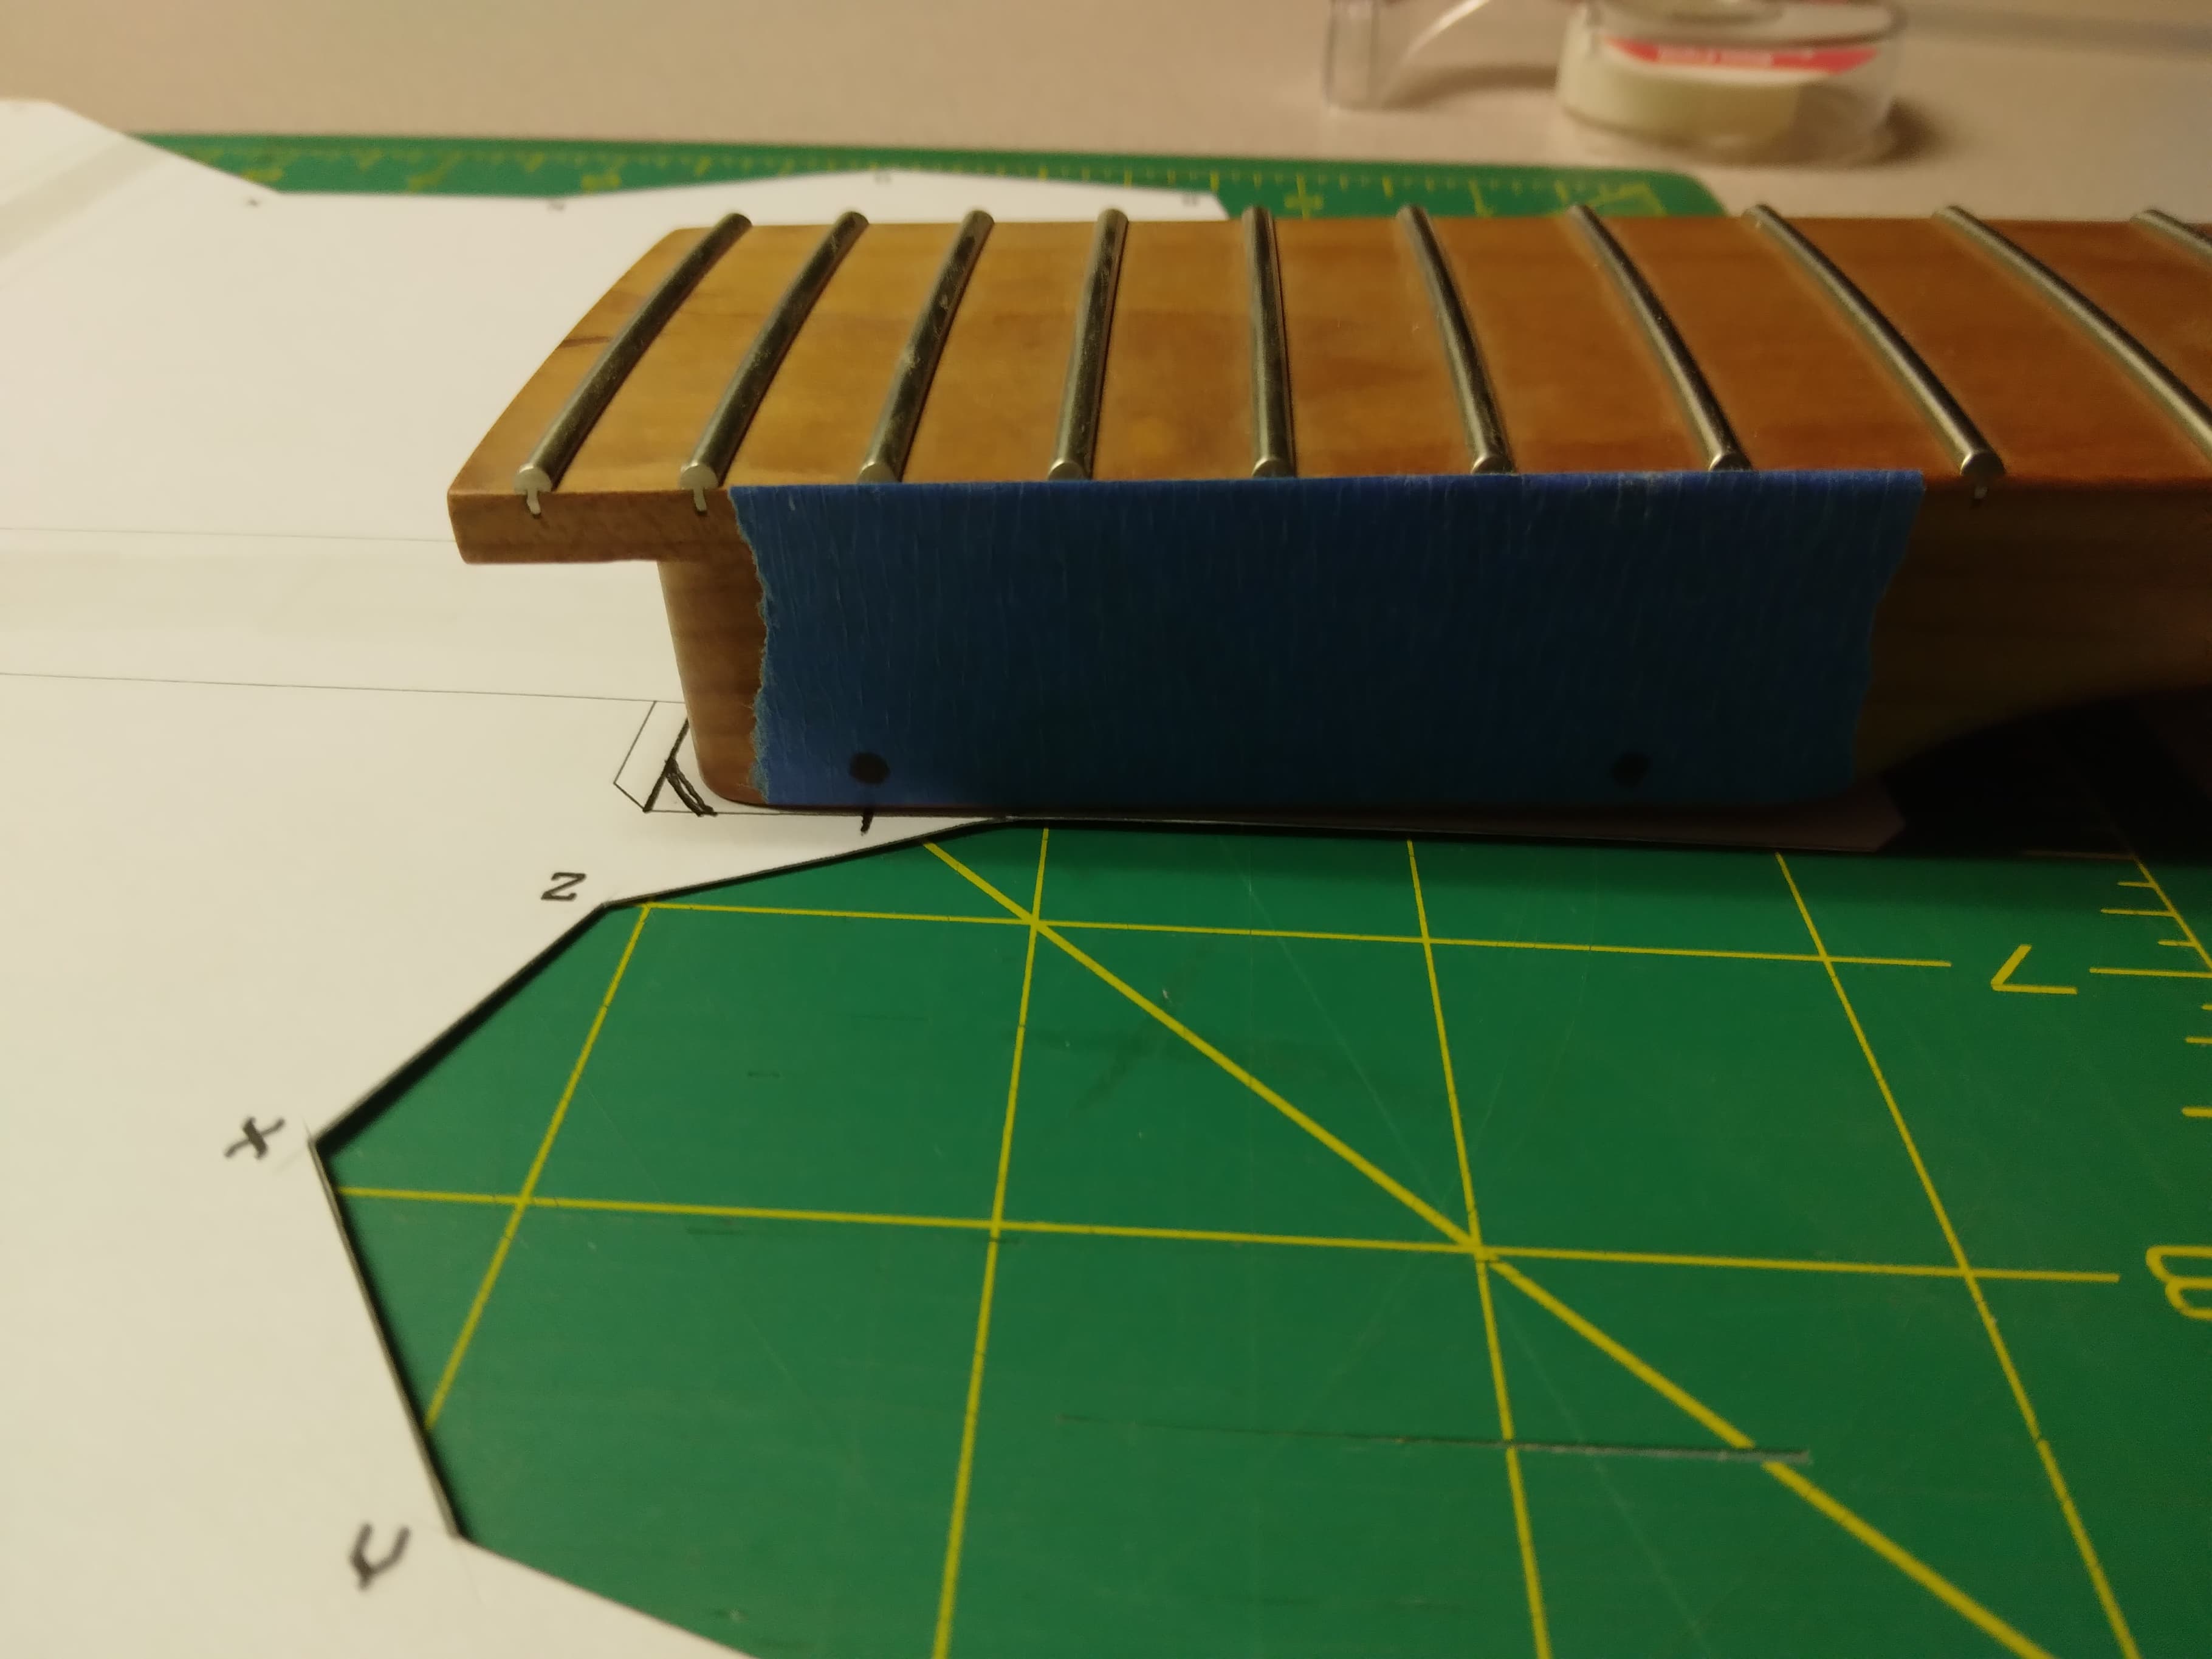
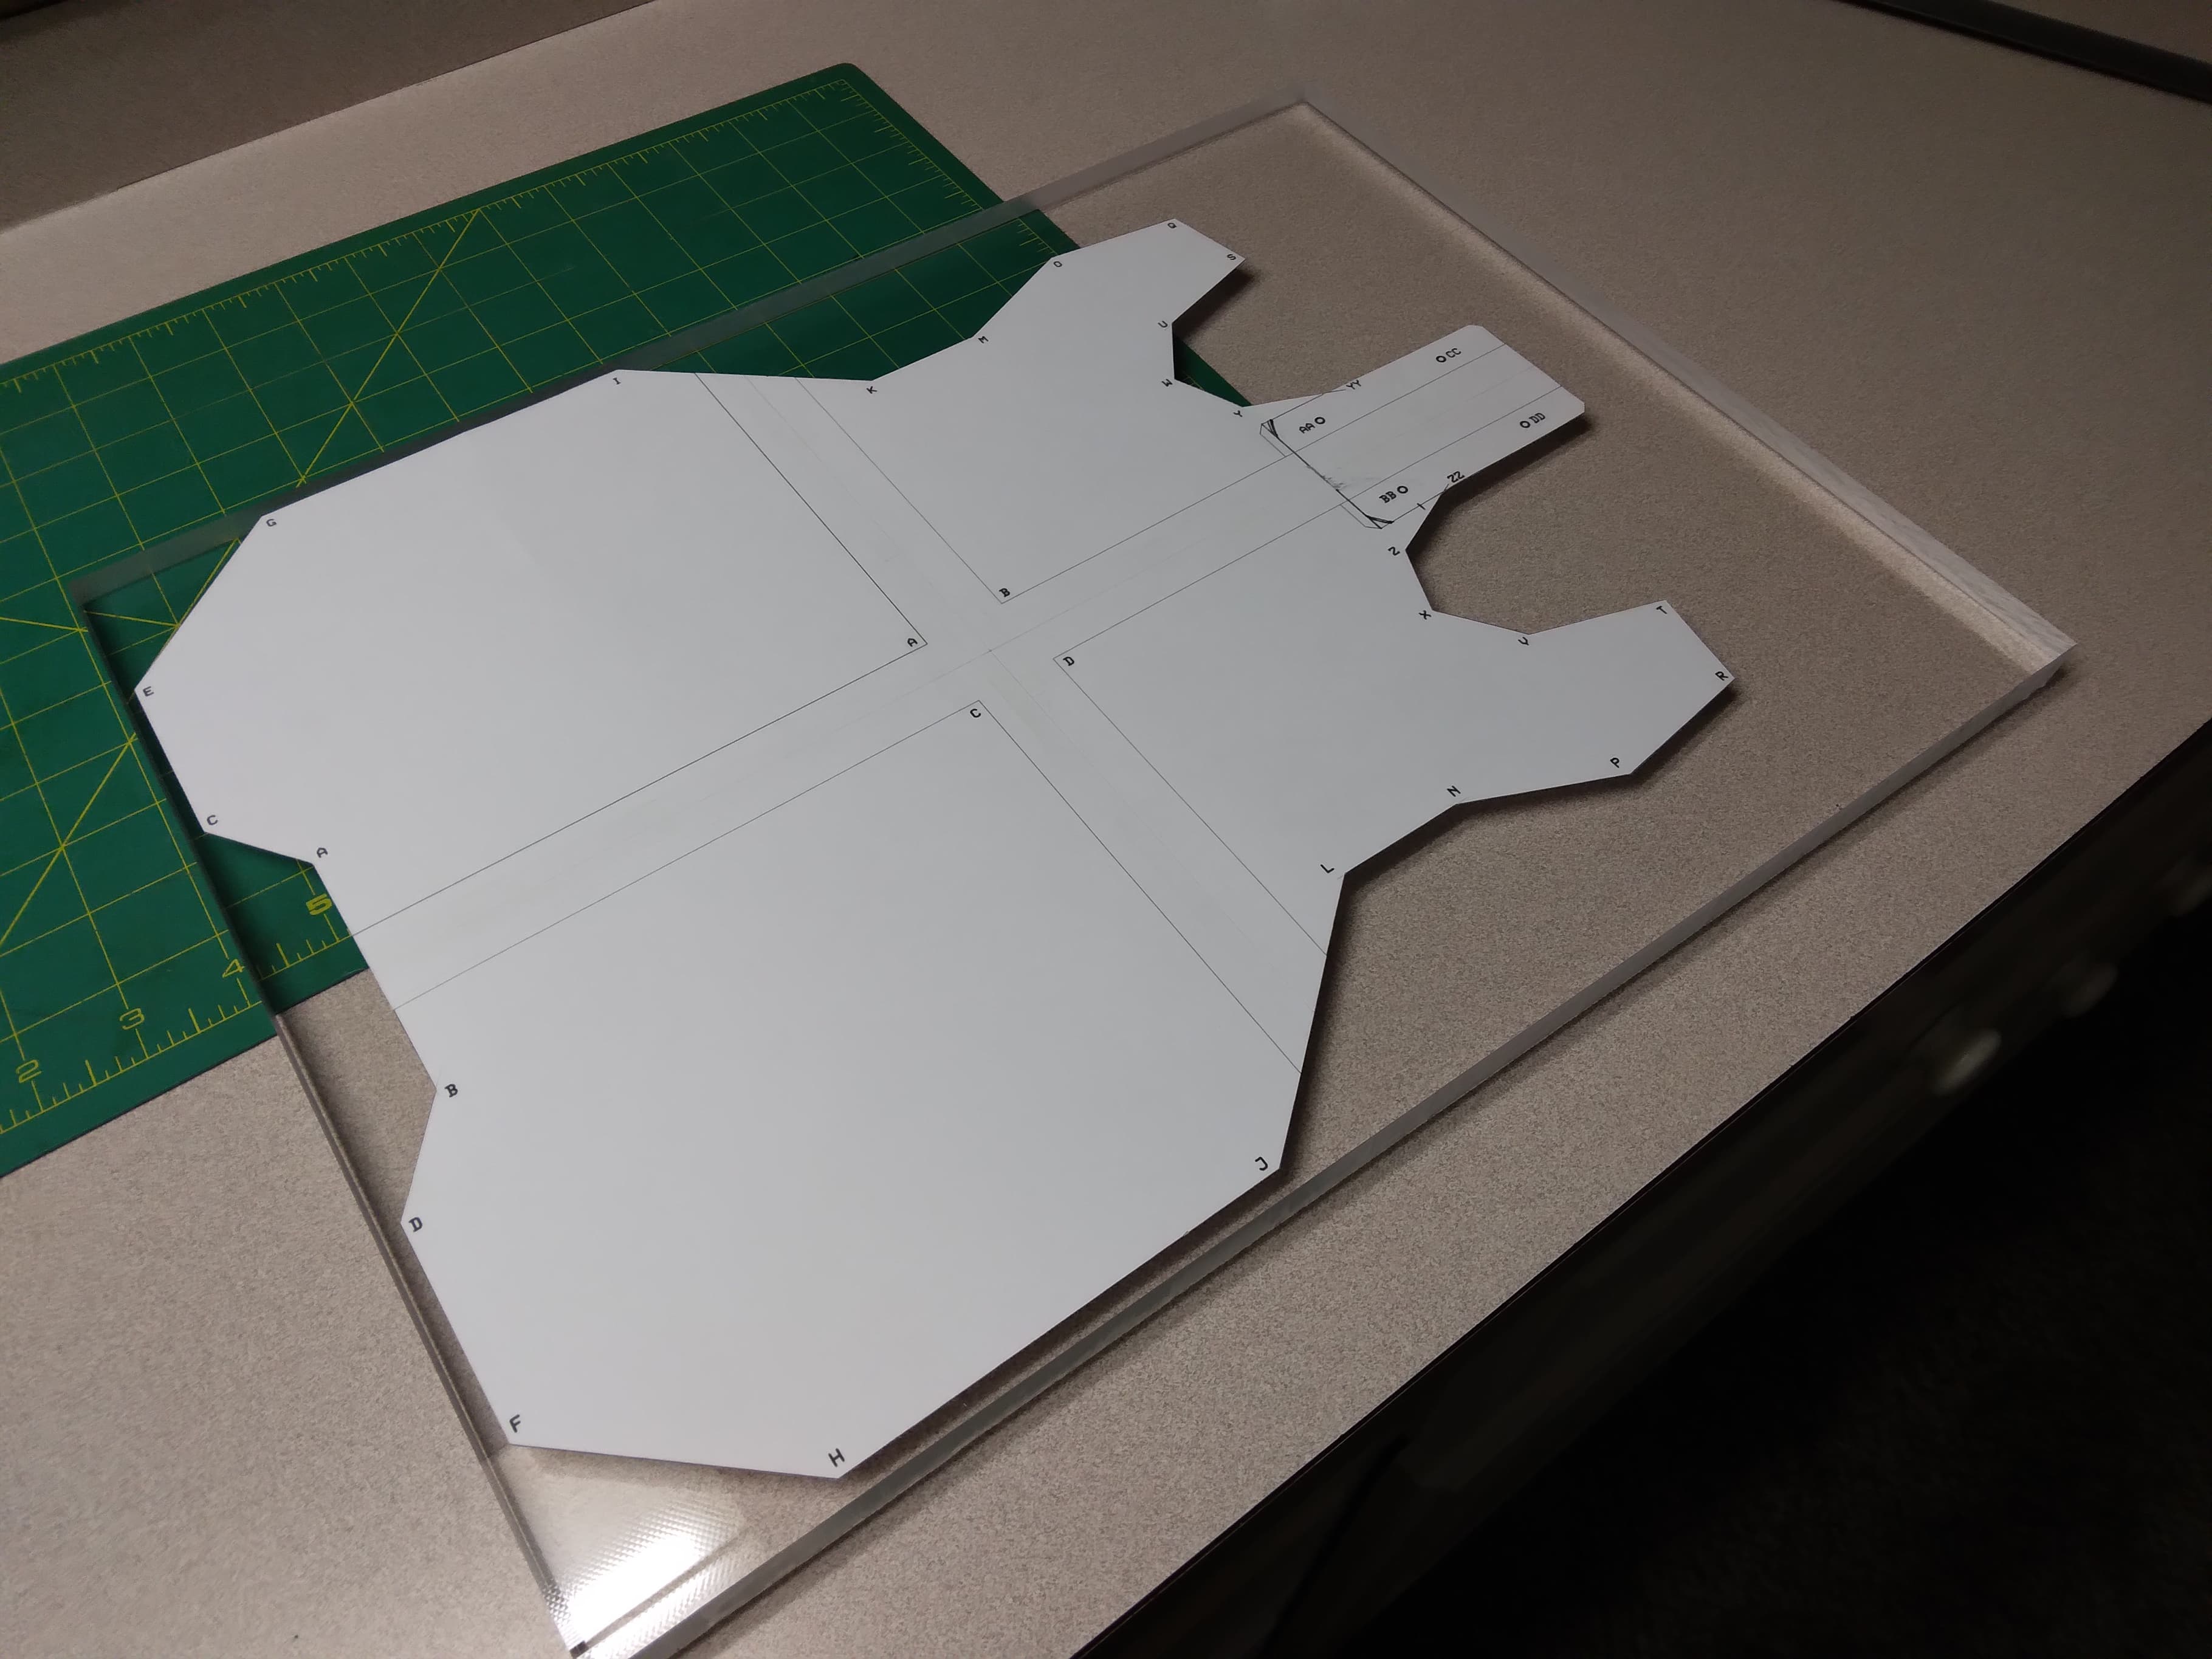
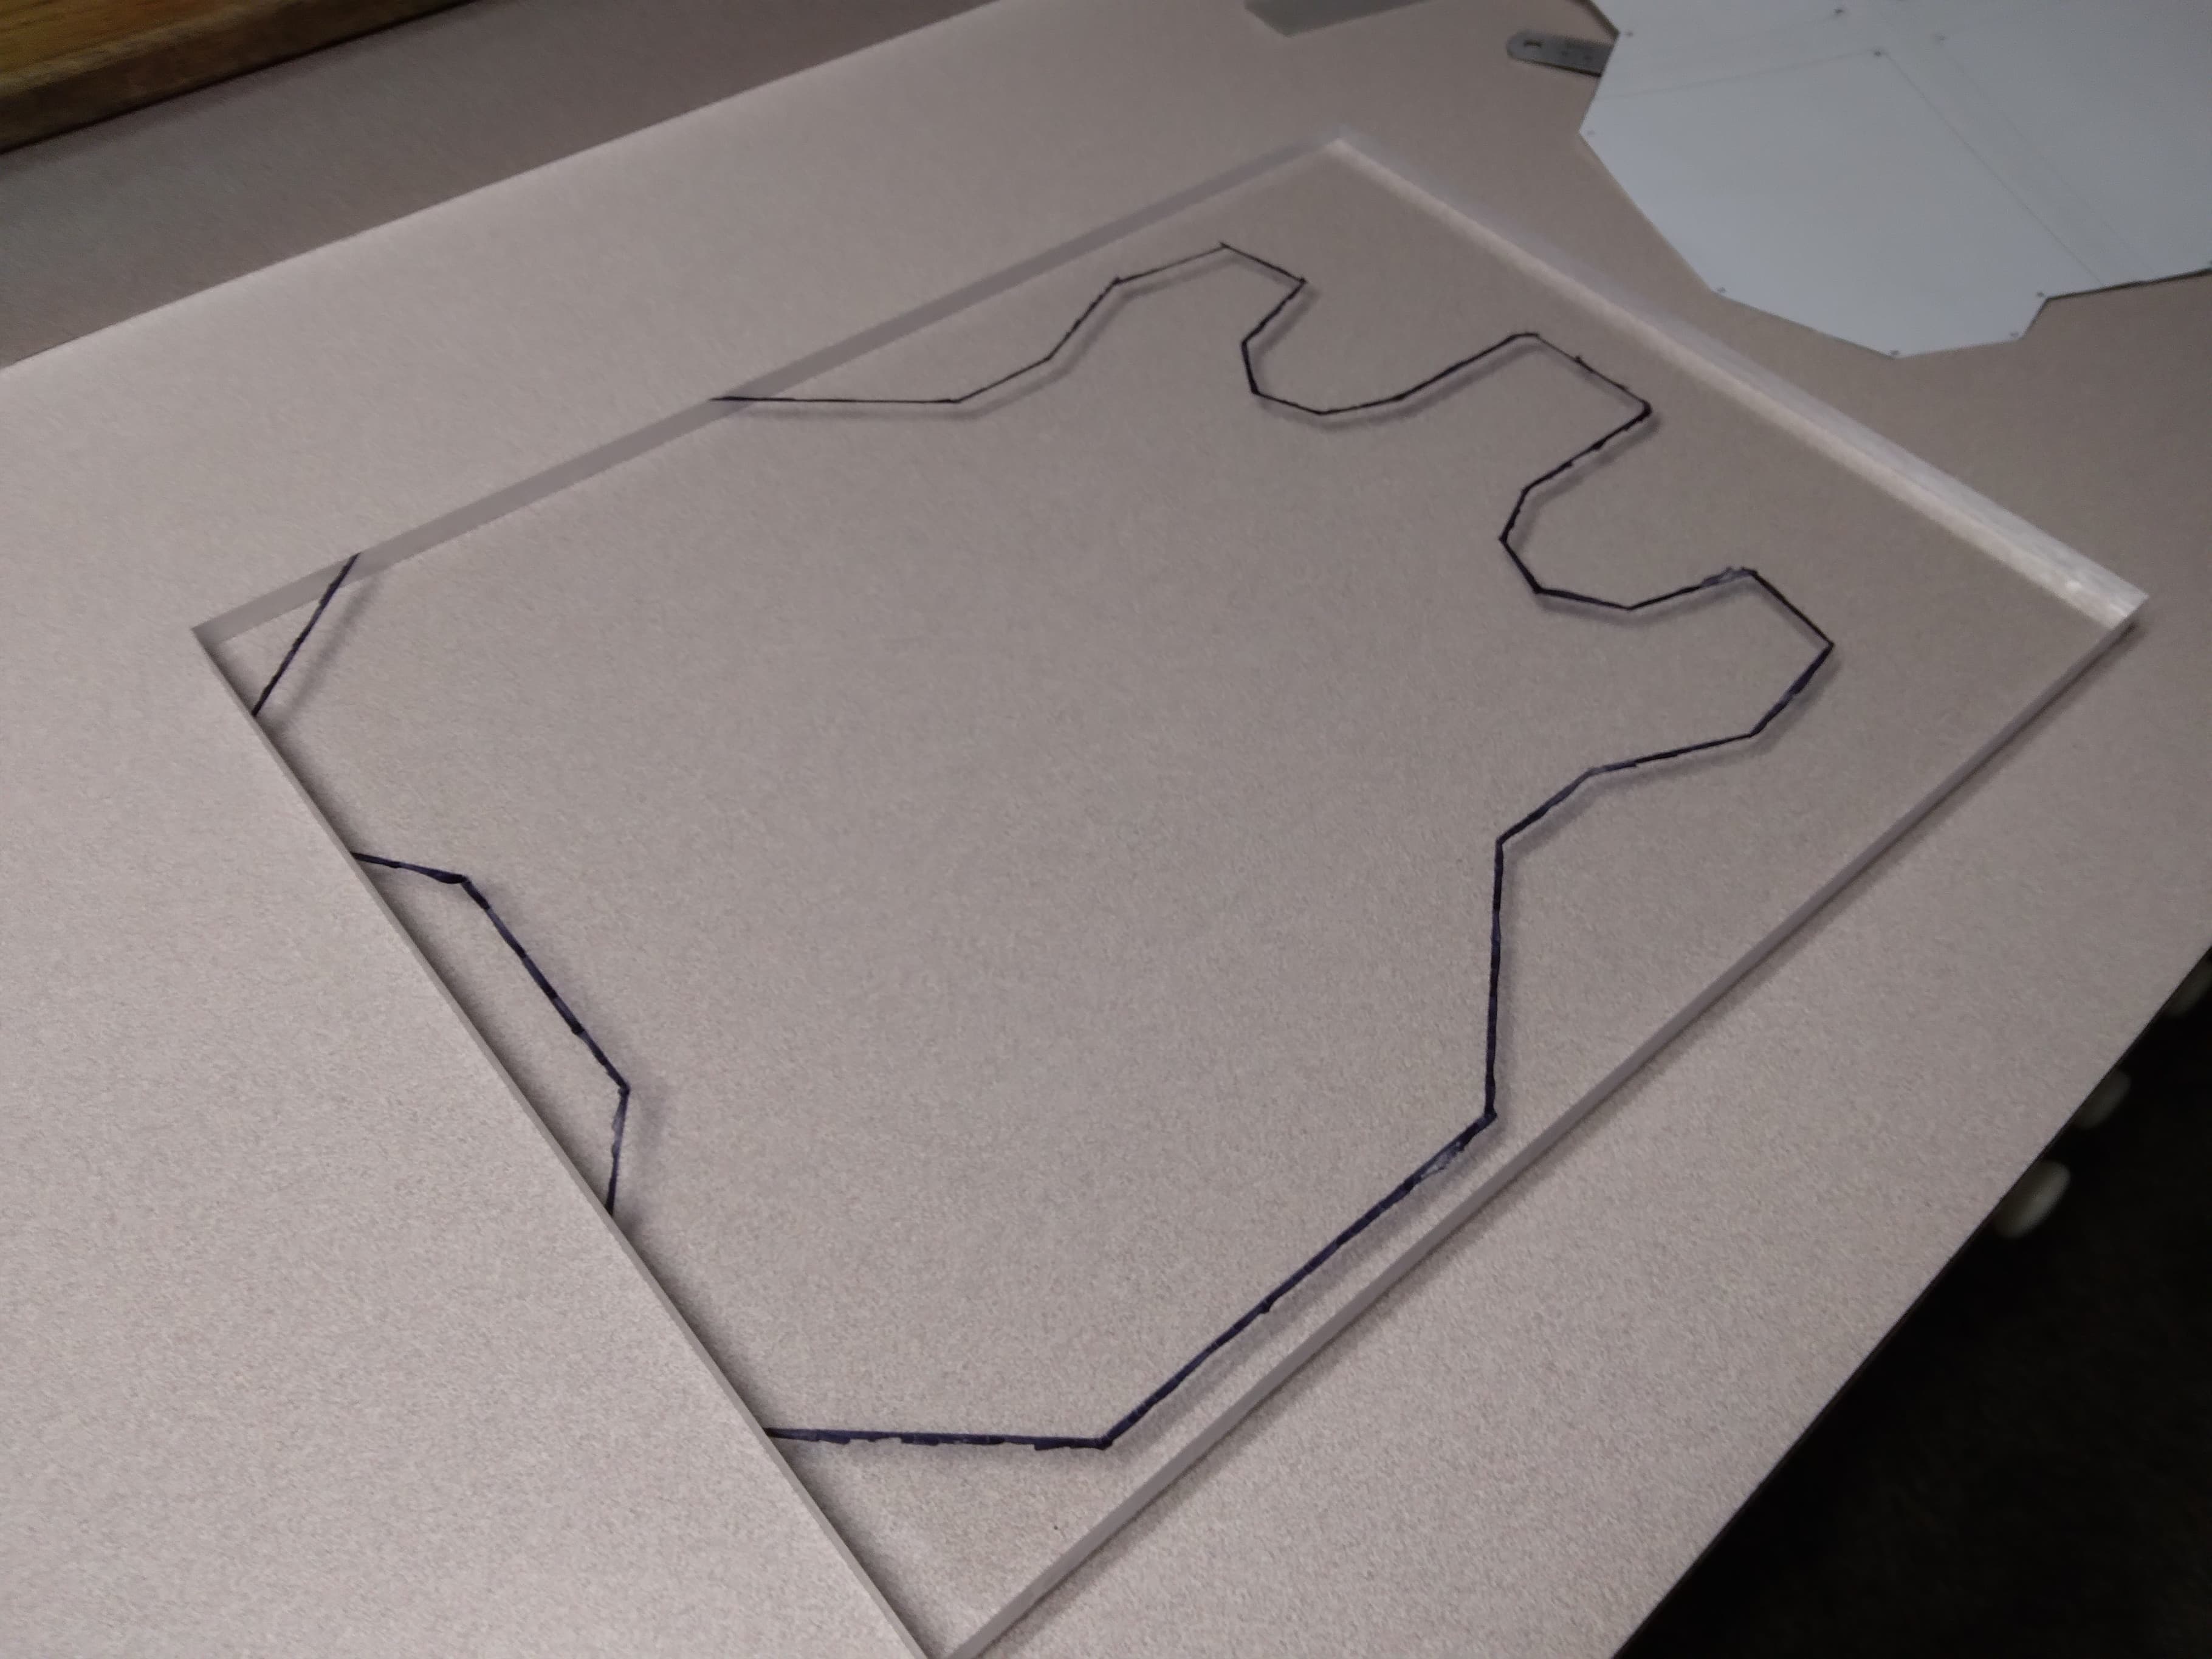
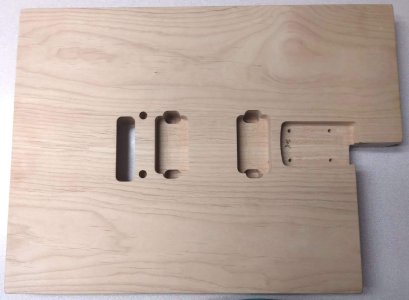
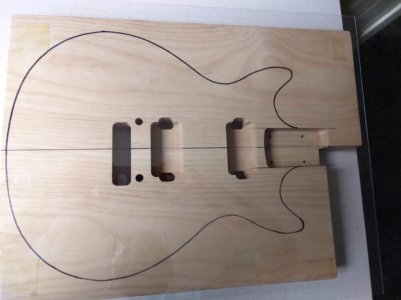
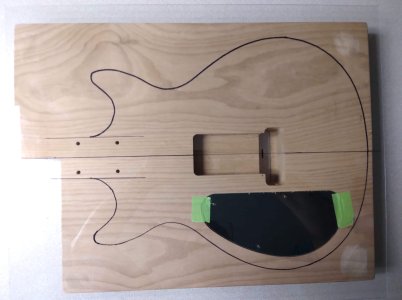
Since I've never cut a body shape before, this was my thinking. In order to create a body template and make sure it correctly fits the Warmoth neck I have on order (I have another Warmoth neck now that I can use to be sure), I thought it would be best to transfer the tracing onto a 0.1" thick acrylic sheet I can actually see through so I can adjust whatever is needed to be certain the template will be correct for the neck and lined up properly to the centerline by putting the acrylic tracing over top of the body and easily see the neck rout, etc. I will then cut out and sand the acrylic tracing carefully and use that as a template to make a 3/4" thick wood template for use to rout the body blank. I just want to be sure the template used to rout the body blank will be as correct as I can get for the neck pocket.

I've done some pattern shaping before with other projects including some pickguards and cavity covers along with other non-guitar projects so I'm quite familiar with that but have never done one as thick as a guitar body. I do have a small-ish router table I'll be using and will use several shallow passes to prevent problems as much as possible. I don't have a band saw though, so once I get the wood template made and transferred to the body blank I figured I'd use my drill press to drill a series of holes around the pattern to remove the excess wood and my spindle sander to smooth out the nubs and get somewhat close to the pattern so routing doesn't need to remove that much material.

If anyone has any tips in that area I'd be glad to read them! I'll try to take some photos as I go so you can see the progress.

Thank for reading!
 
Sounds like an interesting project.

If you have a routed body blank from Warmoth, does it not already have a neck pocket routed?

Assuming the neck pocket is already routed you don't need a template with a neck pocket rout included you only need something for the outline and possibly pickups. Unless you are talking about the edges of the neck pocket being flush with the sides of the neck with your shape being a double cutaway, but even then it is part of the outer shape.

A good jigsaw may also be an idea instead of a bandsaw as long as it has a good depth of cut and can cut fairly perpendicular.
 
The body blank has all routes done except the shape - neck pocket, humbuckers, trem, cavity (no controls drilled).

The template I'm making will extend beyond the neck pocket and, as you described, will not include anything for the neck pocket but will include the outline of the body shape. In those terms I think we're both on the same page. My plan is to start the curve for the horns at about the halfway point of the neck pocket.

Unfortunately, I don't have a jigsaw either. Drilling holes will work, it will simply take a bit more time, and I have plenty of that!
 
I will be taking some, yes. At the moment I have only traced the guitar shape and cut the tracing in half on the centerline.

I'm only using half the tracing since it's symmetrical, plus it will help me to get it properly positioned to the neck pocket more easily being able to adjust each half of the body at the pocket in case the full tracing was too narrow or wide to fit the pocket. Just a little trick I learned with a previous pattern project. By cutting the tracing in half and using each half separately there's no need to change the tracing because it is too narrow or wide, just move the tracing to where the edge of the neck pocket is. Of course, that wouldn't work if the neck pocket still needed to be routed, but in this case it works wonderfully, and would even work with an asymmetrical body tracing.

[EDIT]
I won't be cutting the actual acrylic template until I finalize the body design though. Once it's drawn on the acrylic I might make one or two personal preference changes, such as a small "dent" on the rear end or the body (strap button area) or slight changes to the horns.
[/EDIT]
 
It seems you are heading in the right sort of direction with the tools and time you have available. Look forward to seeing the progress.
 
Ok, finally got started on the project. Ran into a snag but I'll get it figured out.

Attached are images of the routed body blank as I received it, another showing the half tracing, and the full outline on the front and back of the body blank. Those looked pretty good until I put a neck on top of the body.

The neck used in that photo (a little blurry, sorry) is a 7/8 24-fret neck, not a 22-fret Gibson conversion neck that will ultimately be used so disregard the last fret which overhangs the end of the neck heel. However, it does show that the 23rd fret (which would be the 22nd on the Gibson conversion) is too far into the body to be easily reached, especially for my short fingers, so that has to be corrected somehow. I can't simply move the tracing further back because it's already at the end of the body blank. I'm going to have to modify the tracing to fit it better. I've got a few ideas though, shouldn't be that difficult.

That's where I'm at right now. I'm hoping to get some more work done on it yet in these wee hours though.
 

Attachments

  • raw_body_front.jpg
    raw_body_front.jpg
    294.7 KB · Views: 8
  • raw_body_back.jpg
    raw_body_back.jpg
    138.7 KB · Views: 4
  • body_with_tracing_paper.jpg
    body_with_tracing_paper.jpg
    207.9 KB · Views: 4
  • body_outline_1_front.jpg
    body_outline_1_front.jpg
    194.4 KB · Views: 4
  • body_outline_1_back.jpg
    body_outline_1_back.jpg
    227.5 KB · Views: 5
  • body_outline_1_front_with_neck.jpg
    body_outline_1_front_with_neck.jpg
    175.1 KB · Views: 11
Ok, that didn't take long. This version is much better where the neck is concerned. Only the outline from between the pickups forward toward the neck was changed. It looks largely the same but has been shortened in length by about an inch.

Next up: Finalize the outline (I may make a change or two style-wise), cut it out and sand it smoothly to the final shape.

Going well I think. :) Feeling good about it anyway.
 

Attachments

  • body_outline_2_front_with_neck.jpg
    body_outline_2_front_with_neck.jpg
    395.5 KB · Views: 13
Well, the first one failed - basically screwed it up. But it's all good as I learned a lot ... and I decided to change it up as well. So ... I ordered another routed body blank for "Project Part 2."

As far as the design goes, I decided I already have a symmetrical guitar like the design I was working on before (a Carvin DC160) and didn't want to try copying it after all. I also have Strat, LP and Wolfgang style guitars. So I decided I wanted something "different," and keeping in mind that I prefer the look of a symmetrical body shape, I finally came up with a body style that's both different and I think somewhat unique. It's not going to be for everyone, of course, but of all the different styles I played around with, this one grew on me and I came to like it a lot.

I'm calling it the "Geosymmetrical" project now. Here's the basic look:

outline.png


To create the design I used a program I have for laying out printed circuit boards, taking advantage of its silkscreen layer abilities. After creating the basic design in a 14" x 18" sized PCB I then broke it up into four quadrants that would print on standard 8.8x11 card stock.

Anyway, it worked very well once the four quadrants were printed:

layout_quads.jpg


... and taped together:

layout_quads_taped.jpg


Once cut out using a straight edge and finger knife:

layout_cutout.jpg


... it was much easier to see what it might really look like.

The next thing to do was check the cutout against the neck itself to be sure the heel was the correct width at the position on the design:

layout_neck_check.jpg


... which came out just about perfect. I had taken very careful measurements of the neck pocket on the first body blank. Surprisingly, the screw holes in the body blank are not "centered" in the pocket, they are ever so slightly offset so I had to adjust the symmetrical layout to compensate for that. It was actually part of the issue with the first body as I made the assumption the holes were indeed centered and it didn't work quite right. That's ok though, because after I had received the first body I realized I had ordered pickup routs that use pickup rings and I overlooked that when ordering. The replacement body blank has the wood-mount pickup routs so that worked out in the end.

As for making the template, I ordered an 18x24" piece of 3/4" cell-cast acrylic. Here's the template blank cut from the full piece:

layout_acrylic_predraw.jpg


Then I needed only to transfer the layout into the acrylic template material:

layout_acrylic_drawn.jpg


As you can see I used two of the factory machine-cut edges for part of the layout. Those cuts are perfectly straight and smooth so there is no need to rout those lines.

That's where I finally quit for the night. I hope get to more of it done this weekend.

More to come!
 
It looks like you're doing a good job. One concern I have is that all the upper fret access and symmetrical shape does reduce the stiffness of the neck-body assembly. For example, Teles and Strats have one side of the neck pocket pretty well supported by a lot of body wood. An SG has the neck glued in so it effectively becomes part of the body, rather than a neck screwed to a 1/2 thickness piece of the body.
 
I thought about that and used my nephew's Epi SG Special as a guide. It has a bolt-on neck and there is as much body material in my design as there is on the SG. The thickness of the neck heel on the SG is about 5/8", if I remember right. I'll be thinning mine to about 3/4". I believe it will be fine. If there are any issues i can always make another one with an even thicker neck heel. I'm actually enjoying this, and at my age I have to have something to keep me busy, you know? :)
 
Back
Top