Leaderboard

Roasted Swamp Ash body blank project

It was a productive day...

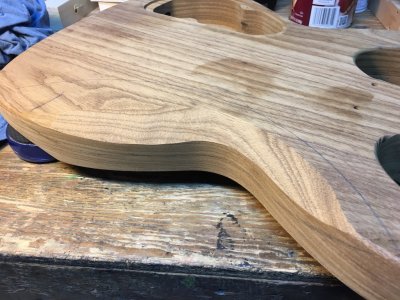
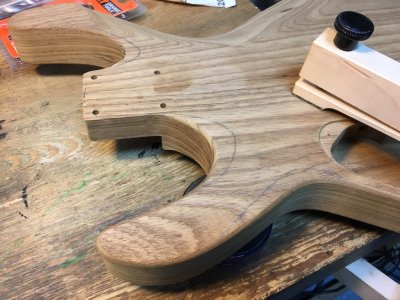
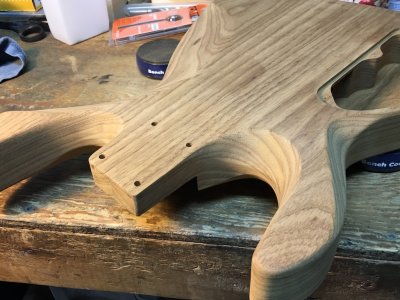
I roughed out the belly cut on the ever present spindle sander (that thing was worth every penny) and a 60 grit drum to speed the material removal. I penciled in the overall shape I wanted, but tried it on for size as I went along.

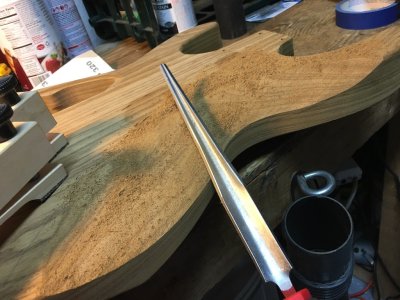
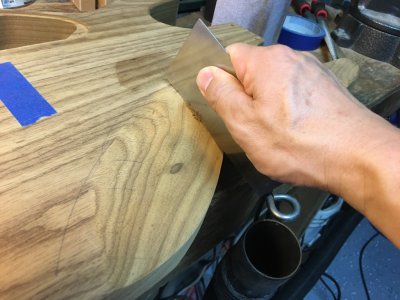
The spindle sander left me with some wavy contours, so I used a half round razor file to even those out and flow the cut into the rest of the body contours. A cabinet scraper was money for making the belly cut actually flat in cross section, as block sanding only got me so far so fast.

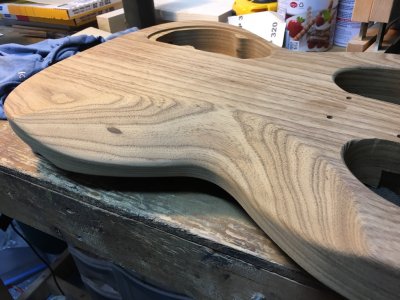
Some 220 grit on the spindle sander's 3" drum - removed from the sander and used as a sanding block/mandrel - as well as free hand sanding got all the contours blended in.

I am really pleased with how the body looks and feels. This has been a great learning process thus far.
 

Attachments

  • 2018-03-28 17.29.12-1.jpg
    2018-03-28 17.29.12-1.jpg
    307.8 KB · Views: 15
  • 2018-03-28 17.49.44-1.jpg
    2018-03-28 17.49.44-1.jpg
    254.8 KB · Views: 15
  • 2018-03-28 21.11.30-1.jpg
    2018-03-28 21.11.30-1.jpg
    216.2 KB · Views: 16
  • 2018-03-28 21.31.18-1.jpg
    2018-03-28 21.31.18-1.jpg
    265.4 KB · Views: 22
Front and back both look great. I wouldn't have thought of scooping the front but it looks like it could be nice.
 
So awesome.  I love the effect hand filing does.  Takes  forever but well worth the time, and for those without expensive CNC tools, the only way to do it!

 
DMRACO said:
So awesome.  I love the effect hand filing does.  Takes  forever but well worth the time, and for those without expensive CNC tools, the only way to do it!

Unless you use an angle grinder or some such device.
 
stratamania said:
DMRACO said:
So awesome.  I love the effect hand filing does.  Takes  forever but well worth the time, and for those without expensive CNC tools, the only way to do it!

Unless you use an angle grinder or some such device.

When I was doing my guitar I watched a guy on YouTube do it that way.  Turned out great.  I have one and used it for metal, but it scares are almost as much as my router (other thread>> :laughing3:).
I thought about it but because my body was made of three different woods with massive difference in degree of hardness....I thought it was a recipe for disaster.

Besides...nothing is better than a hunk of wood, beers, a 75 degree day, and some bonehead files!

Madness starts around 4:30
[youtube]C1orfhZJO_g[/youtube]
 
I roughed in the comfort contours on my Telerauder with a peanut grinder, too. It doesn't cut fast enough to get away from you, as long as you have the body clamped down firmly. You still need to finish it up with files and sandpaper.
 
My pic sequence might have been a touch misleading - I roughed out about 80% of the belly cut on the spindle sander (ie. more roughing out happened between Pic 1 & 2). I have no emotional attachment to doing stuff exclusively by hand, I have enough injuries that I'd be all for more machine work where I could pull it off.

The angle grinder looks intriguing, not sure if it would have other uses other than the belly cut. Do I need one? It looks terrifyingly destructive....

What does interest me is the hand held belt sander. Check out how Simon Padalka does the contours and belly cut on this build. The video link is supposed to be cued, but skip to 5:55:
[youtube]https://youtu.be/OgvWTZCrXYM?t=5m55s[/youtube]

Making the relief cuts free hand seems like it'd take some practice before I'd try that on an actual guitar.
 
I'm kinda surprised he got away with using the portable belt sander that way. They have a hard, flat bottom, so they're not designed to contour inside curves like that. Also, some of the finer edge contours seemed bit risky to use that tool on as well. Those things can take off a helluva lotta wood in a hurry. It would be too easy to go too far on a small dimension. But, apparently, he has a lotta time on the thing.
 
The only side panel jack that I've used that is remotely reliable is the one from EMG, and even that is flawed.

I opt for the Planet Waves sidejack whenever size permits.
 
H108P said:
The angle grinder looks intriguing, not sure if it would have other uses other than the belly cut. Do I need one? It looks terrifyingly destructive....
I'd be more nervous with that belt sander. I was going to do mine with one but it didn't work when I plugged it in. Saved by that one...

As to what else would you need a peanut grinder for, I use mine for loads of things. For one, I'm making a control plate out of stainless right now and for that, the peanut grinder is indispensable. It's one of those tools that once you have one, you find many uses for it, not just guitar work.
 
Did some more work around the neck access on the horns, as well as adding a contour on the back side of the leg rest. I like how the contour on the back side of the leg rest came out. I also planed down the neck joint at an angle to approximate the Warmoth contoured neck heel. Need to finish that, hopefully tomorrow.
 

Attachments

  • 2018-03-31 12.00.26-1.jpg
    2018-03-31 12.00.26-1.jpg
    286.1 KB · Views: 16
  • 2018-03-31 14.26.23-1.jpg
    2018-03-31 14.26.23-1.jpg
    279.4 KB · Views: 20
Nice work! That's gonna be a comfy guitar to play!

I like the idea of a leg rest contour, and I'm sure it's more comfortable to start with, but I wonder how that's going to feel during long sessions? Making the contact area with the leg smaller has the effect of increasing the weight per inch2. Might not be enough to make a difference, but I'll be interested to hear how that works out in the long run.
 
Really impressive contours! Nice work. Keep them pix coming!  :icon_thumright:

Cagey said:
I like the idea of a leg rest contour, and I'm sure it's more comfortable to start with, but I wonder how that's going to feel during long sessions?
I have a question about the leg contour too, but for a different reason. I'm wondering how that reduced inner edge will effect stability on the thigh. I have an Ovation acoustic, and the rounded inner edge made it slide around on my leg to the point where I had to put a piece of self adhesive cork on it to keep it from sliding off. I realize the Ovation is lighter and significantly wider than a Strat/Soloist solid body, and the rear curvature of the Lyrachord back tends to thrust it away from the body, but I also feel that if the inner edge was not so radiused, it wouldn't need the cork.
 
BigSteve22 said:
Really impressive contours! Nice work. Keep them pix coming!  :icon_thumright:

Cagey said:
I like the idea of a leg rest contour, and I'm sure it's more comfortable to start with, but I wonder how that's going to feel during long sessions?
I have a question about the leg contour too, but for a different reason. I'm wondering how that reduced inner edge will effect stability on the thigh. I have an Ovation acoustic, and the rounded inner edge made it slide around on my leg to the point where I had to put a piece of self adhesive cork on it to keep it from sliding off. I realize the Ovation is lighter and significantly wider than a Strat/Soloist solid body, and the rear curvature of the Lyrachord back tends to thrust it away from the body, but I also feel that if the inner edge was not so radiused, it wouldn't need the cork.

I stuck a scrap neck on it just to test out the two questions:
1) The thinner cross section is still wider than a Gibson SG or a Ibanez Saber/S Series and it's made of swamp ash so it's very light anyway. If this was a solid walnut Explorer body then I'd probably rethink thinning down the outside edges.
2) I always hated how my Ovation sat on my leg, I ended up selling it after suffering with the slippery bowl for 20 years. When trying this body alone it did indeed slide on my leg if I rested it on my left leg (classical style), but not when on my right leg. With a neck on it, the contoured leg rest did not behave any differently than a normal Soloist. Good question though!
 
Good points on the cross-section, and in retrospect I played a Mahogany Melody Maker for a lotta years so I know you're right - nothing to worry about.

bcaf941afda1d82c2aee164f2d5acd55.jpg

Never mind!
 
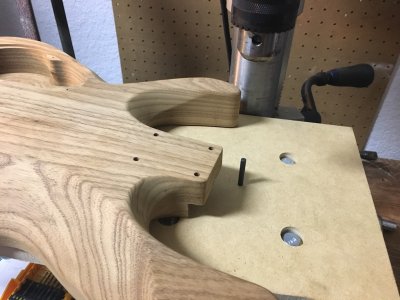
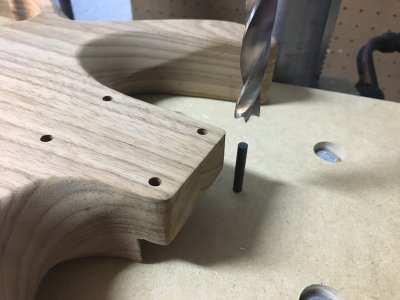
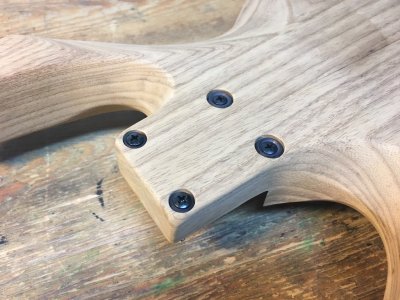
Finished up the neck joint. I had previously planed the block joint down at an angle, similar to the Warmoth contoured neck joint. I wanted to go with bushings instead of a neck plate, so I made a locating fixture in order to drill the concentric countersink holes. I cut a piece of MDF to extend the table on my bench top drill press, bolted it in place, set the table height and locked it all down. I drilled through the MDF with a 3/16" drill bit and then pushed the bit into the hole, leaving it sticking out as an index pin.

I then placed each neck screw hole on the index pin and drilled the necessary counterbore. I eyeballed the counterbore depth after having test drilled a few on a piece of scrap. A little bit of recontouring and the neck joint is ready to go. I just got the notice from Warmoth that my neck has shipped and will be here Friday. Very stoked to see it on this body!

I still need to get the holes for the bridge, pickups, and pots done, but so far am very pleased with how this has come together.
 

Attachments

  • 2018-04-01 18.16.05-1.jpg
    2018-04-01 18.16.05-1.jpg
    192.5 KB · Views: 18
  • 2018-04-01 18.17.11-1.jpg
    2018-04-01 18.17.11-1.jpg
    168.9 KB · Views: 13
  • 2018-04-01 18.49.13-1.jpg
    2018-04-01 18.49.13-1.jpg
    259.7 KB · Views: 22
I like the look of bushings vs. a plate.

That's a good way to keep things centered up. The same thing works well for drilling string-thru holes and ferrule relief for Teles and such, rather than trying to make it through the whole body in one pass.
 
Back
Top