

You are using an out of date browser. It may not display this or other websites correctly.
You should upgrade or use an alternative browser.
You should upgrade or use an alternative browser.
Refinishing a damaged Koa / Mahogany Soloist with Tru-Oil (by a beginner)
- Thread starter Dazkeirle
- Start date
Dazkeirle
Junior Member
- Messages
- 192
PhilHill said:Very nice job on the veneer. This is coming along quite well. :icon_thumright: :icon_thumright:
Cheers Phil
docteurseb
Hero Member
- Messages
- 774
I'll second that, really great matching and as perfect as you're going to get it.
I wouldn't have the patience to do the refinishing you're doing so I'm enjoying this build even more.
I wouldn't have the patience to do the refinishing you're doing so I'm enjoying this build even more.
stratamania
Mythical Status
- Messages
- 12,417
More good progress.
I assume the 3d mounting for the tremolo recess takes into account also where the springs for the tremolo will need to go?
I assume the 3d mounting for the tremolo recess takes into account also where the springs for the tremolo will need to go?
Dazkeirle
Junior Member
- Messages
- 192
stratamania said:More good progress.
I assume the 3d mounting for the tremolo recess takes into account also where the springs for the tremolo will need to go?
Oh yes, absolutely. I actually kinda overengineered that bit by quite a bunch.
I used the schematics on the Schaller website to determine the full range the sureclaw would extend and made sure that the feet started after that, along with a little tolerance plus a little tolerance at the top of the cavity. The feet extend to literally within a fraction of a mm in the recess and stop dead where the cavity breaks down into the body itself, they do not overhang.
I measured the 1,3,5 spring positions on the Tremelo and the reference on the Sureclaw and placed the feet between these in the 2,4 positions (although the SC only allows 3 springs anyway).
And just in case, as I can make mistakes when designing in a frenzy, instead of using a fillet / chamfer to add strength to the feet where they meet the plate I actually have them meet at a 90 degree angle. This is a poor design move and makes them a bit weaker from side impact (not something I will have much of here, but just in case I coated those first initial few mm in super glue to effectively laminate the layers further), but should I need to remove one, it will snap clear off flush leaving a flat plate (with finished veneer) that I can then 3d print and affix a modified foot / feet should I need to.
My main concern was that at some point I may want a tremsetter so this way I can remove one foot for the tremsetter and then I guess create a new foot that straddles it or something... if that even matters / happens.
stratamania
Mythical Status
- Messages
- 12,417
Good job... :icon_thumright:
Dazkeirle
Junior Member
- Messages
- 192
Hey fellas,
So a little update today, last night I decided was time to finish off the veneers so I did exactly that.

Used the same process as with the tremelo cover. Lined up the grain best I could, used pencil to mark a straight edge, cut that. Glued the part and the veneer, waited 10 mins then pushed together.

Once set (applying force throughout that time), I went around the part roughly with my craft knife ( I just realised y'all probably call it an xacto), and then used a small needle nosed file to finish the edges.

This is easy around the outside. The only part which had any kind of challenge was the battery box switch plate as there is a small inset button holder. Once fully dried I made a small hole in the middle, used a reamer to take the hole up to within about 2mm of the edge but then very carefully used a half flat / half rounded file to very carefully clean the edge until it was flush with the plastic.

Throughout this I've realised that veneer of mahogany is actually quite brittle (I wasted a piece just handling it). Once glued to the part its a bit stronger but you still need to go careful when cutting / sanding. Work towards the part to avoid splintering bits off and, as I did, use a few coats of tru-oil just to harden it up a bit.
With all three parts complete, I'm not gonna lie I am super impressed with the outcome, and as I've now put a coat of tru-oil on the back and the parts I can see that we're gonna get a good colour match too. It's closer in person to the photos, but it'll get closer still. We're only on coat 1-2 of 30 odd and they started off entirely different in colour so I'm confident.
I'm just amazed I was able to get anywhere near a grain match too. This is £1 of random hog veneer from ebay. It has no connection at all to this 12 year old body from USA / Australia but somehow I was able to match up quite a bit of the pattern. I also think it just looks great without any screws etc.
I'm especially happy with this mini project because I followed no tutorials, I just used what I've learned and what I know to have a go. Everything except the kind of glue. I'm sure wood / gorilla glue would have worked but the cement is just the right tool for the job. Sorry for all the self praise but I'm used to things not going to plan (body arriving chipped, sanding back, white specks etc. so I'll take a win when I can).


Now I have these complete I can relax for a bit and start the fun job of getting oil onto both sides of the body while I acquire the remaining parts.
So a little update today, last night I decided was time to finish off the veneers so I did exactly that.
Used the same process as with the tremelo cover. Lined up the grain best I could, used pencil to mark a straight edge, cut that. Glued the part and the veneer, waited 10 mins then pushed together.
Once set (applying force throughout that time), I went around the part roughly with my craft knife ( I just realised y'all probably call it an xacto), and then used a small needle nosed file to finish the edges.
This is easy around the outside. The only part which had any kind of challenge was the battery box switch plate as there is a small inset button holder. Once fully dried I made a small hole in the middle, used a reamer to take the hole up to within about 2mm of the edge but then very carefully used a half flat / half rounded file to very carefully clean the edge until it was flush with the plastic.
Throughout this I've realised that veneer of mahogany is actually quite brittle (I wasted a piece just handling it). Once glued to the part its a bit stronger but you still need to go careful when cutting / sanding. Work towards the part to avoid splintering bits off and, as I did, use a few coats of tru-oil just to harden it up a bit.
With all three parts complete, I'm not gonna lie I am super impressed with the outcome, and as I've now put a coat of tru-oil on the back and the parts I can see that we're gonna get a good colour match too. It's closer in person to the photos, but it'll get closer still. We're only on coat 1-2 of 30 odd and they started off entirely different in colour so I'm confident.
I'm just amazed I was able to get anywhere near a grain match too. This is £1 of random hog veneer from ebay. It has no connection at all to this 12 year old body from USA / Australia but somehow I was able to match up quite a bit of the pattern. I also think it just looks great without any screws etc.
I'm especially happy with this mini project because I followed no tutorials, I just used what I've learned and what I know to have a go. Everything except the kind of glue. I'm sure wood / gorilla glue would have worked but the cement is just the right tool for the job. Sorry for all the self praise but I'm used to things not going to plan (body arriving chipped, sanding back, white specks etc. so I'll take a win when I can).
Now I have these complete I can relax for a bit and start the fun job of getting oil onto both sides of the body while I acquire the remaining parts.
S
swarfrat
Guest
The hog is so pretty. I should do a guitar in mahogany some day. Maybe a nightswan.
docteurseb
Hero Member
- Messages
- 774
Looking really great !
I might have missed that part but how to you place on keeping the covers secure ?
I had seen tiny rare Earth magnets used instead of screws. The tremolo cover is still easy to remove thanks to the holes for strings change, and for the control cover one possibility is to place a very strong magnet at its center which, you can then easily pull the cover with a magnet (putting some felt/padding to avoid damage).
Dazkeirle
Junior Member
- Messages
- 192
Hey thanks all.
Yes all three parts are designed with little holes already in them for tiny magnets. This was the original plan, however, I use black tac all the time for various things including photography and it gives plenty of security without being permanent. I have tested with little balls in the magnet holes and it's the perfect level of bond for me.
You're absolutely right though, the big cover still needs to be be removed. And hooking under the edge could damage it.
For this I actually bought a large 15kg pull magnet and I'll glue some washers to the underside of the cover. I'll use the magnet to pull the cover off.
I like this option with the tac as I don't really want loads of magnets in the guitar. In know the effect is supposedly negligible but the purist in my says do whatever you can not to induce interference or other unwanted effects. Don't worry I won't be using screws.
docteurseb said:Looking really great !
I might have missed that part but how to you place on keeping the covers secure ?
I had seen tiny rare Earth magnets used instead of screws. The tremolo cover is still easy to remove thanks to the holes for strings change, and for the control cover one possibility is to place a very strong magnet at its center which, you can then easily pull the cover with a magnet (putting some felt/padding to avoid damage).
Yes all three parts are designed with little holes already in them for tiny magnets. This was the original plan, however, I use black tac all the time for various things including photography and it gives plenty of security without being permanent. I have tested with little balls in the magnet holes and it's the perfect level of bond for me.
You're absolutely right though, the big cover still needs to be be removed. And hooking under the edge could damage it.
For this I actually bought a large 15kg pull magnet and I'll glue some washers to the underside of the cover. I'll use the magnet to pull the cover off.
I like this option with the tac as I don't really want loads of magnets in the guitar. In know the effect is supposedly negligible but the purist in my says do whatever you can not to induce interference or other unwanted effects. Don't worry I won't be using screws.
Dazkeirle
Junior Member
- Messages
- 192
PhilHill said:Most excellent! This is progressing very nicely. :icon_thumright: :icon_thumright:
Can you picture yourself doing this for a living? :icon_jokercolor:
The level of the ocd I have, I'd never make any money.
However a hobby for retirement, absolutely.
Can't wait to get that cnc one day.
rgand
Epic Member
- Messages
- 5,934
I like your idea of gluing washers to the underside of the cover rather than put a strong magnet in the guitar. That's a fine idea. I killed a great pickup by getting a strong magnet too close to it. I don't think I'd use magnets on a guitar for that reason. Even if it doesn't trash anything, it would have to affect the tone since the guitar's sounds are generated by magnetic fields in the first place. Change those fields and the tone would have to be different. Of course, you may end up with something spectacular, too.Dr Excess said:I like this option with the tac as I don't really want loads of magnets in the guitar. In know the effect is supposedly negligible but the purist in my says do whatever you can not to induce interference or other unwanted effects. Don't worry I won't be using screws.
Dazkeirle
Junior Member
- Messages
- 192
Rgand said:I like your idea of gluing washers to the underside of the cover rather than put a strong magnet in the guitar. That's a fine idea. I killed a great pickup by getting a strong magnet too close to it. I don't think I'd use magnets on a guitar for that reason. Even if it doesn't trash anything, it would have to affect the tone since the guitar's sounds are generated by magnetic fields in the first place. Change those fields and the tone would have to be different. Of course, you may end up with something spectacular, too.Dr Excess said:I like this option with the tac as I don't really want loads of magnets in the guitar. In know the effect is supposedly negligible but the purist in my says do whatever you can not to induce interference or other unwanted effects. Don't worry I won't be using screws.
Exactly mate, that's my main concern, the long term effect on magnets and tone. And given this thing will have £300 of pickups in it, I don't really want to nuke them.
Tbh the control cover will probably not be removed once this thing is built. There won't be any need to go in there, however the maker in me had realised many times that it's about half empty and so I am very tempted to add a little pick holder or, something more ambitious (midi setup / integrated wireless transmitter / integrated headphone amp etc).
I actually have a spare vox a 30 headphone amp, jack and switch so it would be be a very easy thing to achieve.
Dazkeirle
Junior Member
- Messages
- 192
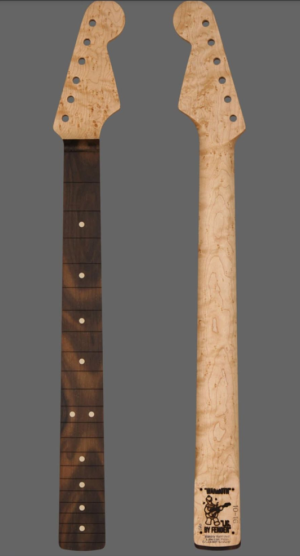
So a small amount of progress, I've ordered a neck!
I was holding out for something in the UK, already used etc. But Covid has pushed the second hand price of Warmoth necks up to almost new value, plus I saw this neck a week or so ago and just keep coming back to it.
The time I'e spent umming and ahhing, decided it would be better I just pay a bit extra and have something I'm clearly in love with.
I've always wanted an Ernie Ball Birds Eye neck (my first and only music teacher had one on his Axis SS and so it signifies the most extreme quality to me), and I've always wanted something Zircote as my luthier friend Ashley Finlayson (https://www.instagram.com/adfinlayson/) is just mad about it.
This neck has both things and was just $310 including 6150 Stainless frets and a Graphtech XL nut.
Attachments
Dazkeirle
Junior Member
- Messages
- 192
Rgand said:That's a beautiful neck. It'll look great on there.
Thanks man.
It'll go one of two ways, it'll either go on this build, or if it doesn't look right I know that the Flamed Roasted Maple on the Dreamsicle will look great and I'll use this new neck on there.
I'm just aware that the BE will be quite the contrast and the Zircote has quite a lot of figure to it, however saying that I looked up pics on Zircote Fingerboards on Koa and found some stunners:

I also looked up Mahogany and Birds Eye, there's less but:

They don't seem to clash too much at all
")
Similar threads
- Replies
- 12
- Views
- 433
- Replies
- 13
- Views
- 691