Dazkeirle
Junior Member
- Messages
- 192
So I should prefix this by saying that I bought this body for a deal, from Australia, just before the Covid stuff started (I'm in the UK).
It took 3 1/2 months and in which time my focus shifted and I made the Dreamsicle / Orange Split Fender / Prs hybrid in this forum.
https://www.unofficialwarmoth.com/index.php?topic=31700.0
So during that build, the soloist body did arrive, but unfortunately it had took some damage to the front horn. I did try a repair, but despite a good start I balls it up. I got a good colour match and fill but the clear nail varnish I used didn't cure properly.


I should prefix this by saying I have no wood working experience or practical experience at all. When I started this I owned a few sheets of sandpaper (no bench, no orbital, no facemask lol).
So, it was either put this in the cupboard or consider something else. Something I’ve always wanted, a nice no-lacquer natural finish guitar.
While I don’t want to use lacquer, I do want to use Tru-oil. I’ve gained a lot of experience using this on my orange Strat’s neck and what I learned is:
- It is easy to get a very glossy, thick hard finish if you do lots of very thin coats
-It gives a lovely lustre to the grain
-It slightly darkens the wood
-It is very repairable, if you ding it, another coat melts into the old
These are all qualities I love about TO, and that I hate about lacquer.
So, I now needed to remove the finish on the guitar, easy right, just get some sand paper. A couple of hours job?..... How wrong could I be?
I started at the horn end, creating enough damage to the finish that I was fully commited. OK on the front here what we appear to have is a layer of lacquer, a layer of paint and then the wood. The back was different, no lacquer - just paint.

I went at it with some sand paper. Yeah I need to do some research. I have absolutely no idea what to do here.
Several hours of youtube and I had a plan. Start with low grit to get the finish off. Then work through the grits (with the grain) to get it all nice and flat. Sounded easy but my god this finish was a lot thicker than I expected.
So After watching a lot more video I decided to invest in a random orbital sander. I got a range of discs and also and interface pad to make it a little less hard.

My initial attempts, even with 80 grit did very little, the sand paper got loaded up very quickly and tbh it just wasn’t doing a good job of removing.

Plus in a couple of areas where I did get through the coat (especially on the back where it was just paint) I appeared to get through to the wood, but then through to the wood but a different colour. What, why is there two different colours to this wood?


This is where I learned that wood is sealed and stained. Shazam. Now I’d accidentally got through this bit in a couple of areas it left me with no option but to remove all sander / sealer. This turned out to be much much harder than the previous steps as I soon learned.

Deflated at how hard this all was I watched more videos and realised that most people using orbitals to finish guitars did not use interface pads, and they also did not use them flat. So with the pad directly on the orbital and using a new angle-grinder, spinning chisel style motion I realised that actually I could be a bit more forceful and I started grinding through the finish fairly quickly, and importantly very evenly. I wasn’t taking chunks out as I expected to and I had a lot more control than I expected.

I spent the next few days working through the many layers of finish front and back and sides, using a variety of common sense techniques and ensuring I didn’t round over.


I purposely left the sealer / finish in the horns to finish by hand as way too risky to use power tools in there, same for the edges.
Day by day I worked away at the finish (always a little worried how rough the front was looking).


As I got to about 95% sealer removed I decided to spice it up a little I’d start working the front back flat, working the swirly marks and scratches out.
I did this by using the same grit paper I had on the orbital, but by working with the grain with both my fingers and pads using a variety of techniques (mostly from Dan on Stewmac, I know the hundreds of hours watching those videos would come in handy).


One final thing I did as I was working through most of the serious refinishing stages was remove what had bugged me in this design, and what I considered to be a flaw. The right horn sweep.
It had become apparent to me that instead of the sweep flowing into the neck pocket, it stops 50mm before it. It just has this kind of lump that doesn’t make any aesthetic sense so with some sand paper wrapped around a white board pen I gradually worked that sweep around tot he pocket and after I was much happier with how this looked.


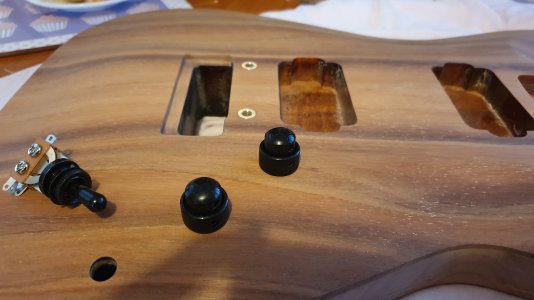
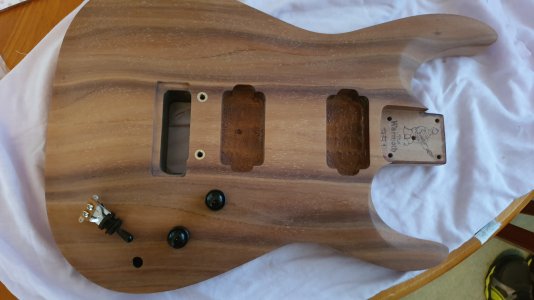
So this is where I am now, I gotta say I love how this body looks. When I hit it with ethanol I can see the finished colours and it’s gonna be nice. I much prefer the look of mahogany to glossy black paint on the back and I’m far happier about having all the lovely Koa showing on the top instead of being covered by burst.

To anybody that gets here and thinks this doesn't actually look that hard. Trust me, it is incredibly difficult. The areas you need to do by hand require literally hours to work your way through.
I'm enjoying the process of learning how to use tools etc. Mainly as a way of education, but it would be far cheaper and better to buy an unfinished body. However that would have left this body on the scrap heap, instead it's gonna be awesome and it will be all that much better for all the love, spit, sweat, beer and occasionally blood that has no doubt made it's way into it.
Plus getting out in the garage once a day for a few hours with a beer has helped me keep my sanity in this lockdown with two kids. tbh that has been one of my main motivations (but having a cool guitar will be nice too).
It took 3 1/2 months and in which time my focus shifted and I made the Dreamsicle / Orange Split Fender / Prs hybrid in this forum.
https://www.unofficialwarmoth.com/index.php?topic=31700.0
So during that build, the soloist body did arrive, but unfortunately it had took some damage to the front horn. I did try a repair, but despite a good start I balls it up. I got a good colour match and fill but the clear nail varnish I used didn't cure properly.
I should prefix this by saying I have no wood working experience or practical experience at all. When I started this I owned a few sheets of sandpaper (no bench, no orbital, no facemask lol).
So, it was either put this in the cupboard or consider something else. Something I’ve always wanted, a nice no-lacquer natural finish guitar.
While I don’t want to use lacquer, I do want to use Tru-oil. I’ve gained a lot of experience using this on my orange Strat’s neck and what I learned is:
- It is easy to get a very glossy, thick hard finish if you do lots of very thin coats
-It gives a lovely lustre to the grain
-It slightly darkens the wood
-It is very repairable, if you ding it, another coat melts into the old
These are all qualities I love about TO, and that I hate about lacquer.
So, I now needed to remove the finish on the guitar, easy right, just get some sand paper. A couple of hours job?..... How wrong could I be?
I started at the horn end, creating enough damage to the finish that I was fully commited. OK on the front here what we appear to have is a layer of lacquer, a layer of paint and then the wood. The back was different, no lacquer - just paint.
I went at it with some sand paper. Yeah I need to do some research. I have absolutely no idea what to do here.
Several hours of youtube and I had a plan. Start with low grit to get the finish off. Then work through the grits (with the grain) to get it all nice and flat. Sounded easy but my god this finish was a lot thicker than I expected.
So After watching a lot more video I decided to invest in a random orbital sander. I got a range of discs and also and interface pad to make it a little less hard.
My initial attempts, even with 80 grit did very little, the sand paper got loaded up very quickly and tbh it just wasn’t doing a good job of removing.
Plus in a couple of areas where I did get through the coat (especially on the back where it was just paint) I appeared to get through to the wood, but then through to the wood but a different colour. What, why is there two different colours to this wood?
This is where I learned that wood is sealed and stained. Shazam. Now I’d accidentally got through this bit in a couple of areas it left me with no option but to remove all sander / sealer. This turned out to be much much harder than the previous steps as I soon learned.
Deflated at how hard this all was I watched more videos and realised that most people using orbitals to finish guitars did not use interface pads, and they also did not use them flat. So with the pad directly on the orbital and using a new angle-grinder, spinning chisel style motion I realised that actually I could be a bit more forceful and I started grinding through the finish fairly quickly, and importantly very evenly. I wasn’t taking chunks out as I expected to and I had a lot more control than I expected.
I spent the next few days working through the many layers of finish front and back and sides, using a variety of common sense techniques and ensuring I didn’t round over.
I purposely left the sealer / finish in the horns to finish by hand as way too risky to use power tools in there, same for the edges.
Day by day I worked away at the finish (always a little worried how rough the front was looking).
As I got to about 95% sealer removed I decided to spice it up a little I’d start working the front back flat, working the swirly marks and scratches out.
I did this by using the same grit paper I had on the orbital, but by working with the grain with both my fingers and pads using a variety of techniques (mostly from Dan on Stewmac, I know the hundreds of hours watching those videos would come in handy).
One final thing I did as I was working through most of the serious refinishing stages was remove what had bugged me in this design, and what I considered to be a flaw. The right horn sweep.
It had become apparent to me that instead of the sweep flowing into the neck pocket, it stops 50mm before it. It just has this kind of lump that doesn’t make any aesthetic sense so with some sand paper wrapped around a white board pen I gradually worked that sweep around tot he pocket and after I was much happier with how this looked.
So this is where I am now, I gotta say I love how this body looks. When I hit it with ethanol I can see the finished colours and it’s gonna be nice. I much prefer the look of mahogany to glossy black paint on the back and I’m far happier about having all the lovely Koa showing on the top instead of being covered by burst.
To anybody that gets here and thinks this doesn't actually look that hard. Trust me, it is incredibly difficult. The areas you need to do by hand require literally hours to work your way through.
I'm enjoying the process of learning how to use tools etc. Mainly as a way of education, but it would be far cheaper and better to buy an unfinished body. However that would have left this body on the scrap heap, instead it's gonna be awesome and it will be all that much better for all the love, spit, sweat, beer and occasionally blood that has no doubt made it's way into it.
Plus getting out in the garage once a day for a few hours with a beer has helped me keep my sanity in this lockdown with two kids. tbh that has been one of my main motivations (but having a cool guitar will be nice too).