Refinishing a damaged Koa / Mahogany Soloist with Tru-Oil (by a beginner)

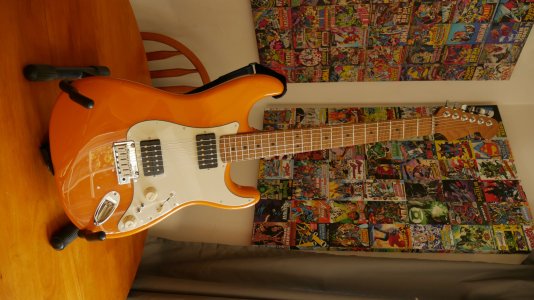
And just like that I got confirmation that my new neck has been dispatched, only 2 day deliver from US to UK too!

Of course the new new is going on my Strat (I think) and this guitar is getting the roasted flamed maple I currently have. I just think it's going to look better and will add instead of distract.

The good news about that is that it means I don't even need to wait to get it setup (I will need to do fretwork on the new one I'm sure).

So here's the neck that's soon to be added to this build (and I can't wait).


Attachments

  • Front.JPG
    Front.JPG
    486.3 KB · Views: 20
  • Neck.JPG
    Neck.JPG
    245.5 KB · Views: 17
Well it arrived!

I'm going to tru oil the back (to is my thing) and use a little bees wax on the zirocote.

Ordered 27th of May for those playing the waiting game.

28r7RjN.jpg


K44rsTA.jpg

 
Some new bits ordered.

My Sureclaw is on route (the most expensive tremelo claw known to man - don't tell the wife).

Only thing left is the Hipshot 21:1 tuners and I've even found those cheap.

I have also ordered a notched edge, a fret rocker and a new file to go with my lovely Crimson levelling file. This is quite empowering as I will have everything to do my own fret levelling and dressing now.

There's a real lack of anybody in the local area who wants to do this kind of work but it's clear that I actually love it. I've spent so much time recently working on guitars that I remembered one of my best buddies had a Sheraton in bits that he couldn't play (as had sent all the hardware off for replating and it came back a dogs dinner).

So I said hey, I'm basically training in guitar tech skills, can I sort your guitar out? He said yes! please!.

As he has everything out of the body and was never really content with the pickups I convinced him to upgrade to some 57 / 57+ and said I'd take of all the work, just buy the parts you want.

Well, I had not even considered that hollow body guitars don't have control cavities and so I had to learn, real fast, how to work on them. Thanks YouTube.

For anybody who hasn't worked on a hollow body, it's really difficult due to having to get everything through the F hole. You've gotta keep things short, neat and need to be clever about cable management.

I recommend airline tubing as in the pic to help get things back but be careful about the order you pull things through, and be careful with your solder connections. If in doubt use zip ties to tie cables off so there's no chance of adding tension to the joints as you pull things through.

6Tb99vi.jpg


E6RDlY3.jpg


The really cool thing though is I sorted it, even designed a fairly novel approach to wiring the pickups which means that they'd be easy to change without having to remove the wiring loom next time. Ultimately after putting it back together, cleaning it, polishing the frets, sorting the action etc it is now incredibly nice to play (which was a relief as the frets are super low, I was worried they'd be super buzzy).

07OuKUY.jpg


Maybe this could be my retirement job, I seem to enjoy the most mundane of guitar tech jobs.
 
On the Crimson fret levelling file I no longer use it for leveling though it is useful for other things. I find them a little aggressive for fret leveling and prefer either a diamond leveler or a leveling beam with sandpaper. With the file you end up having to take away too many file marks especially with stainless I find.
 
stratamania said:
On the Crimson fret levelling file I no longer use it for leveling though it is useful for other things. I find them a little aggressive for fret leveling and prefer either a diamond leveler or a leveling beam with sandpaper. With the file you end up having to take away too many file marks especially with stainless I find.

Thanks for the advice.

Dammit, I was trying to avoid buying a beam as well. Oh well, as we say over here "In for a penny, in for a pound".

The file will still be useful for bevelling the edges of the frets / fretboard.
 
Dr Excess said:
The file will still be useful for bevelling the edges of the frets / fretboard.

Be careful with that also. If you bevel the frets to the point where the board is beveling also the frets are probably over beveled. Rolling fretboard edges and beveling frets are two operations.
 
stratamania said:
Dr Excess said:
The file will still be useful for bevelling the edges of the frets / fretboard.

Be careful with that also. If you bevel the frets to the point where the board is beveling also the frets are probably over beveled. Rolling fretboard edges and beveling frets are two operations.

Yeah I'm aware but if you roll the edges you do need to take a little off the edges of the frets otherwise they will stick out a little. I don't mean for the top bezel, more the side.

I did it on the flame and it worked out well, we're talking a very small amount from the sides but made a huge difference to playability for me, especially as I go thumb over quite a bit (especially Mayer songs).

I've never properly dressed the edges before (Is that the term, where you file them so they look all rounded and shiny like on a PRS?) but I do plan to on this rather than just leave them sharp and on an angle. I'll obviously be using a little needle nose file for that though and following the Stewmac guidance.

So are you saying that actually it's not really a particularly useful tool? :( 
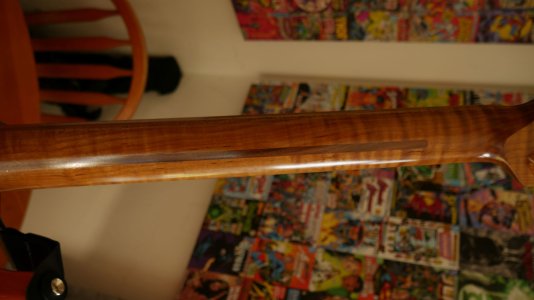
Balls it was £40, could have got a nice beam for that. Still looks pretty though.

 
I do have an early Crimson fretting file. I just do not use it for frets any longer. For doing the edges of the board I use blades, very fine needle size files and finer abrasive paper.

 
Hey long time no update!

So you may recall that I was waiting for the end of the month (30th) to get some lovely pressies for my birthday to get on with this build. Well that is exactly what has happened.

Tools (and components) were received and so this meant I could get on with my first ever fret levelling, crowning and polishing of the new neck (so I could liberate the flame maple for this build).

GsPONVZ.jpg


During the time witing I spent quite  abit of time just refining this body best I could. One area I was concerned about was pickup heights, especially due to long legged pickups and 720 mod so one evening I bit the bullet and tentatively with a dremel and a small file I whittled some wiggle room in the cavities. They sit much lower now and I think we'll be ok.

eXefbH9.jpg


Not the neatest job but fine with the shielding paint over it.

So in terms of the body, basically I gave it a fair few more coats and then went for my final finish.

This consisted of micromesh all the way from 2600 through to about 9000, then I buffer the front with Novus #2. I haven't done the back yet.

I'm pretty happy with the finish, it's smooth and very glossy and there's about 97% coverage. Full disclosed there are just a few little grain lines and dots where I'd worked on the body, I guess that the TO didn't fill but tbh it adds to the character having a little texture.

The back I actually didnt even attempt to grain fill at all, I like if having a bit of mahogany texture and the neck being a roasted flame maple is similar (as was also unfinished originally).

So here's what the guitar is going to look like. I'm going to do a full fret level, crown and dress on this because now I have the tools I know it isn't perfect and know I can make it nicer (I'm update my Orange Strat post shortly with what I did for the new neck) but this is mostly what she's gonna look like.

Personally, I love it. The front is very much all about the body figuring, the back though is actually kind of bananas, the flame looks great but I had no idea the chatoyance of the mahogany would be such that it would compete.

Colour and match wise I'm very happy and think when the black hardware is on it's gonna be really quite something. Everything about this neck was destined for this body, from the hue to the fret markers to the LSR.

pHrR911.jpg


9pIgMfD.jpg


pEYZppA.jpg


EtjDf5T.jpg


bNt3GQy.jpg


2Xgb8gJ.jpg


When you started on this journey the destination was not clear but quite a result after all the twists and turns.  :eek:ccasion14:
 
As always thanks for the motivating comments :D

Well, as you may have saw in my other thread, I recently learned how to level frets with my own tools on my new neck. Time to get some more use out of them and to use some of the experiences before to do a better job this time. Let's see how level this roasted flamed maple really was (I suspect not considering I did have some fairly serious buzz in a couple of spots).

This is a simple common fret levelling process, but for completeness I documented and photos each stage, hopefully it will be useful to somebody.

Step 1: Level that sucher (adjust truss until fretboard is level) 

uL8SfvL.jpg


Step 2: Wrap her up (I like this thin yellow tape, takes a little longer on the lower frets but much faster on the higher than cutting. Notice I use a straight line down both sides first and don't allow overhang to go over. That's important, you'll see why later).

2izh2ff.jpg


Step 3: Mark the tops of the frets with sharpie and sand away, down the fretboard making sure not too put any pressure on the neck and working with the radius. You should really put something under the neck (which I actually did after this pic was taken). Just glide it using the weight of the beam.

tXwcab7.jpg


Step 4: Oh dear oh dear. Keep sanding evenly until all marker is gone. You're gonna lose a bit of material but at least its flat.

kkjDBNl.jpg


Step 5: That's better/ You just need the top most surface to be clear. You'll sort the crowning later.

SoJtHEM.jpg


Step 6: Check your work. I actually found an errant high fret so did the whole process again, took just a few minutes and was then confirmed uber flat.

AEoDws0.jpg


I8mIlC4.jpg


Step 7: Now use sharpie on the top again and with your 3 sided file work the edges of each side of the fret. I find the best way to do this is to put the file actually on the fretboard and start close as you can to the fret (shaving off the vertical part), and then gradually mov the file away while resting on the board and the fret. The angle becomes more horizontal until eventually it can't get any flatter. It'll never touch the top though.

0nRxuRA.jpg


Step 8: Use a small needle nose file for the fret edges using the stewmac method and then use all the grades of micromesh on each side of the fret and finally the top, working through them, removing any scratches. If any remain repeat the entire process. No skipping.

sZhvRrZ.jpg


Step 9: Not totally necessary but if you have some metal polish then you can shine those suckers up now.

AjTQ6xj.jpg


Step 10: The big reveal. Remember I said about the two strips of tape, here's why. Mostly just pulls all the edges up at the same time.

CDMgVIp.jpg


Step 11: Admire your work. Looks 100x nicer than before, so shiny. Well worth the 2 hours.

mMlxZOF.jpg


aEzfN5l.jpg

 
OK just a small update but I've started the build :)

I havent done a final buff on the body yet because, well, it's about to go through some things but it's looking super glossy.

I used micromesh and then Novus #2 to get everything nice and smooth, worked well. Haven't even touched the back yet.

First item I've fit is the Schaller Sureclaw. Now I know it's crazy to spend £45 on a bloody tremelo claw, but from an engineering POV it's fantastic, and boy is it something. So nicely engineered, so smooth, so over engineered. I love it. Thanks @stratomania for the recommendation.

(Neck plate is temporary, got a nice cosmo one to go on).

kRPzugS.jpg


I've never really drilled into a body like this but I took it easy. Measured the inner of the screws with calipers, selected a drill bit that size. Measured the amount of screw that would be recessed, taped the drill bit.

Oh and check it out, my maths was right, the cover clears it...like a glove.

rrUlw6U.jpg


Marked the screw points with an awl and slowly off I went. No problem, although there's not a lot of body behind those screws. On the plus side they're solid.

With the neck on I put the PRS into it's case, I want this thing on show now so I can have fun looking at it.

I was trying to think of a name, and because of all the browns and black it made me think of coca cola. Then suddenly I was like Co Ca, CO-rona CA-ster Cola. What a coincidence, done! It's called "Coca Cola"!

But then it hit me, "Coca Koa". Mic Drop.


Anyway, lol. So this is a strange time to discover that the Soloist is a tiny body. LOL. So I had never really held one. I thought it was a slightly different shape to a Strat, but otherwise a Strat. But no way, it's WAY smaller... and I love it.

Bk8Qg7F.jpg


Just messing around it has a totally different feel, and I'm giddy to build this sucker. You wait until you see how I'm gonna treat this thing.

Here's some progress shots:

VkMVVEc.jpg


D7nBKuO.jpg
 
Back
Top