As the title says. I haven't had a lot of time to work on this so it has taken some time. I bought all my lumber rough sawn so it took a little time just to get it dimensionalized. after that had to plane it down and glue it up. It is all down hill from here though.

You are using an out of date browser. It may not display this or other websites correctly.
You should upgrade or use an alternative browser.
You should upgrade or use an alternative browser.
making progress on first build
- Thread starter ocguy106
- Start date
BigSteve22
Hero Member
- Messages
- 2,798
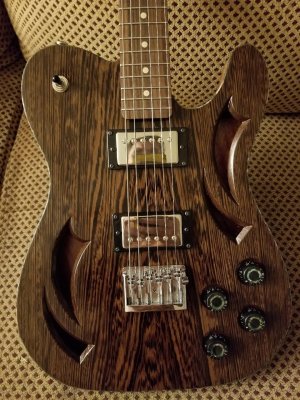
Wow is right! Tell us about the wood. What was your process in making those sound holes?
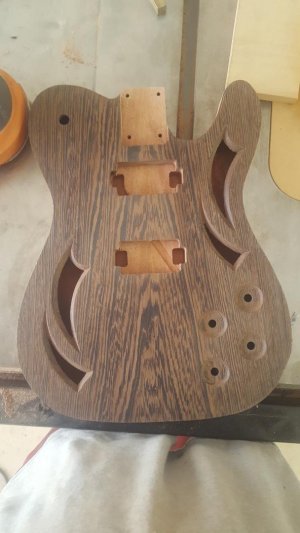
The wood is African mahogany with an 1/4" Wenge top. For the top I bought 4/4 rough sawn Wenge and re-sawed it to make book-matched top. The body is 8/4 the I planed down and made a two piece body with. It is going to be bound with "abalone" binding. As for the sound holes I just wanted something different and that is what I came up with. I beveled them at 45deg just to be that much different. I designed it all on the computer and cut it out on my CNC. Those sound holes would be a little difficult to do with a hand router.
Ken
Ken
Verne Bunsen
Hero Member
- Messages
- 2,472
Outstanding!
dmraco
Master Member
- Messages
- 4,652
Amazing work and design. I love the holes. CNC machining.....so jealous!
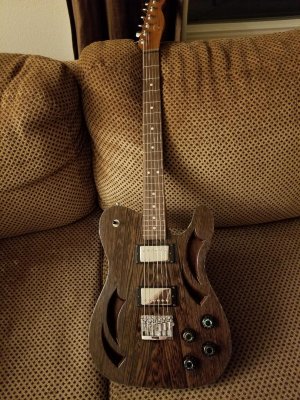
That Wenge will look killer when finished.
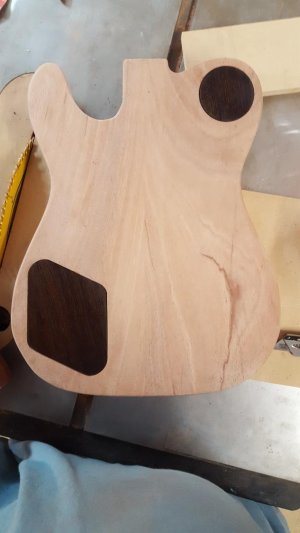
Just one comment, the control cavity for the toggle looks HUGE! Make sure you have enough wood for the strap button to bite. I would hate to see something catastrophic happen. You could always glue a small piece in if needed. It may just be the photos though.... :icon_thumright:
That Wenge will look killer when finished.
Just one comment, the control cavity for the toggle looks HUGE! Make sure you have enough wood for the strap button to bite. I would hate to see something catastrophic happen. You could always glue a small piece in if needed. It may just be the photos though.... :icon_thumright:
rgand
Epic Member
- Messages
- 5,934
Alternately, if it's thin in that area, you could simply put a nut inside on a machine screw. You'd never have that strap button loosen up.DMRACO said:Just one comment, the control cavity for the toggle looks HUGE! Make sure you have enough wood for the strap button to bite. I would hate to see something catastrophic happen. You could always glue a small piece in if needed. It may just be the photos though.... :icon_thumright:
Rgand said:Alternately, if it's thin in that area, you could simply put a nut inside on a machine screw. You'd never have that strap button loosen up.DMRACO said:Just one comment, the control cavity for the toggle looks HUGE! Make sure you have enough wood for the strap button to bite. I would hate to see something catastrophic happen. You could always glue a small piece in if needed. It may just be the photos though.... :icon_thumright:
You beat me to it. That was my plan after seeing how thin it is. It is about 3/4 of an inch but better safe than sorry
Mayfly said:Killer! You've got to give us a blow by blow on how you got from there to here!!
Sure. It was a lot of work but not really that hard.
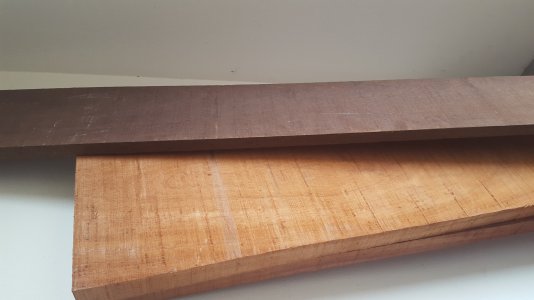
1. First I started with rough sawn 2" Mahogany and 1" Wenge. My finished body was to be 1.75".
2. My finished guitar blank was to be 14x20 so I cut two pieces of each wood at about 25". I found out real quick that if you try to flatten 6' of rough sawn lumber you would need to be at least 3" thick to get 1.5" due to all the twisting. cutting them down smaller made it much easier.
3. I planned the Mahogany down to just over 1.5 inches and jointed the edges. My stock was 9" wide so gluing them together gave me 18" I glues them up and let them sit over night.
4. I planned the wenge just enough to flatten it. It was about 8" wide. I took it to the band saw and cut it length wise so I ended up with two pieces 15x8x.5. I ran these through the planner to just over .25". I then jointed and glued them up and let them sit over night.
5. I cut both pieces of wood to exactly 14x20. I planned the Mahogany to exactly 1.5" I planned the wenge to just under .25". The binding I got is .25" and I wanted the binding to sit slightly proud of the body so I could sand it flush. You can't see in the picture but the binding channel has already been routed. I did it as the last step on the CNC. The binding sits perfect and is proud of the body by about the thickness of 2 fingernails.
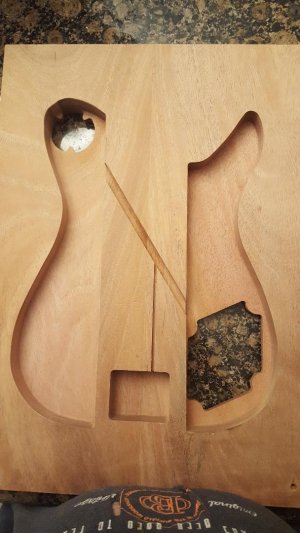
6. I cut the mahogany on the CNC and it came out like pic 3 in first post. I then glued the top on and let it sit overnight. Then I cut the top features and ended up with the finished product.
7. As for the control covers. the same file I used to cut out the control cavities I used to cut the cover. Instead of making a pocket cut which hogs out all the material I just changed it to a perimeter cut and it makes a perfect match.
see really not all that hard. A true craftsman can make the neck....for that I call on Warmoth.
DangerousR6
Mythical Status
- Messages
- 15,478
:headbang1:
stratamania
Mythical Status
- Messages
- 11,035
Looks very good.
Similar threads
- Replies
- 2
- Views
- 215
- Replies
- 7
- Views
- 159
- Replies
- 24
- Views
- 1K