Leaderboard

How can I slightly ream a tuner hole to get rid of paint that is inside it?

kgk9000

Junior Member
Messages
39
Hello!

I have a Warmoth Nomad neck that was drilled for Sperzel tuning machines, painted, and then mailed to me, and it's great!

But, when I try to fit in the Sperzel tuning machines into the hole that Warmoth reamed (presumably perfectly), it just doesn't quite fit.  I assume that the thickness of the paint is my problem, so I have to slightly ream the hole to remove the paint.  How, I wonder?

I could try to find a hand reamer that is the exact size of my Sperzel tuning machines, but I assume that this is a very common problem, and there are some very clever solutions!  I tried searching the forum and didn't find anything, but if somebody can advise me, I'd me most thankful!

:headbang5
 
You could wrap some sandpaper around a pencil or dowel or something like that and just work the hole a bit. But, you may want to keep in mind that those tuner holes are cut very close, resulting in what amounts to a "press fit". This is a Good Thing. You want those holes to be that tight so you have a good mechanical coupling of the string to the neck.

In my experience with Warmoth necks and Sperzel tuners, the fit is tight enough that you can't press the tuner all the way in by hand. It will only go in to within 1/8" or so of the tuner body being flush with the back of the headstock. But, when you thread the bushing on from the front, it'll pull the tuner through the rest of the way. Use a 7/16" nut driver or socket to thread the bushing. Be careful how much torque you put on that bushing - the walls are kinda thin. It's not as hard as you might think to break the thing, and they don't sell bushings separately.
 
After some thought, I'm going to try a 10mm reamer to enlarge the hole.  It seems that there is a metric reamer for wooden airplane propellers (go figure!) on Amazon, I ordered one because it looked easy to align and start.

I'll try to take everything that Cagey mentioned into account.  Wish me luck....  :)

https://www.amazon.com/Great-Planes-Precision-Metric-Propeller/dp/B001KNGAXW
 
Good luck! Go very steady with the reamer - you're far more likely to take a chip out of the finish than with sandpaper.
 
Stick with the sandpaper and pencil!  You don't need to take out the amount of material that reamer is going remove.  My experience has been mostly as Cagey mentioned; when you tighten down the bushings, it all pulls together tight.
Good luck, keep us posted, and  :rock-on:
 
Thank you, thank you, thank you, thank you!  :yourock:

I think that a reamer would indeed have made a perfect hole, but cracked my paint, and I realized that everybody was indeed right about sandpaper and a dowel!  So, I went to Home Depot, got some nice sand paper (I picked P220 on a plastic backing, so it was easy to roll up), and was able to get all of the holes expanded to where things fit perfectly in a mere 30 minutes, perhaps less... thanks again!

I have the aluminum jig that Sperzel sells to drill the secondary holes (that block rotation of the tuning machines), so I will drill those tomorrow.

Do you have any advice about how I shouldn't create cracks in the paint when I drill?  I assume that I should drill at a low rotation and advance the drill slowly?  (I'll search the forum, I'm sure this topic comes up a lot.)

Thanks again!

:headbang5
 
Have a look at these two videos. Espeially the second one where he mentions that you should start drilling backwards.

[youtube]JLN4kV9uB-Q[/youtube]

[youtube]Ha71or0MuXE[/youtube]
 
The subject does come up a lot, and there are a few heroic steps you can take mitigate it, but paint chipping from drilling and other operations is nowhere near the problem it's often made out to be. Not that it doesn't happen; it does. But, it's not a "problem" per se.

The reason is that few guitars are finished in lacquer these days except by DIY types. The vast majority are done in acrylic or polyurethane, neither of which are as brittle as lacquer and so are less prone to chipping. Not that they won't, but you don't get those big fingernail-sized hunks flying off like you might with lacquer. They also don't develop running stress cracks like lacquer does. What you will more likely see after drilling/cutting modern finishes is an edge that resembles hacksaw teeth. Jagged, but small and difficult to see unless you look close, and unlikely to grow.

Of course, we don't want to see even tiny imperfections in our finishes, at least not at first (some guys will deliberately destroy perfectly good finishes to make some kind of statement, but that's another discussion). So, the vast majority of pieces and parts that are going to mount in or on holes in the necks and bodies of guitars either have flanges or washers around their edges (like tuners, pots, switches, jacks), or will cover their mounting holes altogether (like pickguards, jackplates). So, you won't see any rough edges. They'll be covered up and out of harm's way.

But, if you're concerned about it, you can always put masking tape over the holes before you drill them. It doesn't work, but it makes some guys feel better. What tape over holes is actually good for is giving you an easy-to-mark surface so you can locate your holes better and there's less chance of the drill skating off-mark. But, even that is rarely necessary.

Sometimes, holes are "repaired" after the fact by running a shallow countersink on them. Again, not necessary for hidden holes, but it makes some guys feel better. Not sure why; it's simply using a larger cutter on the same hole that was just made with a smaller cutter.

On larger holes like you need for pots/switches/jacks, twist drills can sometimes do a lotta damge to the finish, but it's not the drill doing the damage to the finish so much as the wood chunks it's pulling back from the surface because it's chewing away so violently. In those cases, it's better to use a different type of drill such as a brad point or Forstner bit.

Brad-Point-Bit-Wood-Brad-Drill-Bit.jpg


Brad point bit


33j0408i.jpg


Forstner bit


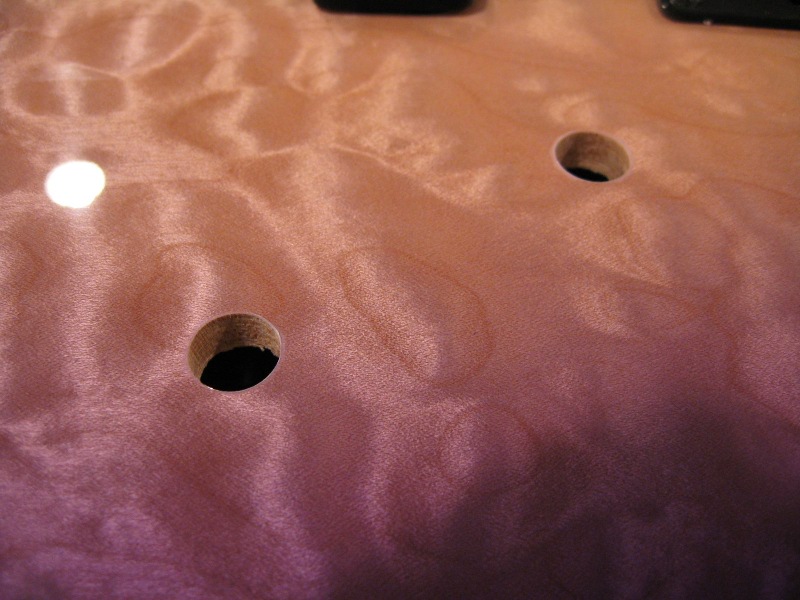
They slice the outer diameter of the hole before they remove the inside material, so the wood fibers don't pull back in chunks that take finish with them. End result is a nice, relatively clean hole like I got for these pot holes...

img_1073_Sm.jpg

Those were actually drilled by hand using a portable drill motor and a 3/8" Forstner bit. Forstner bits are typically more expensive, but often do a better job. Also, while not necessary in this case, sometimes it's handy that they make flat-bottomed holes. So, they're my preferred solution.
 
I'll chime in as one of the guys who countersinks the holes after they're drilled. By adhering to many of the techniques already posted here, I haven't had issue with finish chipping while drilling holes, but more than a few times I've had the finish chip when I actually installed the screw. If the thread grabs the finish and you're not giving quite enough downward pressure, it'll pull the finish up. Which is a bummer. So I use a Dremel conical grinding stone (spun by hand) to remove the finish around the opening of the hole. No more cracked finish.

Dremel_Grinding_Stone_EZ68601_952_(EN)(4).jpg
 
The drilling went pretty well, but the Sperzels turned out to have two different post heights; I'm trying to figure out what happened to my order, as I should have had ONE (uniform) height.

More soon....
 
kgk9000 said:
The drilling went pretty well, but the Sperzels turned out to have two different post heights; I'm trying to figure out what happened to my order, as I should have had ONE (uniform) height.

More soon....

Looks like you have a set of staggered tuners. Great for a strat or tele headstock so you don't need string trees. Possibly not so much needed for a tiltback headstock.
 
stratamania said:
Looks like you have a set of staggered tuners. Great for a strat or tele headstock so you don't need string trees. Possibly not so much needed for a tiltback headstock.

You are certainly right that staggered tuners are ideal for a Strat or Tele, but the Nomad neck tilts back significantly (it's a variation of a Gibson Explorer), and one is ideally supposed to use constant height in that case....

I wrote to Sperzel, and they are very cool, I'll mail in my tuners and have them work their magic (replacing parts)... in the meantime, I will just work on something else, I have so much to do that it isn't even funny!  :headbanging:
 
If you need to take away a little wood, or hardly any at all, I recommend the Irwin UniBit. They come in standard and metric and are a little pricey, but they last long. DON'T buy those Harbor Freight ones for use on wood.....I put that Irwin in a screwdriver handle that accepts 1/4" drive, and ream slowly. Works for me.
 
Or, a pencil (or something about that size) with some 320 grit wrapped around it. Be sure to only push into the painted side - if you pull, you're liable to pull a chip.
 
Back
Top