G4: From black to Korina - to DIY chambering

Thanks Cagey - I will be watching..!  :icon_thumright: 

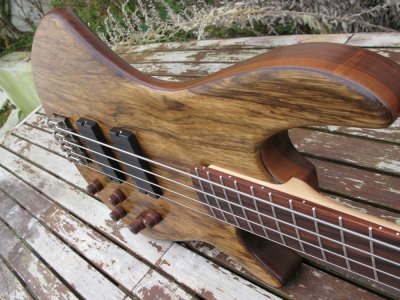
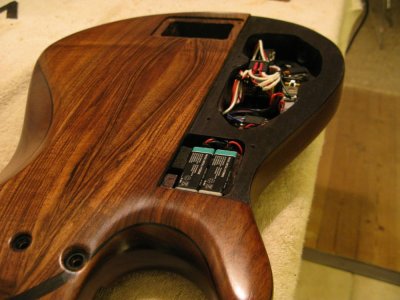
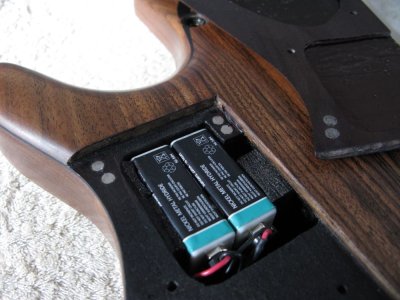
What's not to love..? Good question..! I can't think of anything, but maybe the work involved drilling, routing, gluing etc is not to love for everyone. I will say though, that this is a fairly easy DIY project. Basic wood working skills and knowing how to use a router is all that is needed.

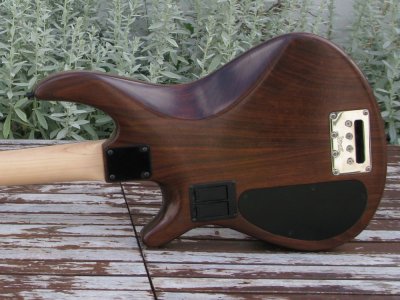
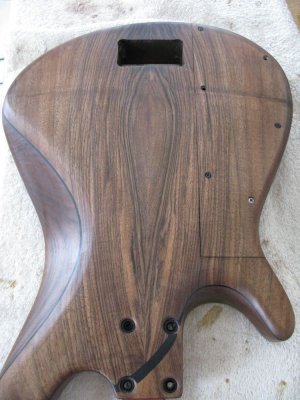
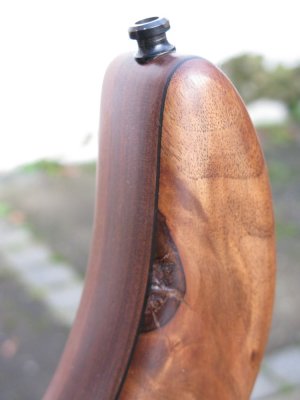
This was actually a really cheap modification also, I bought this beautiful book matched set of walnut for just 10 bucks on e-bay. There is a seller in California who sells beautiful woods and they are dried and planed, so ready for use. He is ''onemill101'' on e-bay. Sometimes he runs auctions and walnut like this goes for 10 - 20 bucks. Everything he sells is top quality.
 
Nice work. 

I think that is who I bought my book matched spalt/flame maple cap from.  Good stuff and great prices.
 
I'm building up the oil finish and things are starting to look good... I like this Danish Oil better than Tung Oil because it's so much faster to work with and it gives a nice look/feel. I also did the holes for the neck bushings. It's cool how the holes kinda work together with the area where the black veneer fans out.

I need to add one more screw to the cover. It tips up ever so slightly at the end towards the neck - as you can tell it's not as ''tight a fit'' at that end right now. This will mean a bit of re-work in the battery compartment, and of course I still need to route for the bridge on the back also.


Attachments

  • IMG_8005.jpg
    IMG_8005.jpg
    107.9 KB · Views: 13
  • IMG_8004.jpg
    IMG_8004.jpg
    134.4 KB · Views: 16
Really nice work.  I may have missed it but what bridge are you using??  One of those Babzzick (spelling sorry)?
 
2TEK bridge... And that is part of the problem with this body.... See the first post on the first page for the story on this body.
 
Almost done... I have routed for the 2TEK bridge, installed the batteries so they are held by foam blocks that I have glued in place, and I have installed the preamp. Just need to install /solder the jack, but I will do that tomorrow when the final coat of Danish oil I have just applied is dry.

Here a few pictures showing the latest work. I think this walnut cap is looking even better now that it has several coats of oil... It's totally dark here now, so the light is a bit different in these pics...


Attachments

  • IMG_8007.jpg
    IMG_8007.jpg
    112.3 KB · Views: 18
  • IMG_8011.jpg
    IMG_8011.jpg
    107.8 KB · Views: 18
Thanks  :)

I'm almost done now, just need to install/adjust the pick ups and put some strings on it - but here are some pictures of the back... What started out as a chambering project turned out to be both a chambering project and a re-work of the back of this bass project. I'm so pleased with the result... Maybe it's because I made this myself, but I think it's BEAUTIFUL and soooo clean looking compared to before.

Instead of reworking the battery compartment to make room for one more screw holding the end of the lid down I used small neo magnets as can be seen in the close up picture. It works perfectly and the cover now has a snug fit all the way around. Actually before drilling the holes for the screws I was thinking about using magnets instead of screws all around for an even cleaner look, but I thought the cover was too big, and that it would slide off to easily. I'm happy with this.

Another small detail is a knot in the wood positioned on the side of the horn. I decided not to fill it completely and make it smooth, instead I just stabilized it with a bit of epoxy and let it keep a more ''natural'' look. I like it..! And I really, really like walnut... (We don't have this kind of walnut here).
 

Attachments

  • IMG_8036.jpg
    IMG_8036.jpg
    62.3 KB · Views: 16
  • IMG_8033.jpg
    IMG_8033.jpg
    132 KB · Views: 15
  • IMG_8019.jpg
    IMG_8019.jpg
    79.7 KB · Views: 15
  • IMG_8015.jpg
    IMG_8015.jpg
    110.8 KB · Views: 9
Thanks man - I'm really pleased with the result. I know it's ''just a bass'' and that they don't create as much attention in this forum as the guitars, but maybe this can be an inspiration for others. I was a bit concerned if the new back would look good on the bass, but I think the result looks much better than before. The new walnut cap has beautiful figuring, the binding works great and the new cover is perfect.

I have now played it, and at first I thought there was a small sonic difference, but after fine tuning the pick up positions to the exact heights they were before I honestly can't hear any difference. So at least on this bass there seems to be no sonic impact from chambering.

Regarding the weight it's down by almost 300g and I can really feel that. The bass is still heavy at it's 4.35kg / 9.6pounds, but the damn 2TEK bridge is 495g / 1.1pound. With another bridge the weight could be around the 4kg mark. I hope this weight saving will work out for me, otherwise I might have to drill some more holes in the 2TEK to make that beast lighter too  ;)

Done for now! It's been quite a journey with this body, here are some ''before and after'' pics, but I really, really like this bass, so it has been worth the effort.
 

Attachments

  • IMG_5281.jpg
    IMG_5281.jpg
    118.5 KB · Views: 4
  • IMG_5446_2.jpg
    IMG_5446_2.jpg
    132.9 KB · Views: 5
  • IMG_6001.jpg
    IMG_6001.jpg
    162.6 KB · Views: 9
  • IMG_8033.jpg
    IMG_8033.jpg
    132 KB · Views: 12
Back
Top