

You are using an out of date browser. It may not display this or other websites correctly.
You should upgrade or use an alternative browser.
You should upgrade or use an alternative browser.
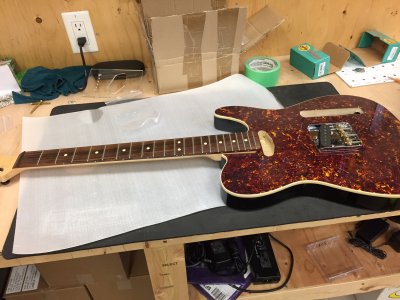
Cheap Thrills Tele
- Thread starter mayfly
- Start date
Cagey
Mythical Status
- Messages
- 24,425
Looks like the hole going into the control cavity is the shallow one, unless it's both of them. Since we haven't heard anything since he chucked that bit into the cordless drill driver of doom, I'm guessing he drilled right through body into the benchtop, through the drawer beneath it, and into the motor housing of his circular saw on the shelf beneath that. Now he's drinking it off, and we'll hear some excuse in the morning about how his shop was destroyed in a mysterious fire. It's the only explanation possible.
mayfly
Epic Member
- Messages
- 9,225
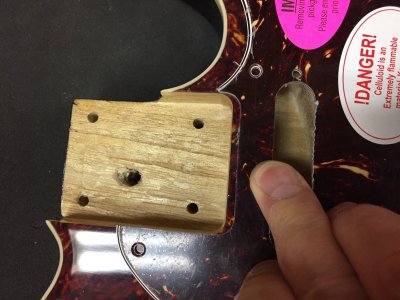
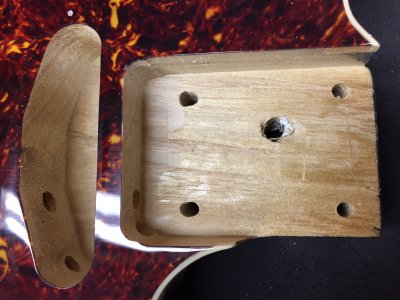
Despite the fears of our friend Cagey, the drilling went fine. Yes I drilled them both out again: For the neck pickup I went through the neck pocket and straight into the control cavity. For the bridge pickup I went through the freshly routed bridge pickup hole. Managed to lower both holes, got the bridge pickup half and inch further down!
I had an interesting situation happen when I mounted the bridge. The wood is so incredibly soft I decided to just drill clearance holes in the plastic top and NO pilot hole from there on. The screws went in with no problem, but one of them stripped! Just think about that: Big bridge screws, no pilot hole, and one stripped before I got it tight. Crazy.
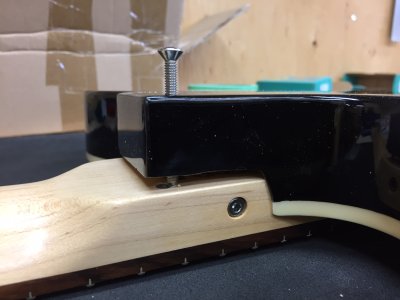
Then it was on to the next issue: Mounting the neck. I disassembled one of my warmoth telecasters (with rosewood and abalone inlays - rare around these parts now) and tried to fit the neck.

It fits with a bit of slop - no worse than your typical fender back in the 80's. Not that that's a gold standard or anything, but it's workable.

Then it was time for the next problem. The neck screws did not line up. They appear to be about 1/8" off of where they should be. Glad that I had a look at this...

Because of this I wondered if it was the holes, or the end of the neck pocket that was the problem. I decided to check the scale length. Here's the result. Hmmmm.

Anyone got a neck pocket routing template?
I had an interesting situation happen when I mounted the bridge. The wood is so incredibly soft I decided to just drill clearance holes in the plastic top and NO pilot hole from there on. The screws went in with no problem, but one of them stripped! Just think about that: Big bridge screws, no pilot hole, and one stripped before I got it tight. Crazy.
Then it was on to the next issue: Mounting the neck. I disassembled one of my warmoth telecasters (with rosewood and abalone inlays - rare around these parts now) and tried to fit the neck.
It fits with a bit of slop - no worse than your typical fender back in the 80's. Not that that's a gold standard or anything, but it's workable.
Then it was time for the next problem. The neck screws did not line up. They appear to be about 1/8" off of where they should be. Glad that I had a look at this...
Because of this I wondered if it was the holes, or the end of the neck pocket that was the problem. I decided to check the scale length. Here's the result. Hmmmm.
Anyone got a neck pocket routing template?
Attachments

Cagey
Mythical Status
- Messages
- 24,425
Why am I not surprised?
Anyway, it looks like the scale length is right as it sits. If only you could mount the neck! But, if you move the neck pocket forward a bit to accommodate the misplaced mounting screw holes, will there be enough saddle travel to compensate? Looks like it - if the bridge plate mounting screws don't end up in the way of the saddle height adjustment screws once you do. Let's pretend they won't. Will the fretboard overhang interfere with the neck pickup? I can't tell from here, but it looks iffy. Then, will the pickguard mount? Probably not without modification.
You may be able to slide out from under all that stuff if you buy one of their necks. Or, not.
Stay tuned for our next episode of "Goddammit What Was I Thinking When I Bought This Body?"
mayfly
Epic Member
- Messages
- 9,225
Cagey said:Anyway, it looks like the scale length is right as it sits.
Well not really - according to every other guitar I've got, the bridge and the nut are 1/4" further apart than they should be.
I'm considering my options:
1 - dowel the holes and re-drill. Hope that I can get it intonated. hope I don't get neck dive
")
2 - extend the neck pocket. Hope I can mount the neck pickup.
Leaning towards #2 as it has the advantage that neck dive will be reduced. It's a really light body
rgand
Epic Member
- Messages
- 5,934
My ancient Japanese Tele is the same way. I went to put a different neck on it and it was too far from the saddles to intonate and the holes didn't line up. I wound up taking about 1/4" off the end of the neck and re-doing the holes. It didn't matter because the neck is marginal anyway. For that matter, I still have to finish it up. One of these days I want to route the neck pocket 1/2" further in so it'll take a standard Warmoth or Fender neck. Maybe there's an 'Asian inch' scale we're not aware of.
BigSteve22
Hero Member
- Messages
- 2,798
I'm certainly not as knowledgeable as Kevin is on this subject, but the scale length looks doable, as is, to me too. And as for the high E being near the end of it's travel, there's always a quick trip to the hardware store for a slightly longer screw.Cagey said:The high E is the closest to actual scale length once intonated, so it needs to be at 25 1/2" once intonated. Looks like you have room for that, although you'll be at the end of screw travel. The rest of the saddles will be back from that.
I thought I was the only one who realized this! Send me a PM via the Secret Decoder Ring system! :icon_jokercolor:Cagey said:Yeah, it's called "metric", whatever that means. I think it's some kind of commie measuring system that's designed to keep things from going together.
rgand
Epic Member
- Messages
- 5,934
I knew it!Cagey said:Yeah, it's called "metric", whatever that means. I think it's some kind of commie measuring system that's designed to keep things from going together.
dmraco
Master Member
- Messages
- 4,655
I had same issues with mine. Fill the holes on the neck and re-drill. Simple.
The neck pocket is the bigger issue, no pun intended. I filled the gaps with business cards and used a sharpie to color the edge. I only used two total. After you have the bridge on see what side needs to be shimmed. I needed one card on each side for a snug fit. They are almost completely unnoticeable. You could glue in some super thin lam wood. But I figured, business cards are made from wood fiber...so what the hell....
The neck pocket is the bigger issue, no pun intended. I filled the gaps with business cards and used a sharpie to color the edge. I only used two total. After you have the bridge on see what side needs to be shimmed. I needed one card on each side for a snug fit. They are almost completely unnoticeable. You could glue in some super thin lam wood. But I figured, business cards are made from wood fiber...so what the hell....
DangerousR6
Mythical Status
- Messages
- 15,478
From the looks of his tape measure, it appears his scale length is off by 1/8th inch...DMRACO said:I had same issues with mine. Fill the holes on the neck and re-drill. Simple.
The neck pocket is the bigger issue, no pun intended. I filled the gaps with business cards and used a sharpie to color the edge. I only used two total. After you have the bridge on see what side needs to be shimmed. I needed one card on each side for a snug fit. They are almost completely unnoticeable. You could glue in some super thin lam wood. But I figured, business cards are made from wood fiber...so what the hell....
mayfly
Epic Member
- Messages
- 9,225
DangerousR6 said:From the looks of his tape measure, it appears his scale length is off by 1/8th inch...DMRACO said:I had same issues with mine. Fill the holes on the neck and re-drill. Simple.
The neck pocket is the bigger issue, no pun intended. I filled the gaps with business cards and used a sharpie to color the edge. I only used two total. After you have the bridge on see what side needs to be shimmed. I needed one card on each side for a snug fit. They are almost completely unnoticeable. You could glue in some super thin lam wood. But I figured, business cards are made from wood fiber...so what the hell....
precisely the amount the holes are mis-drilled by :doh:
mayfly
Epic Member
- Messages
- 9,225
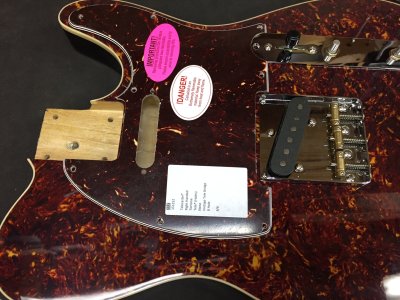
Update! I think that I've found my routing template:

Note how the pickguard fits around the control plate and bridge, but there is 1/8" space at the neck joint between the pickguard and the neck pocket. It's amazing that they actually sell these things

in other news, I've decided that I won't be keeping this guitar, but rather giving it to a local school. This means:
[list type=decimal]
[*]No Bender
[*]I can put whatever neck I find on it
[/list]
I'll probably make a little guitar amp to match.
Note how the pickguard fits around the control plate and bridge, but there is 1/8" space at the neck joint between the pickguard and the neck pocket. It's amazing that they actually sell these things
in other news, I've decided that I won't be keeping this guitar, but rather giving it to a local school. This means:
[list type=decimal]
[*]No Bender
[*]I can put whatever neck I find on it
[/list]
I'll probably make a little guitar amp to match.
Attachments
Cagey
Mythical Status
- Messages
- 24,425
I wouldn't feel comfortable using a pickguard as a template because they're pretty thin. If the router base moves vertically at all, you'll color outside the lines and get points off for sloppiness. Besides, if your pattern follower bits are anything like mine, there's a bit of space between the pattern following bearing and the cutting flutes. You may not be able to follow something that thin at all. Stewmac makes neck pocket templates if you want a proper one, although it's slightly oversized for some stupid reason I don't remember. You end up having to put a layer or two of tape around the inside to shrink it for properly made necks. Maybe not in this case, since your pocket is already oversized.
Kudos on the school donation. Although, I think if it was me, I'd find a deserving but deprived individual to give it to instead. At a school, it's liable to suffer the "tragedy of the commons".
Kudos on the school donation. Although, I think if it was me, I'd find a deserving but deprived individual to give it to instead. At a school, it's liable to suffer the "tragedy of the commons".
dmraco
Master Member
- Messages
- 4,655
My stew mac had tele on one side and strat on the other.
You could always use the pick guard to DRAW a template on some thicker scrap wood and cut with a saw. Something 1/2 or 3/4 should do it. Then use that as your template. :icon_thumright:
There is always a little overhang if it is not 100% perfect.
You could always use the pick guard to DRAW a template on some thicker scrap wood and cut with a saw. Something 1/2 or 3/4 should do it. Then use that as your template. :icon_thumright:
There is always a little overhang if it is not 100% perfect.
mayfly
Epic Member
- Messages
- 9,225
Gentlemen,
"pickguard as a routing template" worked out just fine. I attached it with double sided tape, then mounted the router in the router table and placed the body on that upside down. Had to do two passes to get the required depth. The little shoulders were because the 'template' was a bit under-size. I just cleaned up with a drill mounted circular rasp in the drill press. Neck fits fine and the holes line up!

more on the next 'what the hell you've got to be kidding me' moment in a bit...
"pickguard as a routing template" worked out just fine. I attached it with double sided tape, then mounted the router in the router table and placed the body on that upside down. Had to do two passes to get the required depth. The little shoulders were because the 'template' was a bit under-size. I just cleaned up with a drill mounted circular rasp in the drill press. Neck fits fine and the holes line up!
more on the next 'what the hell you've got to be kidding me' moment in a bit...
Attachments
Similar threads
- Replies
- 12
- Views
- 343