

Cagey
Mythical Status
- Messages
- 24,425
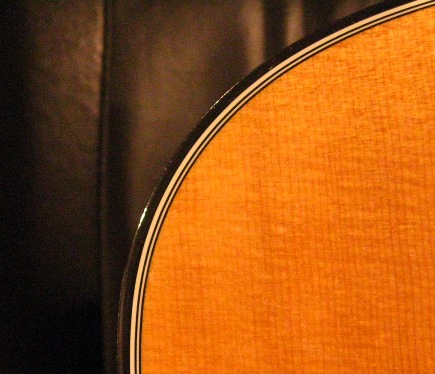
I recently managed to add a Mahogany L5S body to the collection through some judicious horse-trading, and after thinking about how to finish it came up with the idea that regardless of the finish, it might look great with some binding on it. For those of you who aren't familiar with that guitar design, it was something Gibson made a long time ago that looks sorta like cross between a Telecaster and a flat-top Les Paul with a lasagna addiction...

Never having done this before, I did some research and found that it doesn't look impossible. The body has a flat top, so the router will ride it nicely, right? So, what the hell? Let's try it. What's the worst thing that could happen?
Probably famous last words, but we'll see. I don't know how long this will take, but you gotta start somewhere so here we go.
First, you gotta come up with a design. How many layers, how thick, what colors, etc. Then, you gotta buy the binding. Then you're stuck. You gotta do it.
I decided I wanted a multi-layer binding like what's on my Taylor acoustic. I've never done this, but I figgered if I was going to go through the trouble there may as well be as many layers as a good pro job would have. Stupid me. But, long story short, I ended up with 5 layers: 3 at .020", 1 at .040", and one at .060" colored cream/black/cream/black/cream, the inverse of the Taylor job.
You may want to throttle your ambition a bit the first time around.
Then, you need 2 kinds of glue. One to laminate the binding strips with, and one to attach them to the guitar. Laminating glue turns out to be simple acetone. You basically melt the strips together. Attachment glue is some stuff called "Weld-On #16", whatever cancer-causing concoction that is.

You can also use CA, but we all know what happens when you open a bottle of that stuff.
You also need the appropriate router bit and stand-off bearings to make the channel on the body that the binding will set into. Buy 'em all! You know you want to!

You also need a laminating jig - don't think you can get away without one. This is used to hold/press the layers together as you make the binding. It counts as about 3 hands of the 5 or 6 you need to do this. Luckily, they're fairly inexpensive because make no mistake - laminating binding is much like herding cats.

We're also gonna need some high-tack tape and a scraper, but we'll come back to that later.
At one or more of the links above to Stewart-MacDonals's site, they have links to articles that explain how all this stuff is used. I just have a few pictures here of what I've accomplished so far.
First, you can't laminate 5 layers all at once. It's just too much to do in the time allotted. 3 is pushing it. The problem is the acetone you use to melt the strips together boils off too fast. It starts to melt the plastic right away, and you have about 2-3 seconds to stick it together. If you're too fast, it won't stick and you end up having to do it again which the plastic doesn't want to take. If you're too slow, the plastic re-hardens and won't stick. So, I started with 2.
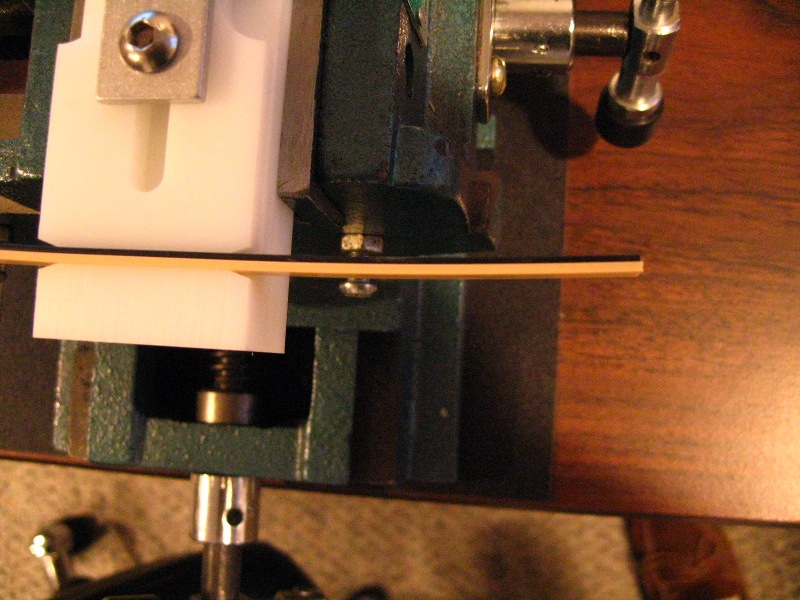
Basically, you paint the mating surfaces with acetone, and slowly push them through the jig. You only do 6-8 inches at a time because of the time restrictions I mentioned.
Then, I did the three narrower parts...
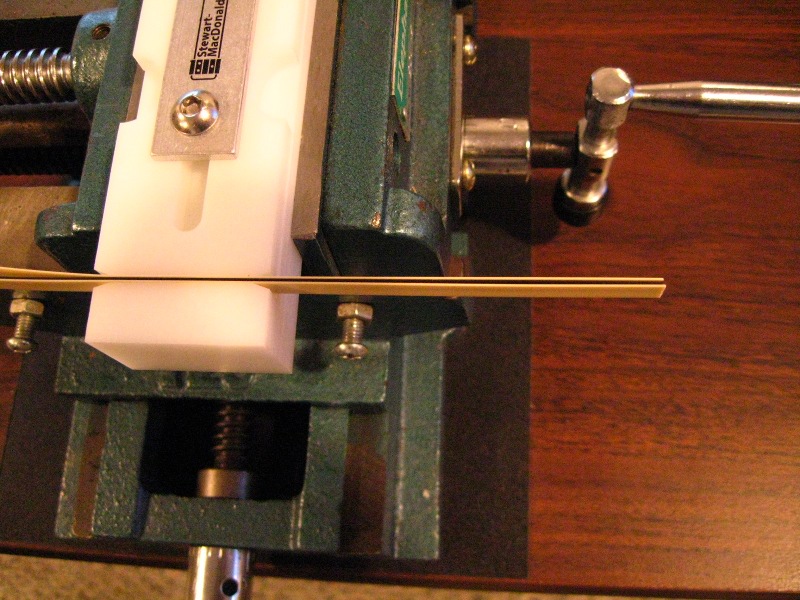
It's the same exercise, except now you have to paint 4 inner surfaces. You also have to be careful to hold the pieces apart so you can paint them...
I should also mention that it's important that you do something to hold both ends of the laminate up level with the jig, or they'll go through crooked. I used a pile of books on both ends. Also, put something heavy and small on the books as barriers to hold the strips in line or they'll flop all over the place, making it harder to hold/feed them.
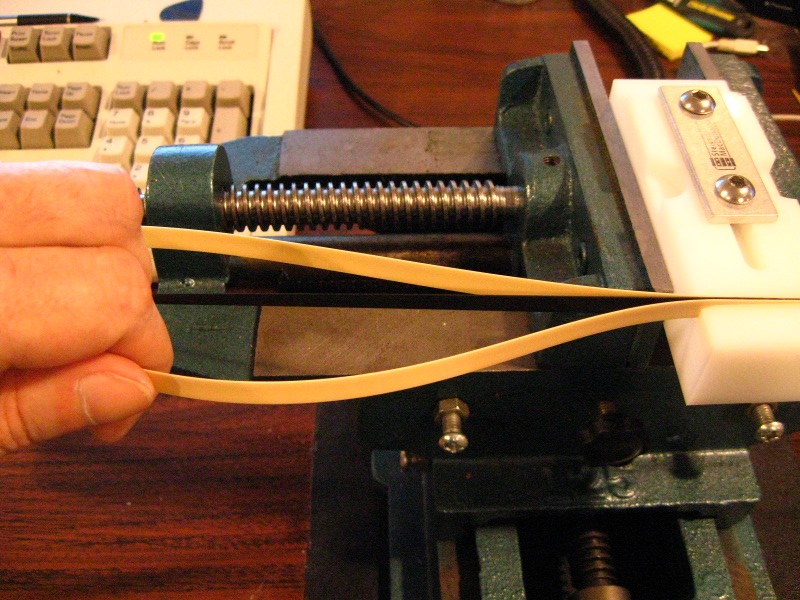
Once I had the two strips made, I could mate them up for the final binding configuration I wanted...

Now we wait. Not pictured? How much binding strip I ruined.
The stuff is just ABS plastic. It's not strong to start with. Acetone melts it, and makes it weaker. It'll harden back up, but it takes a while. They say 24 hours. In the meantime, it's VERY easy to break. Theoretically, you can just melt it back together, but I'm not sanguine about the idea. It has yet to be bent around the body's contours, which is going to stress it. I'd bet dollars to donut holes a previous break will break again. So, that stuff's wasted. Buy extra. Pretend you bought a case of beer for the project, but drank it already so that $20 is gone. You'll need it for the learning curve.
Stay tuned. Soon we'll start chewing on the body.
Probably famous last words, but we'll see. I don't know how long this will take, but you gotta start somewhere so here we go.
First, you gotta come up with a design. How many layers, how thick, what colors, etc. Then, you gotta buy the binding. Then you're stuck. You gotta do it.
I decided I wanted a multi-layer binding like what's on my Taylor acoustic. I've never done this, but I figgered if I was going to go through the trouble there may as well be as many layers as a good pro job would have. Stupid me. But, long story short, I ended up with 5 layers: 3 at .020", 1 at .040", and one at .060" colored cream/black/cream/black/cream, the inverse of the Taylor job.
Then, you need 2 kinds of glue. One to laminate the binding strips with, and one to attach them to the guitar. Laminating glue turns out to be simple acetone. You basically melt the strips together. Attachment glue is some stuff called "Weld-On #16", whatever cancer-causing concoction that is.
You also need the appropriate router bit and stand-off bearings to make the channel on the body that the binding will set into. Buy 'em all! You know you want to!
At one or more of the links above to Stewart-MacDonals's site, they have links to articles that explain how all this stuff is used. I just have a few pictures here of what I've accomplished so far.
First, you can't laminate 5 layers all at once. It's just too much to do in the time allotted. 3 is pushing it. The problem is the acetone you use to melt the strips together boils off too fast. It starts to melt the plastic right away, and you have about 2-3 seconds to stick it together. If you're too fast, it won't stick and you end up having to do it again which the plastic doesn't want to take. If you're too slow, the plastic re-hardens and won't stick. So, I started with 2.
Then, I did the three narrower parts...
Once I had the two strips made, I could mate them up for the final binding configuration I wanted...
The stuff is just ABS plastic. It's not strong to start with. Acetone melts it, and makes it weaker. It'll harden back up, but it takes a while. They say 24 hours. In the meantime, it's VERY easy to break. Theoretically, you can just melt it back together, but I'm not sanguine about the idea. It has yet to be bent around the body's contours, which is going to stress it. I'd bet dollars to donut holes a previous break will break again. So, that stuff's wasted. Buy extra. Pretend you bought a case of beer for the project, but drank it already so that $20 is gone. You'll need it for the learning curve.
Stay tuned. Soon we'll start chewing on the body.

 Cagey, you must have big balls :icon_thumright: