80s shredder first build, high-accent flame maple PRS Dragon Burst

phatstats

Junior Member
Messages
28
Finally got an 80s shredder glossed up (yeah, I know there's some orange peel in the 2k urethane... oh well), which turned out pretty awesome so I thought I'd share with ya'll. I logged everything pretty meticulously, and started recording after the first layer of dye went down, so hopefully this might be informative if there are any n00bs like me who want to do something complicated for their first build. I spent about 2 or 3 weeks practicing on flame maple scraps I got from a local exotic wood dealer before jumping up to the guitar to refine techniques and recipes since I really didn't want to F up all the ideas I had for this guitar when I first decided to do a build going back a year ago. The TL; DR video is on my instagram:
https://www.instagram.com/p/Ce1VUKbjtbC/

and the full video with recipes/tips on youtube:
https://www.youtube.com/watch?v=9Qr9FtdOJOY

The guitar turned out like the attachment.
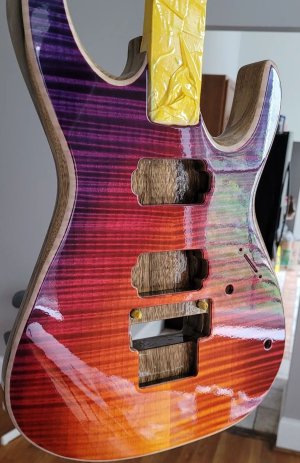
 

Attachments

  • warmoth.jpg
    warmoth.jpg
    254.8 KB · Views: 112
Thanks guys :) Now I just gotta not get too excited and jump the gun on the urethane curing...
 
Great job on this one.
Like you said practicing on scrap wood is of critical importance. I did a lot of practice on scraps and smaller parts (backplates, truss rod covers) before daring to stain my first Soloist carved top (a flat top, or even better a tele top would have been easier to start with).

One can buy small hobby pieces from say: https://www.curlymaplewood.com
A flat sawn small piece that's at least 0.5-0.75" thick can be sliced up along the length easily with a table saw, and you create a lot of strips of wood that will be highly figured and perfect for testing dyes.
 
DrSeb said:
Great job on this one.
Like you said practicing on scrap wood is of critical importance. I did a lot of practice on scraps and smaller parts (backplates, truss rod covers) before daring to stain my first Soloist carved top (a flat top, or even better a tele top would have been easier to start with).

One can buy small hobby pieces from say: https://www.curlymaplewood.com
A flat sawn small piece that's at least 0.5-0.75" thick can be sliced up along the length easily with a table saw, and you create a lot of strips of wood that will be highly figured and perfect for testing dyes.

To be honest by the time I got to the actual soloist itself... After doing several weeks of of 3 inch by 5 inch small "blocks" (which leave like ZERO room for bursting and take a looot of finesse to get a decent blend), I was honestly surprised at how easy the actual instrument itself was to get right XD When I finished up I was like... "wait... it worked?? I didn't just wreck 800 dollars of wood??" Next up I'll have to try a carved top when I have money or someone trusts me enough to send me a body for them XD
 
Audiowonderland said:
That will sand out fine.. Just let it finish curing
I was patient and just let it cure and at this point... I don't even care thank god! Just left the little amounts of orange peel; p sure no one but me will notice it for now and I'll save some urethane layers for when I scratch it to hell gigging with it!
 
Not only is that an amazing result, thank you for including the video - that really "demystifies" a lot of the process! I've got a couple of builds where I want to do the finish myself, and this is extremely helpful! Which dyes did you use?
 
rick2 said:
...
[youtube]https://www.youtube.com/watch?v=9Qr9FtdOJOY[/youtube]

The expensive flame lam left no money in reserve for a shirt!!
 
rick2 said:
...
[youtube]https://www.youtube.com/watch?v=9Qr9FtdOJOY[/youtube]

whoa welcome to The Gun Show, am i right? nice 'ceps (short for biceps). whenever i go to the gym i tell my coworkers I'm off to the Muscle Office. i never explained it to them, tho, so they might not even know what i mean lol. anyways, awesome guitar
 
fingolfen said:
Not only is that an amazing result, thank you for including the video - that really "demystifies" a lot of the process! I've got a couple of builds where I want to do the finish myself, and this is extremely helpful! Which dyes did you use?
It's all keda wood dye... I found the bare-bones out of the box recommended recipes by them left a little to be desired in terms of depth/saturation, so I upped the concentrations a bit, which are listed in the full video. It is my understanding that temperature and humidity play a big role though in how the dye goes down and then dries and behaves with your sealer, so YMMV.
 
Back
Top