justsomeguy1
Junior Member
- Messages
- 74
I'm part way through my first Warmoth build and while I'm waiting on the final parts I thought why not post about the progress, especially because people here have been very helpful to me.
You can see my out of the box photos here
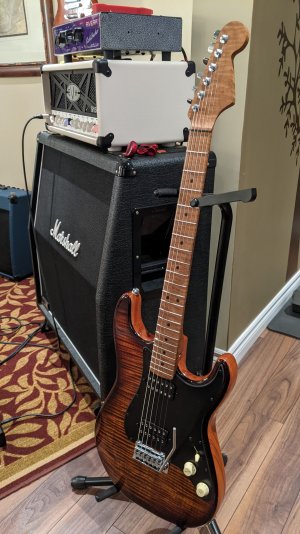
The idea behind this build was that I've always liked the comfort and feel of strats but most of them did not align with the style of playing that I gravitate to. I like rock, metal (stuck in the 80s) and love humbuckers. So naturally I own a couple of superstrats in the form of Jacksons and Charvels which are equipped with Floyd Rose trems. With this build, I wanted to return to a more classic strat design but with pickups and features that are catered more to my tastes. While I have the most experience in soldering, the rest of this process is completely new to me.
Basic specs: mahogany body, flame maple top, roasted flame maple neck with SS frets, Schaller locking tuners, Wilkinson WVS1302P bridge. Pickups are a Vineham "Triple D" set which is based off of a Super Distortion and PAF Pro. A fellow Atlantic Canadian who builds pickups. Suggest you check him out: http://www.vineham.com/
I'll now post some photos with descriptive commentary below them.

Very first thing I attempted was to drill the tuner locator pin holes in the back of the headstock. Thought I was being clever (and cheap) by having a local shop 3D print a jig I found online for around $10. Drilled a few holes before realizing that they were off by 1-2 tenths of a mm. I've used this shop before for other projects and they have a good reputation around here. Regardless, either their machine wasn't calibrated properly or the design itself was slightly off. Not a good start to the build.


Drilled out the misplaced holes to 1/8" and glued in some maple dowels. Cut them as flush as I could after curing then used a chisel to shave it flat with the headstock. Pretty pleased with how this turned out as I've never done this before.

Tuners are finally installed. Ended up buying a proper alignment tool online which lined the holes up perfectly for drilling. If you look close you'll see that two of the tuners are rotated slightly to the rest. The clamped straightedge I used must have shifted ever so slightly between tuners. It's very minor and doesn't really bother me.

Next I installed the strap buttons. Used tips that Aaron spoke about in one of the YT videos and took proper measurements for screw shaft diameter before drilling. Chamfering the holes stripped away some of the finish and as a result I did not experience any chipping or cracking when driving the screws.

Copper shielding on the pickguard.


Before, after 1 coat, and after all 3 coats of shielding paint. You can see in the second photo how thin this paint goes on.


Here is some of the electronics being wired. While I've replaced some pots and cleaned up shoddy soldering in the past, this is the first time I've ever wired a guitar/pickguard from scratch. One thing that I regret already is that I didn't take the HSH route into consideration when dealing with the excess pickups wire. I've tried moving it around and taping in different spots but I'm not having any luck finding a way to get them out of the way, and as is the pickguard will not sit flush against the body.
To do:
- Figure out what to do with the extra pickup wire
- Roll fretboard edges, level/crown if needed, and dress fret ends. I will be doing this with a luthier and guitar building friend sometime over the next couple of weeks at his shop
- I'm still considering burnishing the back of the neck
The major holdup at the moment is that the bridge. It has been out of stock since early April when I ordered my parts. I want to wait for the bridge before aligning and drilling holes for the pickguard. I haven't even been able to order yet and it'll likely be a longer shipping time from the UK when that time comes.
Not much to do until I link up with my friend at his shop or get my hands on the bridge.
Thanks again to people who have answered my questions over the last year.
You can see my out of the box photos here
The idea behind this build was that I've always liked the comfort and feel of strats but most of them did not align with the style of playing that I gravitate to. I like rock, metal (stuck in the 80s) and love humbuckers. So naturally I own a couple of superstrats in the form of Jacksons and Charvels which are equipped with Floyd Rose trems. With this build, I wanted to return to a more classic strat design but with pickups and features that are catered more to my tastes. While I have the most experience in soldering, the rest of this process is completely new to me.
Basic specs: mahogany body, flame maple top, roasted flame maple neck with SS frets, Schaller locking tuners, Wilkinson WVS1302P bridge. Pickups are a Vineham "Triple D" set which is based off of a Super Distortion and PAF Pro. A fellow Atlantic Canadian who builds pickups. Suggest you check him out: http://www.vineham.com/
I'll now post some photos with descriptive commentary below them.
Very first thing I attempted was to drill the tuner locator pin holes in the back of the headstock. Thought I was being clever (and cheap) by having a local shop 3D print a jig I found online for around $10. Drilled a few holes before realizing that they were off by 1-2 tenths of a mm. I've used this shop before for other projects and they have a good reputation around here. Regardless, either their machine wasn't calibrated properly or the design itself was slightly off. Not a good start to the build.
Drilled out the misplaced holes to 1/8" and glued in some maple dowels. Cut them as flush as I could after curing then used a chisel to shave it flat with the headstock. Pretty pleased with how this turned out as I've never done this before.
Tuners are finally installed. Ended up buying a proper alignment tool online which lined the holes up perfectly for drilling. If you look close you'll see that two of the tuners are rotated slightly to the rest. The clamped straightedge I used must have shifted ever so slightly between tuners. It's very minor and doesn't really bother me.
Next I installed the strap buttons. Used tips that Aaron spoke about in one of the YT videos and took proper measurements for screw shaft diameter before drilling. Chamfering the holes stripped away some of the finish and as a result I did not experience any chipping or cracking when driving the screws.
Copper shielding on the pickguard.
Before, after 1 coat, and after all 3 coats of shielding paint. You can see in the second photo how thin this paint goes on.
Here is some of the electronics being wired. While I've replaced some pots and cleaned up shoddy soldering in the past, this is the first time I've ever wired a guitar/pickguard from scratch. One thing that I regret already is that I didn't take the HSH route into consideration when dealing with the excess pickups wire. I've tried moving it around and taping in different spots but I'm not having any luck finding a way to get them out of the way, and as is the pickguard will not sit flush against the body.
To do:
- Figure out what to do with the extra pickup wire
- Roll fretboard edges, level/crown if needed, and dress fret ends. I will be doing this with a luthier and guitar building friend sometime over the next couple of weeks at his shop
- I'm still considering burnishing the back of the neck
The major holdup at the moment is that the bridge. It has been out of stock since early April when I ordered my parts. I want to wait for the bridge before aligning and drilling holes for the pickguard. I haven't even been able to order yet and it'll likely be a longer shipping time from the UK when that time comes.
Not much to do until I link up with my friend at his shop or get my hands on the bridge.
Thanks again to people who have answered my questions over the last year.