'54 Goldtop Tele project

jackthehack

Epic Member
Messages
5,630
Well, here we are in DIY finishing phase; here was original concept:

54gttele.JPG


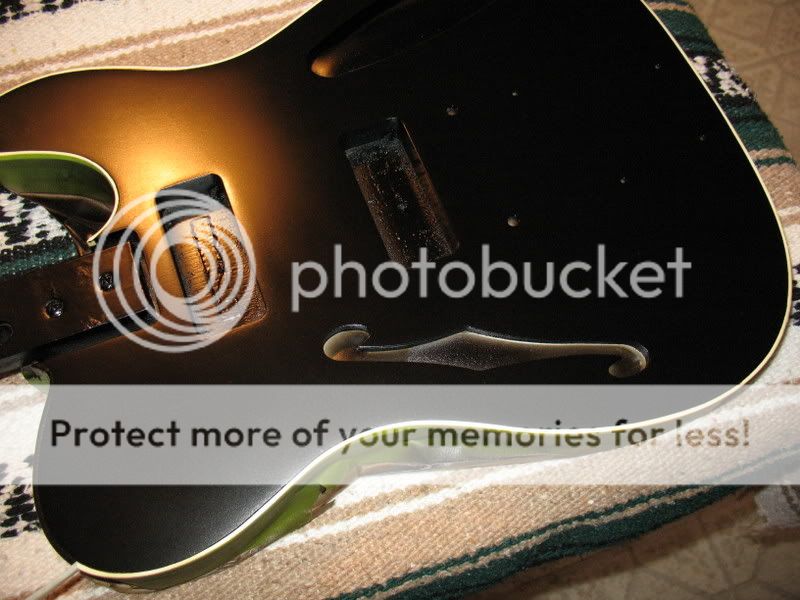
Here are the parts as arrived today:

54GT2.jpg


54GT1.jpg


One issue is that the mahogany coloration is way different between the neck and body (so much for the "try to match" plea in ordering instructions, so I don't know how feasible the idea of trying to replicate the original back color from a '54 Gibson will be, if you check this link with pics:  http://www.provide.net/~cfh/lpgold0.html the original finish was a lot lighter brown than all the re-issues over the years and didn't have dark grain fill.  Was going to grain fill brown and use one of the lighter shades of Tandy leather dye to try to match, but don't know that that's feasible; may wind up doing a black grain fill and a darker hue of brown on the back, or maybe wind up shoot with toner instead of dying it - I'm sure CB's got some opinion about that...

The other issue is masking the binding... no problem for grain filling and dying or shooting toner on the back, but anyone have any handy hints about masking the narrow lip around the top? Be a while before I get there, it's turning off cold so it'll probably take most of the week just to get the grain filled as drying times will be SLOW.....

 
One thing that might help is using a natural coloured grain filler on that Mahoganny. I used that colour on a similar coloured mahoganny body recently and its come out looking really nice.
 
I always seal the binding with clear before I shoot color that way it will scrape off easier when you scrape the binding.

I use 3M ¼” masking tape.  I tried the blue vinyl tape that pin strippers used and wound up throwing it away; I did not like the adhesion on it.  I would tape the side first since it is a lot easier to follow.  You will still have some tape that goes over the lip; I trim that off with a blade.   I start taping the top at the bottom of the neck pocket by the horn and work my way around.  On really sharp corners you may have to make a couple of cuts to make the turn.  The hardest parts are the edge of the horn and that little bend at the top of neck pocket; I just cut pieces to pick up areas I missed.  I clean those areas up when I scrape the binding after the color coat.

RemovingBindingTape.jpg
 
"I always seal the binding with clear before I shoot color that way it will scrape off easier when you scrape the binding."

Should've thought of that myself, Thanks! BTW Tonar, that's a sharp P90 equipped Tele you're working on there, is that a work in progress? Don't recall seeing pics of that finished....

"One thing that might help is using a natural coloured grain filler on that Mahoganny"

Could do that, but the color of the brown grain filler I was going to use is pretty damn close to the brown on those pics from an original '54 Gibson. I have to pull out the sanding paper and experiment this evening on where I can get color-wise with the dyes I have. May wind up having to go a darker brown to get the neck/body tone to match, or use toner rather than dye. In either case if I can replicate the original color I'll probably wind up using the black grain filler to get more of an effect.
 
Thanks! BTW Tonar, that's a sharp P90 equipped Tele you're working on there, is that a work in progress?

Thanks Jack.  Actually I finished that guitar for Pete Anderson and shipped it to him at the first of this year.  They put it together in LA with Loller P90’s and a Bigsby.  
 
I've really been looking forward to this project, this is going to be fun to watch.
 
Jack, I can't believe you screwed that stick into the neck pocket and created 2 new holes in the body. Why not use the existing holes?

 
Yeah, have to ask Tonar 'bout that. This one's getting a Rio Grande JazzBar/BluesBar set for pickups, off to play with the dye collection....
 
Doesn't appear if any of the dyes are going to work, the differentiation in mahogany color is too great, and a combination of lighter brown on the darker neck and vice versa isn't going to cut, I guess it's on to fill with black grain fill and thinking about going toner for the back....
 
Resigned to finishing back with darker toner, so first grain fill with black filler done, cold as hell here, be lucky if it dries in 24 hours in basement...

54GT1stfill.jpg
 
Sanding back prior to doing another grain fill; as you can see the mahogany grain pores are much longer/deeper than in last Thinline project. Lord knows how many fills it's going to take, at least 4, maybe more... Have decided to do neck back in toner as close to what I can match to "Transparent Brown" from Warmoth Showcase, going to take something that dark to mask wood coloration difference in neck/body...

54GT2tfill.jpg
 
hey Jack

how long does it take you to sand back the grain fill each time and what grit of sand paper are you using?

Brian
 
On this particular build, a long time, couple of hours, as I have to do all the sanding on the sides by hand because of the binding. I just sand back with #220, after the final fill I sand back to #320 or 400 prior to spraying with sanding sealer.
 
On third fill, will let dry overnight and sand back tomorrow after work, but there are still another couple of fills in my immediate future. It's a good thing mahogany sounds so good, because it's such a bitch to fill!
 
After sand back, seems like neck is filled, but body needs one more...

Found a local woodcraft store and bought an assortment of Behlen lacquer toners and two pieces of "test" mahogany approx. the shades of the mismatched neck and body I have to even out and sprayed some test shots. Looks like Dark Mahogany or either Walnut shade will be dark enough to even them out, should any of you run into the same situation in the future. Will post a pic in morning, hard to see the color gradations in artificial light.

The Behlen toners spray "thinner" than Mohawk toners do, and will be a bit trickier to apply without any runs, for what that's worth...

Filled neck with 1 coat sanding sealer:

54GTnfill.jpg


Back
Top