Leaderboard

Using Routing Patterns

rgand

Epic Member
Messages
5,934
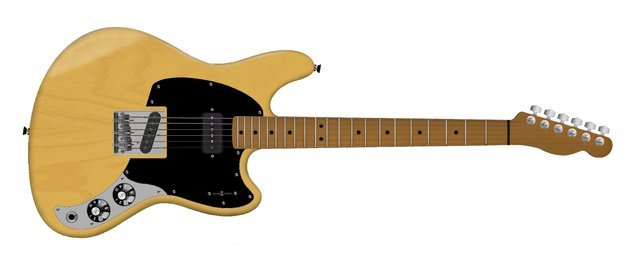
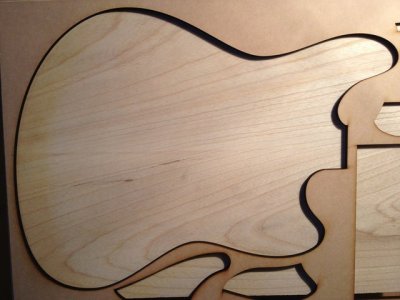
OK, I finally have some wood to make the body out of. I have 1/4" MDF routing patterns but will make 3/4" ones to work from. Today I traced the body pattern and rough cut it to less than 1/8" of the trace line. Now that brings up a question.

What is the best way to hold the routing pattern so you can cut out your body, and in this case, also the working pattern? Double stick tape to keep it from shifting and clamps? If tape, then which tape is best for the job so it doesn't leave a bunch of adhesive residue when I take it off?
 
Tape has a tendency to stay put until you get confident and then alow the template to shift, clamps get horribly in the way. Personally I like to screw the template to the body in areas that will get routed away in a next step. Pickup cavities, neck pocket, control rout.
 
Thanks, that helps. The only area I have to screw to is the neck pocket. The pickup and control cavities are part of the body pattern, as are the bridge mounting and string-through holes. I could put a screw into the neck pocket area and maybe somewhere that would get hidden by the pickguard.

That brings up still another question. How do you hold the neck pocket pattern in place to route that? It's only about an inch and a half bigger than the pocket and the router will hit any clamps I use for it. I guess I could screw that to the body where the pickguard would cover it.
 
for the smaller templates, put the router into the router table, flip the body over, and route it that way.  It will be much easier to do.

I've personally had good luck with both screws and tape, but for my larger templates (b-bender for example) I always screw it down.
 
I try to use some sort of positive fastener like screws or clamps on patterns whenever possible, knowing that the routerbeast is a powerful, hungry and hateful little bugger that always wants to eat more than you want to feed it. Screws are best, if possible, since clamps often get in the way. But, I've been known to use double-sided tape when the job is light and I have good mating surfaces, like a lexan pattern to a finished body. Then, even just the general store variety of 3M DS cellophane tape works fine. That would never work with MDF patterns, though. The tape just can't get a good enough grip on it. Maybe with a different tape, but I haven't seen it yet.

As for your neck pocket pattern, I don't know what to say without seeing the pattern. Mine's long - the one from StewMac, if you're familiar - so I'll typically use DS tape toward the front end and clamps to the rear, like they show in this drawing...

i1120-1_template.gif
 
Since you're doing the smart thing and researching this before you apply high-speed spinning tool steel to wood, go on over to TDPRI and dip into the collected wisdom of a guy named Ron Kirn, who has done some very long, detailed threads on scratch builds with hordes of photos.  He is hugely informative on many, many aspects of solid-body guitar building.  Plus he's a laff riot.
 
I use Scotch brand mounting squares.  they are about the size pf a postage stamp.  they hold 6lbs.  I like because they are strong and can go anyplace on the template to hold it down.  I just used them for a neck pocket, 2 pickups and control cavity.

70006584687_spsi.png
 
+1 for Ron Kirn. Probably his most famous thread is here. Every last detail, how, and why. Very educational and entertaining.
 
Mayfly said:
for the smaller templates, put the router into the router table, flip the body over, and route it that way.  It will be much easier to do.
Yeah, about that. I'll need to rig up a table for that purpose. That's now on my list for this job. Thanks for the tip.

Cagey said:
I try to use some sort of positive fastener like screws or clamps on patterns whenever possible, knowing that the routerbeast is a powerful, hungry and hateful little bugger that always wants to eat more than you want to feed it. Screws are best, if possible, since clamps often get in the way. But, I've been known to use double-sided tape when the job is light and I have good mating surfaces, like a lexan pattern to a finished body. Then, even just the general store variety of 3M DS cellophane tape works fine. That would never work with MDF patterns, though. The tape just can't get a good enough grip on it. Maybe with a different tape, but I haven't seen it yet.

As for your neck pocket pattern, I don't know what to say without seeing the pattern. Mine's long - the one from StewMac, if you're familiar - so I'll typically use DS tape toward the front end and clamps to the rear, like they show in this drawing...

i1120-1_template.gif
Thanks for the information. Screws and clamps it is, then. My pattern is just big enough to make a pocket. I'll screw it to as piece of 3/4" MDF and make a long one like that and I'll have something to clamp on. Now, that image shows the neck pocket being cut first. Is that better than doing it after the body is routed?

Bagman67 said:
Since you're doing the smart thing and researching this before you apply high-speed spinning tool steel to wood, go on over to TDPRI and dip into the collected wisdom of a guy named Ron Kirn, who has done some very long, detailed threads on scratch builds with hordes of photos.  He is hugely informative on many, many aspects of solid-body guitar building.  Plus he's a laff riot.
Thanks for this. I'll check out TDPRI and Ron Kirn. Right now, I'm a newbie to routing a body and can soak up a whole lot of information before my head gets too big to hold it. :icon_biggrin: Right now I have a nice light piece of swamp ash that took several tries and 5 months to get so I don't want to trash it.

DMRACO said:
I use Scotch brand mounting squares.  they are about the size pf a postage stamp.  they hold 6lbs.  I like because they are strong and can go anyplace on the template to hold it down.  I just used them for a neck pocket, 2 pickups and control cavity.

70006584687_spsi.png
Good to know. i have that stuff on hand all the time.
 
Rgand said:
Thanks for the information. Screws and clamps it is, then. My pattern is just big enough to make a pocket. I'll screw it to as piece of 3/4" MDX and make a long one like that and I'll have something to clamp on. Now, that image shows the neck pocket being cut first. Is that better than doing it after the body is routed?

I've never had a choice so I can't say from first experience. When I've done it, it's been to change the pocket floor - drop it or angle it - so the rest of the body has always been done. One issue I did have that I can warn you about is using a portable router. The tongue of the template hanging out over the pocket area might want to sag under the weight of the machine, so it's a good idea to either make the template very sturdy, or add a spacer block at the front end of the template to hold that end up. Otherwise, you'll route the exit end of the neck pocket too deep, and erratically at that. And if you're going to make a template, I'd suggest making it a little wider than the StewMac version so the router has plenty of surface to ride on and/or keep things level.
 
Cagey said:
I've never had a choice so I can't say from first experience. When I've done it, it's been to change the pocket floor - drop it or angle it - so the rest of the body has always been done. One issue I did have that I can warn you about is using a portable router. The tongue of the template hanging out over the pocket area might want to sag under the weight of the machine, so it's a good idea to either make the template very sturdy, or add a spacer block at the front end of the template to hold that end up. Otherwise, you'll route the exit end of the neck pocket too deep, and erratically at that. And if you're going to make a template, I'd suggest making it a little wider than the StewMac version so the router has plenty of surface to ride on and/or keep things level.
Thanks, I'll make it wider. That's a good bit of advice about the pattern sagging. I have 3/4" MDF to make it so I don't think that will sag under anything lighter than my pickup.
 
I saw a cool thing at Crimson Guitars.  He would take tape and put it on both sides of what you are trying to affix together so that when the pieces are matched up the backs of the tape are aligned.  Then he would take superglue and apply it to the back of one of the pieces of tape.  Then he would put them together.  Holds it secure until you want to take it apart, then you just yank.  You gots to make sure you don't overlap your superglue, however.

[youtube]https://www.youtube.com/watch?v=ub6PsY4cgwg[/youtube]

Fast forward until about 7:00 if you are impatient...
 
Another tape to consider is called Carpet Tape. It's used to keep carpet edges from curling and moving. Also used to keep throw rugs in place. I've used it on small pieces while working on a router table. It's a double sided, cloth like material that will stick to most surfaces, even rough, uneven ones, (like the back of a carpet). I've had good luck with it.

Also, +1 on the Scotch foam backed, double stick. It's my go to product. I recently used it to  fix a piece of flapping car door trim. Holds up at 80MPH plus!  :icon_jokercolor:
 
I like to do the perimeter and internals separate. I have several templates I've made that have the bridge, pickup, and neck pocket routes all on a plank. It just seems like an easier way to keep everything nice and inline. It also comes in handy for future use. It's versatile and sort of modular. On the other hand MDF is pretty cheap. I do use double sided tape and it works just fine for me. A few strips going in different directions have always been laterally stable for me. Good luck and post some pics :headbang1:
 
Thanks for all the great ideas. I appreciate everyone's input. Now I have some excellent choices to make.

Here are a couple pics so you know what you're helping me with. It's going to be a Telerauder (that's what you get when you leave a Telecaster in the closet with a Marauder prototype). Right now, I have a mock-up image (subject to minor changes) and a block of wood (two-piece).

Once this thing is rolling along, I'll start a thread on it. Progress will be slow since I have to work on it between other things and I want to do it right.

In order - the concept, the wood and where the body will get routed (I laid the piece the patterns were cut from on the blank).


Attachments

  • MarauderHybrid3sm.jpg
    MarauderHybrid3sm.jpg
    19.5 KB · Views: 320
  • IMG_1324sm.JPG
    IMG_1324sm.JPG
    40.5 KB · Views: 305
  • IMG_1319sm.JPG
    IMG_1319sm.JPG
    52 KB · Views: 310
Aaron, are you seeing this? This is an awesome body you might want to consider offering. I know I'd buy it in a heartbeat (it is intended for 24" scale necks isn't it?)

150416498299538800_resized.jpg
 
Logrinn said:
Aaron, are you seeing this? This is an awesome body you might want to consider offering. I know I'd buy it in a heartbeat (it is intended for 24" scale necks isn't it?)

150416498299538800_resized.jpg
That's one of the finest compliments I could hope for. Thanks for that.

The body is 14" wide and 19.25" long to the tip of the upper horn. It takes a full 25 1/2" neck but the interesting part of it is that the neck pocket is almost a full inch further into the body than most guitars. I'll try it first with that but may eventually go for a 24 3/4" conversion. There's no reason why it couldn't be made 7/8 scale to accommodate a 24" neck though.
 
Here's a pic of the 1966 Marauder Type II prototype. I worked from that until I got it where I liked. It had a few too many switches for me.
 

Attachments

  • 1966 1st Prototype (2).jpg
    1966 1st Prototype (2).jpg
    79.8 KB · Views: 305
Dunno if you're doing your own fretwork on your necks yet, but the sanding beam for fret leveling can be a pricey purpose-built tool, considering its simplicity. I solved the sanding beam problem by going to a stone countertop business and picking up a piece of scrap marble of an appropriate width and length.  The guy gave it to me for nothing.  Even trimmed the rough end so it was square.  I tried a headstone shop first, but they didn't actually do their own stonecutting - they were just the storefront near the cemetery, and the cutting took place elsewhere.  So call ahead!
 
Back
Top