Tonemaster build! (Non-Warmoth)

rapfohl09

Hero Member
Messages
1,673
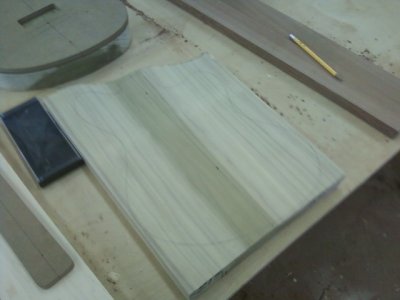
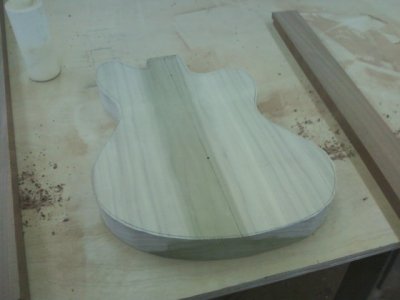
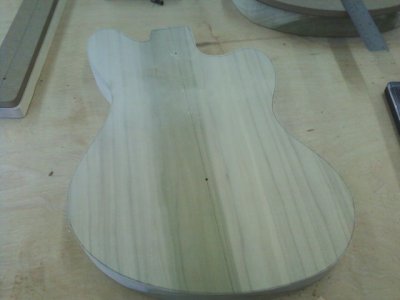
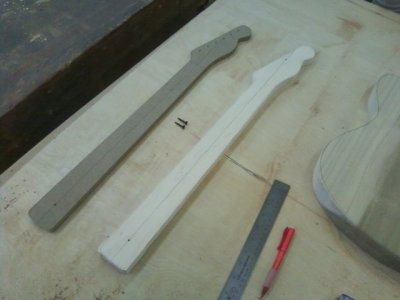
Hey everyone, my planning build kind of flopped but there is actually progress now so I figured I would post it up. Today I went to that guys house and after having a big hunk of poplar and maple planed down I got to work. I cut out two bodies, a maple neck blank and also a mahogany neck blank. After I cut them out I sanded them close to the line and soon ill rout them out.

Here are the specs:
Poplar 1-piece body
Maple/Rosewood neck
Single P90 pickup
1V/1T

Those are the basic specs as I'll decide on some other things as I go. I'm thinking a blue color (Sonic? LPB? Pelham? Daphne?) with just an oil finish on the neck. More pictures to come with more progress.
 

Attachments

  • downsize.jpg
    downsize.jpg
    46.1 KB · Views: 48
  • downsize_2.jpg
    downsize_2.jpg
    43.4 KB · Views: 56
  • downsize_3.jpg
    downsize_3.jpg
    45.3 KB · Views: 62
  • downsize_5.jpg
    downsize_5.jpg
    51.8 KB · Views: 75
I'm bringing this thread back to life my friends! I have been working quite diligently on this guy for a while now, but wanted to get by a large milestone so that I didn't bring it back, then flop it again. I only had a week (Spring break from college) to do the work I did last time and I rushed a lot of things and messed a lot of things up/didn't make them the way I wanted them.

So here is the Tonemaster build part 2! There are a lot of pictures so hang in there with me! I am really proud of the work I have done on this so far and I hope you guys enjoy it. I am uploading these pictures in the groups of the days work.

This is a completely new body (from the same hunk of wood as the original). The only thing not shown is rough cutting it with a band saw.

1. First I built a planing jig and plane the two side perfectly parallel.
2. About halfway there!
3. And done, shown with template.
 

Attachments

  • downsize_2.jpg
    61.3 KB · Views: 43
  • downsize_3.jpg
    51.6 KB · Views: 31
  • downsize.jpg
    71 KB · Views: 39
Firstly, I attach my body template with screws, and take away as much extra crap as I can with a sander. A robosander is on my list of things to get.

Here are some various pictures after the job is done. One of the most important things I can say is GET GOOD TOOLS! I did all of this with my new Kreg router table. It is RIDICULOUS how awesome it is. I highly recommend it.

I got a tiny bit of router burn, but no tear out to speak of! I figured out a downhill routing plan and used that.
 

Attachments

  • downsize.jpg
    60.4 KB · Views: 29
  • downsize_2.jpg
    55.4 KB · Views: 19
  • downsize_4.jpg
    88.1 KB · Views: 19
  • downsize_5.jpg
    73.8 KB · Views: 22
I made a neck pocket template a way that I saw a couple of times. You line up perfectly straight edges super tight up along the sides of the neck, then route out the area left behind. Then your left with a neck pocket that is custom to the exact neck you are using. Since I am using a Warmoth neck, I now have a perfect Warmoth neck pocket template. I actually don't have any pictures of the neck itself, because I originally wasn't planning on using it for this build, but I now am and I will take some pictures soon for you guys.

1. I line up some straight pieces along the sides of the neck.
2. It leaves you with the footprint of the neck.
3. Then you cut out a big hunk of MDF, then rout it out.
4. A perfect fit!
 

Attachments

  • downsize.jpg
    46.1 KB · Views: 34
  • downsize_3.jpg
    54.2 KB · Views: 33
  • downsize_4.jpg
    40 KB · Views: 24
  • downsize_5.jpg
    42.9 KB · Views: 26
I made a bunch of copies with the neck pocket so that I wouldn't ever have to make another one if I ruined one. This one is my working template, made out of 3/8 acrylic.

1. Here it is! Acrylic is really cool to work with.
2. Super tight fit!
3. Another winner!
 

Attachments

  • downsize_3.jpg
    81.7 KB · Views: 25
  • downsize_2.jpg
    79.1 KB · Views: 22
  • downsize.jpg
    81 KB · Views: 28
After getting every all set up and lined up it was time to get the neck pocket started! This was the milestone I wanted to reach before I started posting again. I was really worried about getting this step right.

1. I double sided taped the template on and forstner'd about a bunch of excess wood.

I just realized I didnt take any pictures without the neck in...But I will later.

2. A perfect pocket!
3. Whooo!
4. It's really starting to look like a guitar! I am so proud when I look at this picture.
 

Attachments

  • downsize_3.jpg
    76.2 KB · Views: 65
  • downsize_4.jpg
    53.6 KB · Views: 22
  • downsize_6.jpg
    16.2 KB · Views: 49
  • downsize.jpg
    77.6 KB · Views: 56
Here it is in all of it's glory. My first ever neck pocket! I couldn't have asked for this to have gone better!

1. The true test! Holding it by the neck, super tight pocket holds the guitars weight
2. A not very good picture, but here is a half compass showing the neck in the pocket is perfectly parallel to the center line. I honestly don't know how I pulled it off so well :laughing7:

Today I will take some pictures of the pocket itself and a bunch of the neck, since I know you guys will love it. Now that I have a camera (my cell phone, don't tell anyone) and can upload pictures that aren't GIGANTIC I can put up some of my other projects too.
 

Attachments

  • downsize_2.jpg
    76.4 KB · Views: 32
  • downsize.jpg
    46.6 KB · Views: 42
Death by Uberschall said:
Are you making carved top guitars? The pics make the body look really thick.  :icon_scratch:

Great work BTW.  :icon_thumright:

I know what you mean! I think it is just that guitars that haven't been rounded over yet look thick. It is actually only a tiny bit over 1 5/8". I made it a little thin ( I would actually like it thinner) because I am so used to playing Gibson SG, which by my measurements is only just barely 1 1/4"
 
Excellent job! As usual, it's true that the lord helps those who help themselves. You couldn't easily get a better neck pocket template than what you've created, and the results show it.

And your comment earlier about buying good tools? +1,000,000. Nothing more frustrating and potentially destructive or injurious than fighting with sub-standard tools. When it comes to that stuff, It only costs a little more to go first class and you're never sorry.
 
Time for some bolt holes! I did this a way that I saw just recently by another member. I cut some neck screws off and then threaded them into the neck and pushed it into the pocket. It leaves some nice pinpoints and you just drill there, and bam! Perfect holes. I was just a little tiny bit off on one, I'll let you guys guess which  :laughing7:. It is a really tiny amount and you cant tell when it is all buttoned up, so I'm not the slightest bit worried. Enjoy some pictures! The ones I took of just the neck came out really crappy, so more later.

1. Cut some screws and thread them in.
2. Push it in and it leaves some nice pinpoints.
3. All done!
4. All buttoned up, can you tell ones a little off?

P.S. The neck plate is the only one I had laying around and is a gift from my girlfriend, so no crass remarks about the mushy words (that plate means a ton to me). I will be getting a different one for this guy.

Next step: Tons of sanding.
 

Attachments

  • downsize.jpg
    downsize.jpg
    138 KB · Views: 87
  • downsize_4.jpg
    55 KB · Views: 32
  • downsize_3.jpg
    40.1 KB · Views: 34
  • downsize_4.jpg
    67.4 KB · Views: 43
Great work so far, and no need to apologize for sentimentality, I think it's phenomenal you have a significant other that supports you, let alone to this degree.

Are you going to do a tummy/forearm contour?
 
Corey P. said:
Great work so far, and no need to apologize for sentimentality, I think it's phenomenal you have a significant other that supports you, let alone to this degree.

Are you going to do a tummy/forearm contour?

I'm not sure if I will or not. The body is quite small and fits nicely on my lap, but I forgot to check it out when I had the neck on there. So next time I test the fit or something hopefully I remember to check that out. I will put a tummy contour if it needs it, but I dont think ill be doing a forearm contour.

I put in the order for the rest of the parts last night. I think this will really pick up now that I dont have to make anymore templates and its basically just drilling holes now.
 
Well my router just broke.....We will see if I have the will to go and buy one on my lunch break tomorrow. That was something that I didn't plan on having to buy....

However, it was a older craftsman router that my girlfriend's dad gave to me that had been sitting in the garage for like 10 years, so it wasn't completely unexpected.
 
Not to be totally post crazy, but I found these scrounging my computer earlier. They are better than anything I've been able to take :laughing7:
 

Attachments

  • TN2536A.jpg
    57.7 KB · Views: 52
  • TN2536B-1.jpg
    69.9 KB · Views: 42
Well I got a ton of work done on this today. All I have left is to decide whether I want to put strap pins on, decide whether I want a tummy contour, then drill a bridge ground hole. I need a smaller, longer drill bit for that. Without further ado.

1. First I positioned the bridge. I didnt really just trust the centerline so I drew my scale length line, then used a compass to keep it perpendicular. Then I used strings to make sure I had the outside strings lined up where I wanted them. It came out perfect. I should say that I double side taped everything down, especially the bridge before I drilled the holes.

2. Another shot.

3. Then I rounded it over with a 1/8" bit. For some reason this is the point when I think a guitar really starts to take shape. It just looks so good afterward.

4. A close up.
 

Attachments

  • downsize_4.jpg
    44.8 KB · Views: 28
  • downsize_3.jpg
    69.6 KB · Views: 28
  • downsize_2.jpg
    61.3 KB · Views: 35
  • downsize.jpg
    59.2 KB · Views: 32
*Edit* I put the wrong picture in, so I just took it out.

2. I drill the input hole first. That way it doesn't blow out on the inside of the cavity. It just makes it look a little nicer.

3. Then I rout the cavity in. I did it the same way as before, I forstner the extra junk out and then just rout it. I left about 1/4 of an inch.

4. I lined things up nicely. The input hole looks good.
 

Attachments

  • downsize_7.jpg
    6 KB · Views: 22
  • downsize.jpg
    46.8 KB · Views: 23
  • downsize_3.jpg
    51.3 KB · Views: 24
1. And then the pickup rout. Again the same as before. It made a little mistake in that I was trying to hog out some extra material before I went full depth and hit the side of my template. But I just flipped the template and used the other side. It is about 1/32" of an inch longer than it should be, but I think its fine :laughing7:

2. And another one. You can see the hole I drilled to the cavity as well.

3. Hopefully you can see where the hole came out in the cavity. I am nervous about doing the bridge ground hole.

4. And I couldn't leave it without showing you guys a mock up.

Now I have a ton of sanding to do, and I have to decide on a color. I hope that you guys are enjoying this! Please leave any and all comments!

In a little bit, you will get sneak preview of the next one :icon_thumright:
 

Attachments

  • downsize_4.jpg
    52.6 KB · Views: 26
  • downsize_5.jpg
    46.7 KB · Views: 27
  • downsize_6.jpg
    38.9 KB · Views: 22
  • downsize.jpg
    80.7 KB · Views: 69
Back
Top