Leaderboard

Telerauder Build

Rgand said:
stratamania said:
I suppose you could also use some steel rod of the correct diameter as an alternative to drill bits. But of course, that may not be lying around either in most peoples spaces.
If it was 3/32" I could do that but I need 7/64". That's OK, this is a good excuse to replenish my indexes.

A silver lining. Over here I find it difficult to find imperial measurement stuff unless I order it online.
 
Rgand said:
stratamania said:
I suppose you could also use some steel rod of the correct diameter as an alternative to drill bits. But of course, that may not be lying around either in most peoples spaces.
If it was 3/32" I could do that but I need 7/64". That's OK, this is a good excuse to replenish my indexes.
If you have wire gauge, (#), drills, you can get pretty close to 7/64, (.109375"). Try a #35, (.110") or a #36, (.1065"). Depending on how carefully the holes were drilled, one of these might very well work. The #35 is less than 1/1000" off, (.000625").  :icon_thumright:
 
BigSteve22 said:
Rgand said:
stratamania said:
I suppose you could also use some steel rod of the correct diameter as an alternative to drill bits. But of course, that may not be lying around either in most peoples spaces.
If it was 3/32" I could do that but I need 7/64". That's OK, this is a good excuse to replenish my indexes.
If you have wire gauge, (#), drills, you can get pretty close to 7/64, (.109375"). Try a #35, (.110") or a #36, (.1065"). Depending on how carefully the holes were drilled, one of these might very well work. The #35 is less than 1/1000" off, (.000625").  :icon_thumright:
Thanks for that information but I just checked and don't have the right ones. I have dozens each of #'s 10, 21, 30 and 40 but that's like having tires that are just an inch different rim size than you need. It's tempting to just run a #30 through there but then I'd have to ream the bridge and ferrules as well as the holes through the body. No matter how you cut it, a trip to the store is in order.
 
stratamania said:
Rgand said:
stratamania said:
I suppose you could also use some steel rod of the correct diameter as an alternative to drill bits. But of course, that may not be lying around either in most peoples spaces.
If it was 3/32" I could do that but I need 7/64". That's OK, this is a good excuse to replenish my indexes.

A silver lining. Over here I find it difficult to find imperial measurement stuff unless I order it online.
Well, that's the bunk if you need one in a hurry.
 
Rgand said:
stratamania said:
Rgand said:
stratamania said:
I suppose you could also use some steel rod of the correct diameter as an alternative to drill bits. But of course, that may not be lying around either in most peoples spaces.
If it was 3/32" I could do that but I need 7/64". That's OK, this is a good excuse to replenish my indexes.

A silver lining. Over here I find it difficult to find imperial measurement stuff unless I order it online.
Well, that's the bunk if you need one in a hurry.

Indeed it is.  :icon_thumright:
 
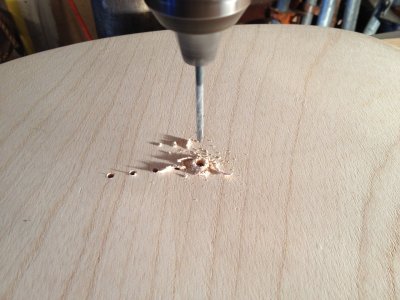
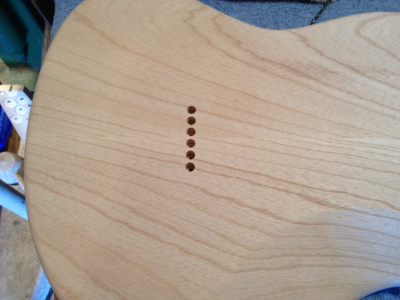
So armed with the right number of 7/64" drill bits, I changed my mind and went with 1/8" ones. The holes in the bridge were almost that size already and basically the 1/8" bit just deburred them slightly. So I screwed the bridge back on and drilled halfway through the body in the string-through holes.

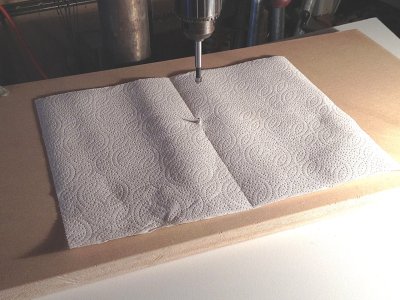
I made a centering jig with a piece of 3/4" MDF and a 1/8" stainless rod set in it and clamped it to the drill press aligned with the chuck. With that I was able to set the body on it and locate the other side of the holes and drilled through from the back. Then I put a 5/16" Forstner bit in and drilled just deep enough for the ferrules. Bingo. Nice clean, aligned holes. I'm pleased and I now have that jig for the next project.


Attachments

  • IMG_1437sm.JPG
    IMG_1437sm.JPG
    251.4 KB · Views: 41
  • IMG_1447sm.JPG
    IMG_1447sm.JPG
    335.3 KB · Views: 41
  • IMG_1442sm.png
    IMG_1442sm.png
    1.1 MB · Views: 21
Label it prominently. Big letters. Use a Sharpie or something. It's so simple it'll look like scrap, and it'll get used for something else. If not by you, then somebody who doesn't know any better. Not that you couldn't make another one easily, but you'll look for it for an hour before realizing it's just gone, used as a potted plant platform on the deck or something.
 
Thanks, Logrinn. I was pleased with the results. Almost surprised by how accurately that jig worked.

Good advice, Kevin. I have dedicated some storage space for patterns and associated tools. This will go there, too. I'm the only one who goes out there but I've been known to outsmart myself before.
 
I once did a job for a tool & die model shop (metal, rather than wood) where abuse or unauthorized re-configuration just plain ol' loss/confusion of jigs drove them so crazy that they actually built a huge fenced-in area like a high-value parts crib, loaded it with heavy-duty shelving 30' high, put in some tracks, and designed/built a drone "picker" that was the only authorized moving thing allowed inside. When you wanted something, you had to enter various data in the computer at the disbursement point, and the drone would go get what you were asking for. When you were done with it and brought it back, you did a similar data entry thing and the system found a place to stash it. Worked sorta like a file system. My software kept track of the database of where things were, where open storage existed, and controlled the drone. It wasn't foolproof because humans could still get inside, but as long it was used as designed, it was great.

My guess is it's a complete mess these days, assuming they're still using it at all. Automated materials handling is always a cast iron bitch due to those pesky humans  :laughing7:
 
I've worked in numerous shops and jigs were hard to keep. They were even harder to find. They also sometimes got modified by someone with a better idea and ended up getting scrapped. I can see how your system would help.
 
There hasn't been much progress posted lately because I've been sanding and sanding and sanding...

Today, however, I got the whole body done to 320 grit. It's now ready for a finish.
GcyjUDo.jpg


I also looked at the idea of making something to bolt to the neck pocket to hold the whole thing while applying a finish. Then I remembered my pile of miscellaneous metal and after rummaging for a few minutes found a 22" piece of 5/16" stainless rod. Since I had drilled down through the neck pocket into both pickup cavities with a 5/16" drill to run wiring, the rod seemed like a good idea. I polished the ends so they were not rough. Then I drilled a 3/32 hole through one end and chamfered the hole on both sides so I could fit a cotter pin through it. Now when I actually apply the finish, I'll just run the rod up through the hole and secure it with a cotter pin. The rod is just the right size so it isn't loose but barely snug so it will keep the body without it being floppy.
FJ6ozFe.jpg


At any time, I can clamp the rod in a vice or even bend the end into a hook to hang it.

That done, I started playing with dyes and finally came up with a base coat. I'll post pics when I have something to show there.
 
Logrinn said:
Woohoo!
:icon_thumright:
My sentiments, too. I'm looking forward to getting the finish on soon. Provided the weather holds. We're having a rather warm winter so far, so that might be the case. :icon_smile:
 
There comes a time when enough is enough. I've tried 4 different ways of getting a finish. Had lots of help from Kevin and Ian (he even dropped off a can of stain for me to try). After numerous sample tries, I settled on a finish that I can live with.

This morning I took the body and a can of naptha out into the sun to look for flaws that would show with a finish applied. Two hours of sanding later, I called it good enough. Then I stuck the rod into the body, clamped it into the vice where I could rotate it 360° and put the first coat of finish on it.

The lighting is a bit weird because of the lights to keep it warm enough to help the finish cure so the color isn't exactly right but here's the first base coat:
bEPVNEA.jpg
 
You got sun where you live? Must be nice. At least, I remember sun being nice. Someday, I hope to see the sun again.

Meanwhile, that body's nice.

 
My roommate's currently spending almost as much on gas for the snowblower as he is for the car.
 
Back
Top