Leaderboard

Soloist in green PRS-style Laguna Dragon Breath finish

Just realized the back was built using of 1 piece swamp ash!
Sure it wasn't a cheap custom order, but it's still a very happy surprise to find a 1 piece lightweight back!

Now there's even more pressure not to mess the DIY stain...

And here are better pics:

BodyFront.JPG

BodyBack.JPG

Body1Piece.JPG
 
The neck showed up yesterday, I'll be a having a lot of fun (well, not really) rolling the fingerboard and frets this week-end prior to staining !

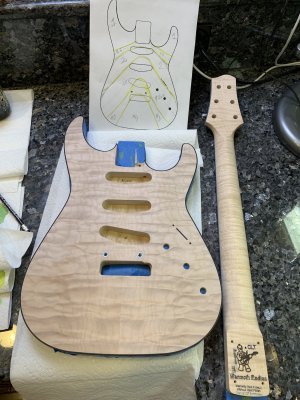
The flame is great and it's a bit scary thinking about staining that.
It would look great with just a clear gloss or satin coat, and much easier to resell than a stained one (if it comes to that)...

neck1.jpg

neck2.jpg

neck3.jpg

neck4.jpg

neck5.jpg
 
I'll document rolling fingerboard edges along the way since it's such an enjoyable process.

Step1 (1 hour): rough bevel of the fingerboard using a nut shaping file from StewMac.

The only important thing may be to keep a straight line in-between frets, this will prevent a 'scalloped' kind of look.

The first 4 frets are done:
roll2.jpeg

roll1.jpeg


...and after 30min the entire edge is done:
roll3.jpeg


Here's the file:
roll4.jpeg


That's all for tonight, I'll take care of the treble side tomorrow or Saturday.
 
30 more minutes tonight and the treble side is done.

Step 2 (1 hour): roughly bevel the fret ends using the same file
I only did the 1st fret on the bass side tonight to show how that'll look:
roll5.jpeg


Once all frets are done (maybe tomorrow) I'll even things out a bit using a long and flat sanding block with coarse sandpaper.


Step2 took 1hour:
roll8.jpeg


Step 3 (35min): removing the sharp corners at the bottom of the frets, still using the same file.

It's only a very rough sanding as the next step will take care of rounding those frets. My only goal here is to round the bottom of those frets which my other file can't reliably reach.

roll9.jpeg


Step 4 (30min): smoothing / rounding the fret ends. For that I use a fret file (crowning) from Stewmac.

roll10.jpeg


Step 5 ( 2 hours): final rounding and smoothing the fingerboard edges. For that I used the file as well as sand paper.

It took 55min for one side and that'll be all for tonight.
I'll do the other side tomorrow and do a final pass to take care of spots I missed.

roll11.jpeg


So roughly 5 hours to do this...
 
Good fretwork takes time, especially if done "well".
I do it in spurts too, just to get some rest & objectivity between stages so that I can properly evaluate how I am doing at each stage without fatigue or hunger affecting it.
Last thing you want to do is rush through it just to get the dadgummed thing done because you're tired & hungry.
 
Very true, I always break this over several days now.
It's much easier on the back, the posture used while sitting is terrible for my back if I do it for more than 1hours in a row
And it indeed prevents mistakes from fatigue / trying to rush things out, especially if you go for an aggressive roll like this neck.
 
Prepared a larger batch of stains and practiced more, while tweaking some colors a little.

Before I start the body, I want to draw a template showing where each stain will go.

In the meantime, I did start the easy part: the tuner buttons
buttons1.jpeg

buttons2.jpeg
 
docteurseb said:
Nice! I always try to match the buttons to the rest of the hardware. Matching the buttons to the body: Bold and Beautiful! Watching this with avid anticipation!
 
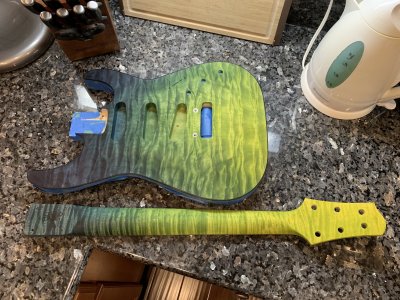
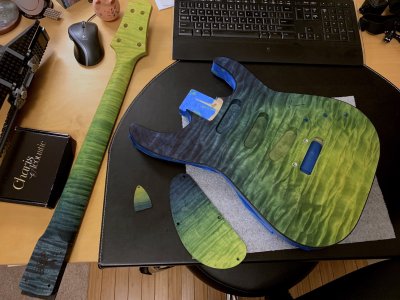
I'm happy to report the staining went well !
Of course everything is dry in those pics, so it'll really come alive with a gloss finish.

I spent Saturday afternoon building three backplates out of curly maple, only one of them survived.
I almost threw it away as it didn't seem to absorb stains at all. But after some rougher sanding and multiples coats the color finally looked right.

I'm super excited about this build ! This is the first time I really stain a body and neck, let alone in a fancy pattern like that.

Edited: Adding the time-lapse of the staining process:
[youtube]https://youtu.be/bgskpGK2tKg[/youtube]
 

Attachments

  • soloist_ready_for_stain.jpg
    soloist_ready_for_stain.jpg
    677.5 KB · Views: 17
  • soloist_stained.jpg
    soloist_stained.jpg
    856.2 KB · Views: 48
  • soloist_stained_2.jpg
    soloist_stained_2.jpg
    594.5 KB · Views: 47
Thanks!
After this one I think I'll take a break from crazy stained builds. This is the 3rd in a year and I need to play (plus I'm going to run out of space hanging/storing those guitars ).
 
Back
Top