Second body build.. Sapele and Flame Top body. CATASTROPHE!!

War_in_D

Senior Member
Messages
239
When I jacked up the Walnut body's shape, and ended up having to make it more "Soloist-esque", I decided not to use the flame top I had on it.  Instead I ordered a two piece Sapele body blank, and barring any screw ups like the last time.. the flame top will be getting put on this one.  This one will be a Strat shaped body with non recessed Floyd Rose.. haven't decided on the pickup route yet.  Thinking of either a dual hum, or I might go full on Kramer Baretta and do a single hum on this one (with a strathead neck)...  The more I think about it, it'll probably be a single hum.. Yeah, that's the ticket.  :headbanging: 

Oh, forgot to mention...  Sapele smells REALLY good.. lol
 

Attachments

  • Sapele Body Blank.jpg
    Sapele Body Blank.jpg
    560.7 KB · Views: 10
  • Flame Maple Top.jpg
    Flame Maple Top.jpg
    500.9 KB · Views: 7
Looks like a plan! I'm waiting on some raw 8/4 ribbon stripe sapele lumber myself. By coincidence I have two flamed maple drop tops on order also. I'm thinking of something more in the way of a mini 335 type shape though. Hope yours works out well for you, it looks like it could be killer in the end................ :icon_thumright:
 
PhilHill said:
Looks like a plan! I'm waiting on some raw 8/4 ribbon stripe sapele lumber myself. By coincidence I have two flamed maple drop tops on order also. I'm thinking of something more in the way of a mini 335 type shape though. Hope yours works out well for you, it looks like it could be killer in the end................ :icon_thumright:

That 335 shape will be cool.  I took the plunge tonight and ordered myself a 13" thickness planer (cheaper one), so that I might start making my own blanks instead of buying them.  Beside that, my wife has some woodworking "honey do's" for me so I'm using the opportunity to buy some tools! LOL
 
Welp..  Router Beast got me again..  Almost literally this time.  I'm pretty thankful that this is all that happened, could have been much worse.

So, a little background since the last time we spoke..  The Sapele body blank I got had just a slight cup to it, so I ordered a 13" thickness planer (cheaper one) figuring I'd use it for other stuff too.  Got that out this morning and all went well getting both sides of the body blank flat.  Thinking I'm good to go I then decided to go ahead and slap the template on there and route the body out to shape... and it's here where things went south. 

I have a router table with a 1/2" router in it, so I bought a CMT 2" shear bit to just route the body sides to shape figuring I'd bandsaw the body as close as I could and then finish it on the table.  It worked great on the Walnut body (with the exception of the bite, but that was my fault).  Fast forward a bit, and I'm just starting my router cut on the Sapele body, and yup.. I wasn't holding it quite tight enough and it kicked back on me and took a chunk out of the lower horn.  :doh:    I'm thinking.. "OK, no biggie.. I've got some sawdust and glue. We'll just do that again."  Proceded to route the rest of the body, and noticed it was chipping a little more than it did on the walnut body, but the actual cut was looking good so I just slowed down and kept going.  Everything went great until I got to the top edge of the top horn and then BAM!!!  It kicked something awful, and it knocked a HUGE chunk out of the body!!!  I'm talking like 5" chunk out of the top horn!!  I was like WTF just happened.  It was then that I noticed the router started shaking pretty badly.  I reached down to shut it off, and the flippin' bit comes flying out of there and luckily went away from me instead of coming my direction!!  So, I'm not sure what came first.. the chicken or the egg?  Did the router bit work it's way loose, and cause the kickback and the chuck to break.. or, did the wood just give way and that somehow loostened the bit?  Don't know, but however it happened.. I think that's the last time I used the router table to route out a body.  I'm sticking to the handheld from now on.

Anyway, I'm feeling pretty lucky right now.. think I'll go buy a lottery ticket.  Pics below of the carnage.  I didn't get a pic of the horn pre glue up, but if you look you can see where the line is. 
 

Attachments

  • Sucks...jpg
    Sucks...jpg
    299.9 KB · Views: 31
  • Sucks even more.jpg
    Sucks even more.jpg
    465.6 KB · Views: 23
  • Major suckage.jpg
    Major suckage.jpg
    523.6 KB · Views: 28
  • Router Beast.jpg
    Router Beast.jpg
    294.7 KB · Views: 21
On a side note I am really liking the Vandenberg body without the jaggies. Has wheels turning.
 
ooo yea - lucky break it didn't dag you.

I'm pretty sure that the bit worked loose first then it started misbehaving.
 
swarfrat said:

Heck, I don't even need templates!!  I come up with jagged edges all on my own!!  LOL

Speaking of Vandy's.. Here are a couple I owned back in the day.  A neck thru, that was signed by "the Dave's" of Megadeth and a hot pink bolt on.  Great guitars, super thin necks.  I owned one other neck thru Vandy, but I don't have any pics of that one.  They are a little bit of a rare bird these days.

Mayfly said:
ooo yea - lucky break it didn't dag you.

I'm pretty sure that the bit worked loose first then it started misbehaving.

Yeah, that's what I'm thinking too.. and I'm extremely thankful it went away from me, and not toward.  It chucked that bit about 5 feet before it hit something.  :doh:
 

Attachments

  • Picture_187.jpg
    Picture_187.jpg
    40.8 KB · Views: 12
  • Picture_188.jpg
    Picture_188.jpg
    52.7 KB · Views: 9
I blew up a bit recently too. I thought it was just exploded wood first, but then I saw my beautiful orange bit had disintegrated. Too aggressive a feed on entry into the workpiece (a slip)

I bought the set when I was single. Ouch. The replacement won't be Orange.
 

Attachments

  • IMG_20201222_153254642.jpg
    IMG_20201222_153254642.jpg
    2.3 MB · Views: 20
swarfrat said:
I blew up a bit recently too. I thought it was just exploded wood first, but then I saw my beautiful orange bit had disintegrated. Too aggressive a feed on entry into the workpiece (a slip)

I bought the set when I was single. Ouch. The replacement won't be Orange.

Was that a CMT bit?  They usually have a pretty decent reputation. Glad you weren't hurt. 
 
Yes, it was. I'm still surprised it shattered just taking an aggressive bite of pine. I expected a ruined workpiece and little worse.
 
War_in_D said:
Welp..  Router Beast got me again..  Almost literally this time.  I'm pretty thankful that this is all that happened, could have been much worse.

So, a little background since the last time we spoke..  The Sapele body blank I got had just a slight cup to it, so I ordered a 13" thickness planer (cheaper one) figuring I'd use it for other stuff too.  Got that out this morning and all went well getting both sides of the body blank flat.  Thinking I'm good to go I then decided to go ahead and slap the template on there and route the body out to shape... and it's here where things went south. 

I have a router table with a 1/2" router in it, so I bought a CMT 2" shear bit to just route the body sides to shape figuring I'd bandsaw the body as close as I could and then finish it on the table.  It worked great on the Walnut body (with the exception of the bite, but that was my fault).  Fast forward a bit, and I'm just starting my router cut on the Sapele body, and yup.. I wasn't holding it quite tight enough and it kicked back on me and took a chunk out of the lower horn.  :doh:    I'm thinking.. "OK, no biggie.. I've got some sawdust and glue. We'll just do that again."  Proceded to route the rest of the body, and noticed it was chipping a little more than it did on the walnut body, but the actual cut was looking good so I just slowed down and kept going.  Everything went great until I got to the top edge of the top horn and then BAM!!!  It kicked something awful, and it knocked a HUGE chunk out of the body!!!  I'm talking like 5" chunk out of the top horn!!  I was like WTF just happened.  It was then that I noticed the router started shaking pretty badly.  I reached down to shut it off, and the flippin' bit comes flying out of there and luckily went away from me instead of coming my direction!!  So, I'm not sure what came first.. the chicken or the egg?  Did the router bit work it's way loose, and cause the kickback and the chuck to break.. or, did the wood just give way and that somehow loostened the bit?  Don't know, but however it happened.. I think that's the last time I used the router table to route out a body.  I'm sticking to the handheld from now on.

Anyway, I'm feeling pretty lucky right now.. think I'll go buy a lottery ticket.  Pics below of the carnage.  I didn't get a pic of the horn pre glue up, but if you look you can see where the line is. 

Glad you weren't injured. I am always leery of trying to cut the whole side in one pass. I use a bit with the bearing on the shank and only cut about 1/4 to a 1/2 in depth at a time. But I don't have a table either, just use handheld. Never used CMT bits. I have been using ones sold under the name Whiteside or Amana and I've had good luck with them. Have some Freud bits that are good, but the last that I bought they seemed to have lost some quality.  The glue up looks good, you should be able to finish it out to look fine. Hope things work out better from now on.............. :headbang:
 
Thanks, it could have been way worse that's for sure.

In the meantime, while waiting for the glue to dry.. Decided to make the clamping cauls for the bent top.  Used 3/4" plywood, making basically a sandwich with the area of the forearm contour cut off so that it can be used as a separate caul to bend the top in that area.  Can't take credit for the idea, or pretty much any of the things I'm doing as I'm "borrowing" (a.k.a. stealing) ideas from everywhere.  The internet can be a wonderful place.. sometimes.
 

Attachments

  • Clamping Cauls.jpg
    Clamping Cauls.jpg
    249.7 KB · Views: 9
  • Clamping Cauls 2.jpg
    Clamping Cauls 2.jpg
    241.8 KB · Views: 6
  • IMG_20210116_175822016.jpg
    IMG_20210116_175822016.jpg
    2.6 MB · Views: 14
Everything coming out as best as can be expected at this point.  I didn't even post about it last night when this happened, I was so disgusted.. but, that damn router table got me AGAIN!  I had pulled the clamps off, and chucked up my handheld with my pattern bit to finish routing out the body shape.  That went well but the largest bit I had would only reach about half way.  I figured since I had removed about half of the width of the body off the edge, I would finish it out on the router table.  Since it's only doing half the work..  Should be cake, right??  Well, guess what?!?!  Got to the same exact place that the body shattered the first time, and it happened again!  Not quite as big a piece this time, but still about 2 1/2" to 3" chunk.  I may have cussed.  So, back to the glue and clamps.. for the second time!  Went to bed last night pissed, vowing to never use that router table to route out body shapes again.

Flipping off the router table as I walked into the basement today, I took the clamps off and busted out my flush trim bit and finished cutting out the body shape without further incident.  I then proceded to the "body work" portion of the build.  I had used super glue/dust the last time to fix the walnut body but I saw on a Crimson Guitars video where it said to use regular white wood glue instead and it wouldn't come out looking so dark.  So that's what I did, creating a little Sapele/glue "bondo" mixture.  The top horn came out looking decent, especially for the amount of carnage present.  After I got everything filled and sanded, I sent the blank through the thickness planer to just level everything back out and you can't even tell anything happened looking straight on at it.  On the side, you can see some repaired spots but at this point it's going to be what it is.  The bottom horn had a little bit more of a divit carved into it, so I'm having to fill that one in steps and I'm not quite finished with it yet. 

I hadn't really started thinking about the finish on this guitar yet but I'm thinking of doing some kind of black bursted edges, both front and back and just make the entire perimeter of the body a solid black to help cover up the repairs.  That Sapele is some pretty wood, I'd had to cover the back of the guitar up completely. 
 

Attachments

  • Top fixed.jpg
    Top fixed.jpg
    528.5 KB · Views: 12
  • Top Fixed 2.jpg
    Top Fixed 2.jpg
    388.8 KB · Views: 10
  • Top fixed 3.jpg
    Top fixed 3.jpg
    254.6 KB · Views: 13
  • Bottom dust and glue.jpg
    Bottom dust and glue.jpg
    373.2 KB · Views: 12
I had a similar problem with a redwood body a while back. Something that might help in the future is to approach the routing in a pattern called climb cutting.

.
J314Du.jpg


That shows an acoustic, but it's the same for a solidbody.
 
PhilHill said:
I had a similar problem with a redwood body a while back. Something that might help in the future is to approach the routing in a pattern called climb cutting.

.
J314Du.jpg


That shows an acoustic, but it's the same for a solidbody.

Thanks for that illustration.  That picture shows the direction I usually route with the handheld router, except I pretty much use a climb cut the entire way around moving clockwise the entire time.  I may have to try that routing pattern on the next guitar body.  I can see where/why they would want to use the climb cut on those portions of the body though, due to the way the grain would typically be running in a guitar body.  I'm not sure if using a climb cut the entire way around would be detrimental though, as the bit would always be turning into the wood rather than cutting away from it.

Of course, with the table router you would have to go the opposite way, as the router is hanging underneath.  But, by and large climb cutting on a router table is usually considered a big no-no since you can't lock the piece down with clamps, etc.
 
War_in_D said:
PhilHill said:
I had a similar problem with a redwood body a while back. Something that might help in the future is to approach the routing in a pattern called climb cutting.

.
J314Du.jpg


That shows an acoustic, but it's the same for a solidbody.

Thanks for that illustration.  That picture shows the direction I usually route with the handheld router, except I pretty much use a climb cut the entire way around moving clockwise the entire time.  I may have to try that routing pattern on the next guitar body.  I can see where/why they would want to use the climb cut on those portions of the body though, due to the way the grain would typically be running in a guitar body.  I'm not sure if using a climb cut the entire way around would be detrimental though, as the bit would always be turning into the wood rather than cutting away from it.

Of course, with the table router you would have to go the opposite way, as the router is hanging underneath.  But, by and large climb cutting on a router table is usually considered a big no-no since you can't lock the piece down with clamps, etc.

I believe your quite right there. With the grain running the length of the body, as you get near the extremes of width the bit can easily catch a section of grain line and start a crack. That crack will continue along that grain line as far as it can. You and I have both discovered the result of that.
The main problem with climb cutting the whole circumference is that the router will try to walk along the body as the bit grabs into the wood and can get away from you very easily under those circumstances. A very firm grip is required to keep it under control. Sometimes too firm a grip can cause problems of it's own. Such fun, we inflict on ourselves............ :icon_thumright:
 
First of all, glad you're OK !

Cutting along the grain is something I have to be super cautious with thin wood backplates, otherwise I get instead tear out. I forgot about that 'detail' when I started routing my first 2-3 backplates, it didn't go well for them...
It's already dangerous enough with the super thin pieces of wood needed for backplates that I don't even want to imagine how bad that is when you're trying to flush trim a nearly 2" thick piece.

I wonder how that works with a lam top whose grain is never going to exactly be in the same direction as the core wood. I suppose in that case the latter is still what you want to pay attention to since it's the thicker piece that will want to kill you.

 
docteurseb said:
First of all, glad you're OK !

Cutting along the grain is something I have to be super cautious with thin wood backplates, otherwise I get instead tear out. I forgot about that 'detail' when I started routing my first 2-3 backplates, it didn't go well for them...
It's already dangerous enough with the super thin pieces of wood needed for backplates that I don't even want to imagine how bad that is when you're trying to flush trim a nearly 2" thick piece.

I wonder how that works with a lam top whose grain is never going to exactly be in the same direction as the core wood. I suppose in that case the latter is still what you want to pay attention to since it's the thicker piece that will want to kill you.

Good point.  In my case the lam top will be glued on after the body has been routed to it's finished size.  So the lam top will just need to be flush routed to match the body.  But, as you pointed out, the grains will be running opposed to each other so direction could very well indeed make a difference. 
 
Looks like a really good recovery job. The main thing is your 'learning experience' was achieved without personal injury!

I've been using routerbeasts to wreak carnage on various wooden things for 30+ years - in the last few of those I've even been attempting to do so 'properly', or at least in a way that works for me in terms of safety and satisfactory results. YMMV and all that, but a few thoughts...

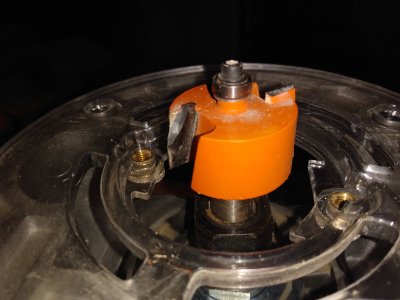
Always use good quality, sharp, clean cutters.

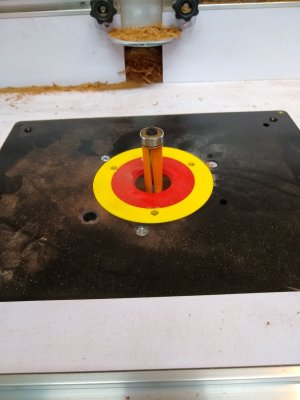
I always use a router table when doing guitar perimeter cuts, because if something is going to be pulled out of my hands and thrown at me, I'd rather it was a few pounds of wood than a few pounds of machinery equipped with 20,000+ rpm razor-sharp tungsten carbide blades.

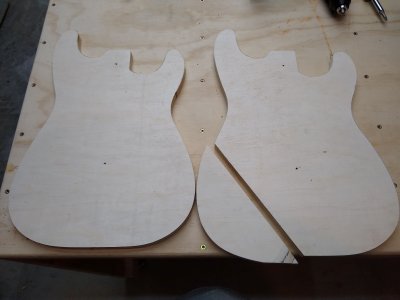
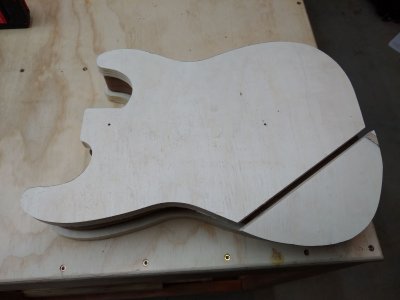
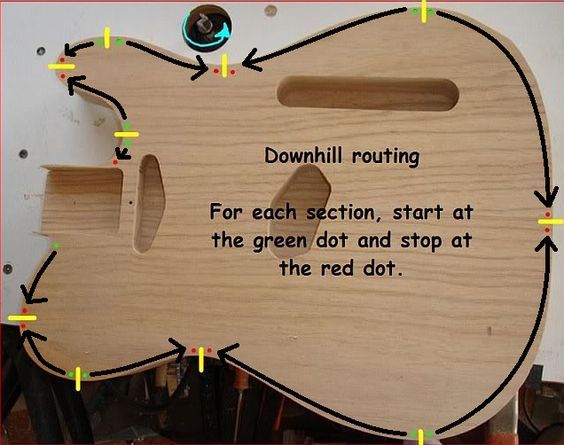
Regarding the uphill/downhill thing, here's another pic:

22060961bc3b35c5fecb8003d44b74ea.jpg


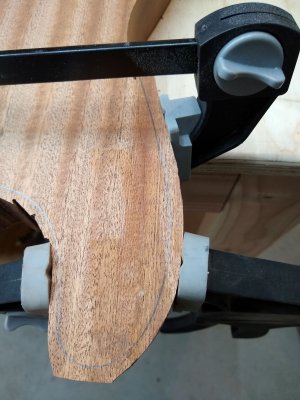
I always try to stick to this, but never route the 'wrong way', always moving the workpiece from right to left - I cut the full thickness of the body using a 50mm ~ 2" cutter with shank and end bearings which allows me to do the cuts shown as clockwise on the above pic with the template on top, then flip the body over to do the rest.

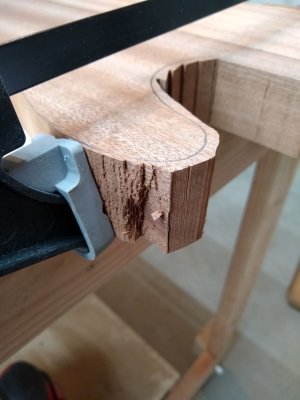
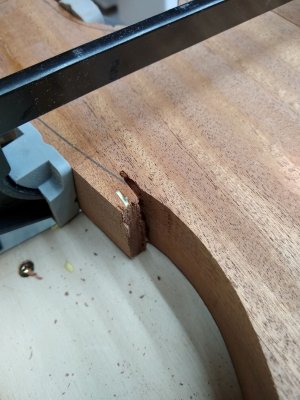
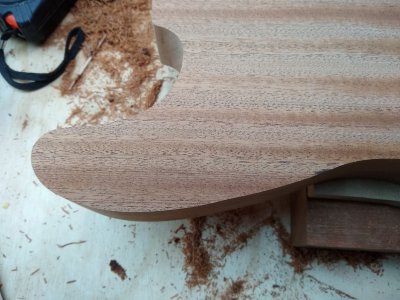
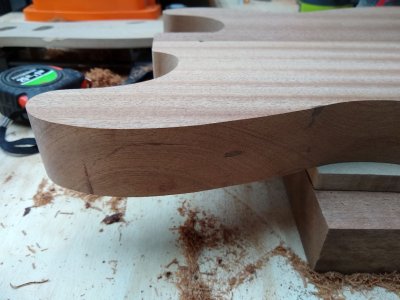
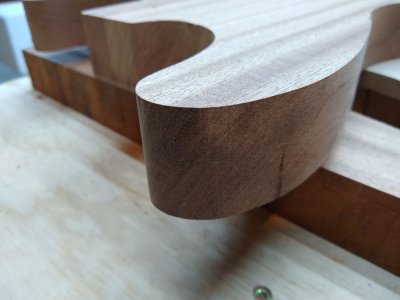
The only tear-out I've had has been due to mishandling the workpiece - inadvertently moving it the wrong way, allowing the router to do the dreaded 'grab'. (That tight little curve above the neck pocket on a Tele is a pig, but I do now have a fun double cutaway La Cabronita body to finish - necessity is the mother of invention etc.)

Also, I only use the router to remove a small amount of material - band saw to get it close, then sand closer - about 1.5mm ~ 1/16".

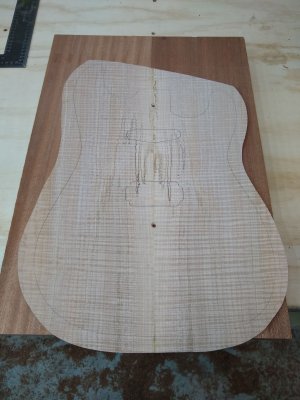
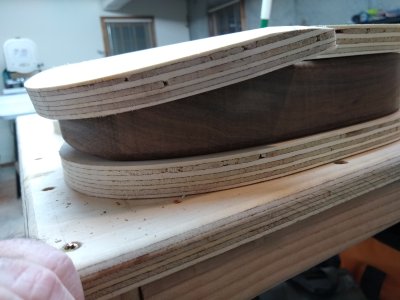
Lam tops normally have the grain going the same way as the body - you can only regard the grain direction as being parallel to edges of the plank it came from, not the apparent waviness within that. Nothing to stop you having a cross-grain top (or using a burl slice 'in the round') but in those non-standard cases you'd either still cut as per the pic, or do the back first and then glue and trim the top to that - for various reasons I don't recommend the latter.

When using the 'beast hand-held - for roundovers etc., I would always still move it the right way - anti-clockwise for outside cuts - because I think that tear-out is only a small risk if 'the rules' are followed, whereas moving it the wrong way is actively asking for grab.

TL;DR? Be careful with the routerbeast!
 
Back
Top