Seattle, WA area

the VRB-P5 finished out nicely and the Nordy NP-5 sounded killer! this bass is happily rumbling foundations in Chicago

RV09502P-Complete-BodyFront.jpg
RV09502P-Complete-Headstock2.jpg


making use of a anniversary sale acquired lefty P body with this build

RV09413PL.jpg


the lefty Heritage '55 finished out nicely and is headed to England where it will join a lefty I built earlier this year

RH09406T5L-CompletedFront.jpg


I'm building a cousin to the above bass, but this time in a vintage styled 2-tone finish

RGW-Trib55l-No2-Fit-up-FrontResize.jpg


and the Axiom 5 finished out nicely as well

AxiomTM-5Image-Shot4.jpg


too many build projects going on these days to have much time to be posting here :( I do try to stop in at least once per month to catch up on things

all the best,

R
 
2009 went out with a BANG as far as new custom build orders go, and 2010 is starting off right at the same pace. I finlly have a little breathing space to post here again ...

got a sister to the Heritage '55 just about wrapped up and ready to ship out to Australia. the Rosewood fretboard is really growing on me

RH09411T5L-AlmostCompleted-Front.jpg


I also have a big brother to this in a lefty 5 version that just returned from the finish shop. it's kinda difficult to make out that this one has a contoured heel, but the neck mounting ferrule recesses can easily be seen (and yes, this is a 1-piece Swamp Ash body)

RH09411T5L-FreshFromThePaintShop-Fr.jpg
RH09411T5L-FreshFromThePaintShop-Ba.jpg


here's the body blank getting the edge contour details after it was first cut out

RH09503L-BodyBlankProfileSandingPro.jpg


time to go grab a few zzzz's for the night

all the best,

R
 
last week I had the great opportunity to pack up my shop (including several projects in mid-stream) and relocate two exits up the freeway  :blob7:

I now have a dedicated fabrication facility -and- a seperate room for final assembly plus a business office. images will be coming later this week to show a couple high lights of the space transformation. so far it's quite refreshing having significantly more shop floor space to sweep

all the best,

R
 
Are you just doing builds, or do you have any interest in repair/restoration jobs?  I'd like to get the neck on my Deluxe 5 refinished, as the guy I bought it from did a junky job, and I'm all about giving business to board members!  My luthier gets enough money from me as it is.

-Mark
 
I won't be ready for any kind of finishing work until later this summer.

presently my backlog for new builds is such that I simply don't have time available to work repairs. I've had one repair job from a VERY patient customer sitting in my shop since early May :( if I ever find myself with a schedule that permits repair/mod work I'll be sure to post an update

all the best,

R
 
two new lefty basses out the door ...

VRB-P4Lefty-Completed-Front.jpg

VRB-P4Lefty-Completed-Back.jpg


Maple/AAAA Birdseye 34" scale 21-fret neck with zero-fret, 1-5/8" nut width, 12"R fretboard, dual graphite stiffening bars
Alder body with gloss black finish (from the Anniversary sale)
Nordstrand NP-4 pickup
Hipshot Ultralight tuners and Vintage bent plate bridge
CTS 250k pots, Orange Drop .047uf cap


Axiom4Lefty-Complete-Front.jpg

Axiom4Lefty-Complete-Back.jpg

Axiom4Lefty-Complete-BodyFront.jpg


Regenerate Guitar Works® Axiom™ model

Maple/Maple 34" scale 21-fret neck with zero-fret, 1-1/2" nut width, 12"R fretboard, dual graphite stiffening bars
Swamp Ash body with clear gloss finish
Nordstrand Big Singles pickup set, 2-band preamp configured Vol (p/p series/parallel) + Blend + Active treble + Active Bass (p/p preamp bypass)
Hipshot Ultralight tuners and Type A alum core bridge

I also have a new Heritage Tribute™ 5-string about to wrap-up and ship

RH10501PE-PickguardTestFit.jpg


all the best,

R
 
looks like I never posted images of the completed Heritage Tribute™ 5-string lefty I wrapped-up earlier this year, so here you go

RH09503L-Complete-Front.jpg
RH09503L-Complete-Rear.jpg


RH09503L-Complete-FrontCloseup.jpg
RH09503L-Complete-RearCloseup.jpg


RH09503L-ContouredHeel-Comp.jpg


Maple/Maple 34" scale 22-fret neck with zero-fret, 16"R fretboard, dual graphite stiffening bars
1-piece Swamp Ash body, Vintage 2-tone burst finish
Nordstrand custom wound 5-string SCPB pickup + Fat Stack pickup set, 2-band preamp configured Vol (p/p preamp bypass) + Blend + Passive tone + Active Bass/Treble stack
Hipshot Ultralight tuners and Vintage bent plate bridge

all the best,

R
 
I got the new space cleaned out at the end of june and put an end to several hundred SPIDERS ranging in size from 'easy to nestle into your shirt collar' to 'too big to eat in a single bite', and will be setting off a bug bomb sometime this coming week after I have everything loaded into the new space

my stash of bookmatched tops, 1-piece body blanks, and fingerboards was the first to be loaded in. yes - that stack of boxes consists only of top sets, and the pile on the router table is just body blanks. there will be a workbench across the far end wall by the end of next weekend

NewShop-BodyBlanksFretboardsParts.jpg


most of the stationary tools will be against this wall or directly behind where I was standing to take this image. I'll construct a new rolling workbench to accommodate hand and power tools

NewShop-EmptyWorkSpace.jpg


all of the machinery (long bed helical head jointer, 14" re-sawing bandsaw, 22"-44" open-ended thickness sander, etc ...) was loaded in, but my camera wasn't able to snag a good image due to poor lighting ... upgrading the lighting fixtures is my activity for sometime after I get things rolling again


=fast forward three weeks=

so far so good - everything is moved into the new facility  :cool:

here's a peek at the shop front. you can't see in this image, but the new place is nestled in a park like setting amongst 50+ year old Western Maples, Douglas Firs, and an occasional Western Cedar

NewShop-BusinessFront.jpg


I also now have a dedicated final assembly & set-up area outside of the woodshop, as well as a business office. here's a peek at the business office just in case you ever wanted to know what the place I'm typing at looks like. I'll have images of the assembly bench later (it's located in the place I was standing to take this second image)

NewShop-BusinessOffice.jpg


=fast forward another week=

I'm just a workbench top away from being able to open the new shop facilities  :D

here's a brief peek inside the new digs ...

NewShop-TourImage-5.jpg


as you can see in this and the other images, the entire place received a paint job (ceiling still needs rolling, but I'll have to do that some time later). this first image shows (front-back) the wood rack where I store my bookmatched tops, top billets, 1-piece body blanks, and 'assembled' body blanks (2+ piece blanks and their figured top/back if getting one); ShopSmith multi-purpose tool which I use as a horizontal drill and vertical drill press; router table where I cut custom pickguards; mini lathe where I'll eventually be fabricating custom wooden knobs; carcas frame for the stationary workbench (sorry about the dusty lens on this image, the dust blew up just as I took the shot)

NewShop-TourImage-1.jpg

NewShop-TourImage-4.jpg


here's another view of the stationary workbench structure. it's bolted to the wall structure and will support several middle aged fats guys jumping on it  :lol:  I'll be adding a 1" plywood top (glued & screwed) base followed by a 1/2" sacrifical top (screwed only) sometime this week as time permits

NewShop-TourImage-3.jpg


several of the 110v tools tucked away (left-right) helical head planer for jointing body blanks and figured tops; 14" bandsaw with 6" riser block for cutting body blanks and bookmatching figured billetts into top sets; thickness sander for detail thicknessing body and top pieces before and after glue-up; that's also one of several wood storage racks mounted overhead (the wood in this rack is for figured tops)

NewShop-TourImage-2.jpg


continuing on that same wall ... part of the thickness sander; oscillating drum sander for detailing body and template contours; dust collector with filter to suck woodchips and dust from the various tools while also removing most of the fine dust before the air disperses back into the shop; another wood storage rack overhead (the wood in this rack is for body blanks)

I still need to bring my 200v tools over to the shop, and that will happen later this month. there's no rush since my present backlog isn't requiring the use of these for several weeks to come (i.e. I have a ton of assembly work to finish before I switch back to neck and body construction activities)

as time permits I'll get a couple images snapped of the various tools in use building parts ...

=fast forward another day=

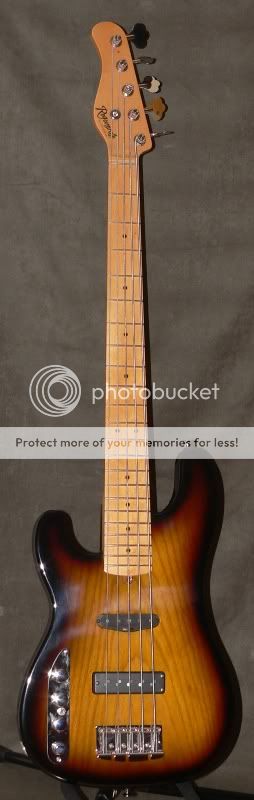
and here's a shot of the finished workbench top plus storage. that's a heritage Tribute™  5-string on the bench for a scale reference

NewShop-TourImage-6-1.jpg


I also added a vacuum bagging system during the move, so I'll have a much simpler workflow for gluing tops to body blanks. Here's an image of my first dry run with the new system

TestDrivingVacuumBag.jpg


here's a quick peek at several M-Series™  body blanks getting ready to be rough cut (there are also a couple on the far right that are just about to be jointed and glued-up)

MiscShopImages_NewBuilds23Aug2010.jpg


all the best,

R
 
Nice! What a luxurious amount of space! I don't know what you had before, but that's such a joy.

I'm surprised at the size of that dust collector. Seems kinda small for the number and type of tools you have. Do you just move it from tool to tool as needed, or are you going to duct the place up?

edit: Actually, looking back at it, it's not so small. But, it's not plumbed into anything yet?
 
due to my current limitation of having no 220v circuits, I run the dust collector hose direct to the tool I am using. with everything on wheels, it's not much of a hassle. I'm wanting to upgrade to a hard plumbed collection system with a cyclone once I have the 200v circuits installed. it'll take quite a few bass builds to save up the funds to get there

my previous shop was les than 50% the size of this one, and my router table served double duty by also being my only workbench surface. everything was jammed against walls and into corners with the exception of the one tool I was working with at that moment. I also had a single 20A circuit with two recepticles ... and ran an extension cord into the kitchen (to provide power for the dust collector) whenever I needed to use the thickness sander

things are about to get a little more crowded, as I'll be setting up my long ago boxed duplicarver so I can speed up the time needed to rough out the rear contour of a specific neck profile and carve drop-top contours on a body

all the best,

R
 
Those dust collection systems don't seem expensive until you start adding up all the parts. Damn thing will nickel-dime you to death! It's an important tool part of the whole, though. Hardwood dust seems to have a mind of its own.
 
dust collection becomes even more important as I'll be setting up a spray booth later this year. I already fight those rogue dust particles when epoxying a fingerboard, but at least these are somewhat covered by the strings

all the best,

R
 
almost done with the latest Heritage Tribute '55 5-string ... just need to finish the pickup installation, slot the nut, install strings, and add the string retainer before this one's ready to ship off to Austin, TX

RH10501PE-BridgeInstalled.jpg


and I couldn't resist giving my first M-Series fretless a test fit. this design has come a long way since the first prototype was built in late 2007. this one will make its home in the greater Seattle area with a very seasoned and well versed bassist/producer

RM09409F-FirstTestFit.jpg


all the best,

R
 
another one completed and ready to ship (seen previously above as a work in process)

RH10501PE-Completed-Front.jpg

RH10501PE-Completed-Rear.jpg


I also picked up a rather large Western Maple burl slab while vacationing out on the Olympic peninsula. it's nearly 5 feet long and over 4 inches thick at the thinnest places. here's a peek at the slab as it came out of the truck

WesternMapleBurl_3.jpg


and a couple close-ups from where I rough sanded an area and wet it with Naphtha to better show the figuring

WesternMapleBurl_1.jpg


WesternMapleBurl_2.jpg


and this filler billet of Masur Birch

MasurBirch.jpg


all the best,

R
 
Back
Top