

You are using an out of date browser. It may not display this or other websites correctly.
You should upgrade or use an alternative browser.
You should upgrade or use an alternative browser.
Refinishing a damaged Koa / Mahogany Soloist with Tru-Oil (by a beginner)
- Thread starter Dazkeirle
- Start date
stratamania
Mythical Status
- Messages
- 12,393
As you say there is nothing to lose in trying one thing and changing later if you wanted to  ccasion14:
This might be a switch of interest to you.
[youtube]https://www.youtube.com/watch?v=kcwSKqSZ0f8[/youtube]
ccasion14:This might be a switch of interest to you.
[youtube]https://www.youtube.com/watch?v=kcwSKqSZ0f8[/youtube]
Dazkeirle
Junior Member
- Messages
- 192
stratamania said:As you say there is nothing to lose in trying one thing and changing later if you wanted to
This might be a switch of interest to you.
[youtube]https://www.youtube.com/watch?v=kcwSKqSZ0f8[/youtube]
This is exactly what I meant by this:
The other overriding thing though is, I like oddities. I'm even considering the Stewmac Ultra Switch to give some splitting options but that all depends on the number of conductors in the pickups I get.
The Ultra is like the even crazier version (https://www.stewmac.com/Pickups_and_Electronics/Components_and_Parts/Switches/Free-Way_Ultra_Switch.html)
 Thanks for having my back though, I only learned of this thing yesterday through this very forum.
Rick
Epic Member
- Messages
- 7,187
That switch is going into my next build.
I have the 6 position blade switch on my Start-O-Master, for neck, bridge and neck, bridge, bridge and neck out of phase series, bridge and neck out of phase para, and bridge and neck, series. The series in phase option makes it way over the top I don't use it that much.
With those six options all in one spot, it's intuitive, and 6 options is about right to remember on the fly.
I have a nashville tele that I wired for 15 different positions, and while fun, I can't remember where everything is.
With the normal three I was always looking for more, but more than 6, without easy access gets confusing.
Good choice on the freeway switch.
stratamania
Mythical Status
- Messages
- 12,393
Dr Excess said:The Ultra is like the even crazier version (https://www.stewmac.com/Pickups_and_Electronics/Components_and_Parts/Switches/Free-Way_Ultra_Switch.html)
It turns out it is the same switch. It is made by NSF known as Freeway switches in the UK. Have a look for one from a UK supplier so you avoid paying for extra charges for something that originated in the UK.
Dazkeirle
Junior Member
- Messages
- 192
Well what do you know, you're absolutely right.
And even better, they sell directly on Amazon.
https://www.amazon.co.uk/Free-Way-Way-Toggle-Switch-Nickel/dp/B07TXZP737/ref=sr_1_1?dchild=1&keywords=Free-Way+Switch&qid=1588194363&sr=8-1
And they have the Ultra here too:
https://www.amazon.co.uk/Free-Way-Ultra-Toggle-Switch-Gold/dp/B07TZ4J7VV/ref=pd_sbs_267_3/260-2088540-7280829?_encoding=UTF8&pd_rd_i=B07TZ4J7VV&pd_rd_r=b4dd485c-1c6e-4e9d-b421-cf63e9cb61a7&pd_rd_w=6PdJ1&pd_rd_wg=UohmI&pf_rd_p=2773aa8e-42c5-4dbe-bda8-5cdf226aa078&pf_rd_r=3MC0QYQMYYRZM7GJME44&psc=1&refRID=3MC0QYQMYYRZM7GJME44
I'm not sure I'm totally in love with the setup (I think I'd prefer a 3 way and then 2 toggles for simplicity like with my Strat) but I'll sleep on it. It certainly looks cool anyway.
Dazkeirle
Junior Member
- Messages
- 192
Small update here.
@hendrix was kind enough to scan his control cover for me so I at least have something temporary to go on with for now.
A simple png to SVG, SVG to STL and then print process was used to take a 2d scan, make it just a solid colour, rescale and print.
I removed the screw holes in the print as it makes for a simpler print and can be added if required.
Also, for the battery box area, I'm going to design and 3d print a spring loaded plectrum holder (think like a PEZ dispenser but sideways). I do love a project (within a project).
Attachments

Dazkeirle
Junior Member
- Messages
- 192
Rick said:My 15 position guitar has a 5 way switch and a three way toggle. Using a toggle is not intuitive. If you can get the sounds you want with the freeway you'll be happier.
Ymmv.
I really don't want to go drilling any more holes, I really like the idea of just having 3 controls on the top and so I think the freeway could be the way to go as you say (If I want / can split coils). I still get the split of singles and doubles and tbh that's usually what I would be using, especially as I don't envisage that I will be be putting 4 conductor pickups into this.
But as for toggles being unintuitive, I respectfully disagree. I use a 3 way switch with 2x toggles on my (2 pickup) Strat and it couldn't be more intuitive.
The 3 way selects the pickup or combination and each toggle selects either single or both coils for the respective pickup. This gives all possible combinations for most humbucker guitars and in a super intuitive way, you don't even have to think about it and you can easily have single neck with humbucker bridge. This is hard to achieve even with the freeway (unless you get the ultra, full disclosure my setup is a rip off of the PRS -08 switching design).
My Strat is also 15 combinations as I use a 2x on/on/on toggle there, with the centre being a combo of humbucker and extra single coil winds, which is fairly unique. Still very simple to use because it's intuitive.
I think the choice of switching will be determined about what pickups I end up with. If I am able to split coils then I'll need to at least use the freeway. If I just have basic 1 conductor, it'll be irrelevant and I'll stick with just the 3 way.
Dazkeirle
Junior Member
- Messages
- 192
Busy day of progress today.
To begin with some new parts arrived, this include a 3 way switch (les Paul style) and the two full size concentric pots.
After testing the pots had similar variance in tolerance to the the smaller and the inner was just as rough, I guess that's the nature of the kind of pot until its been warn in.
Also because its larger, so are the knobs. They stand far more proud and I'm not sure I like it as much so I've re ordered the smaller again and ill see which works best when the rest of the hardware is on.
Unfortunately a freeway is out of the question, after reaming the hole for a switch I realise there's no where near enough room in the cavity for the freeway without some seriously routing.
My new (and what was actually the first plan) is to use the 3 way and hide the two mini toggles in the battery box with some 3d printed funsies.
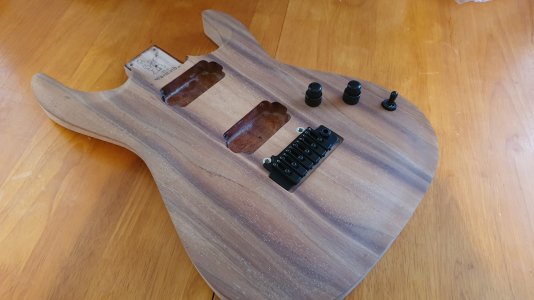
This afternoon I started getting the body ready for grain fill.
A full sand at 120, then 180 and then 230 (front only) .
I love how smooth the front feels now even at only 230. Its also amazing how you can feel when you're done, and the moment you step up the paper catches like velcro, by the time you have it sanded at each stage it's like it's lubricated. I'm sure that's obvious to you experts but I had no idea. I've spent so long sanding with grain, holding against various lights etc to catch each of the little flaws from the sanding / paint removal.
It's super smooth now.
The hardest area is still around the horns but they're looking and feeling really smooth now.
The actual final look is starting to show and I love it.
Goal for oiling will be be to get everything to 230 with more visible flaws, single coat of Tru-oil to get the colour everywhere. Then I'm gonna use the filler / sealer to fill and sand until flat at 400 grit. Then it'll be tru oil layering and micro meshing until a glossy as glass.
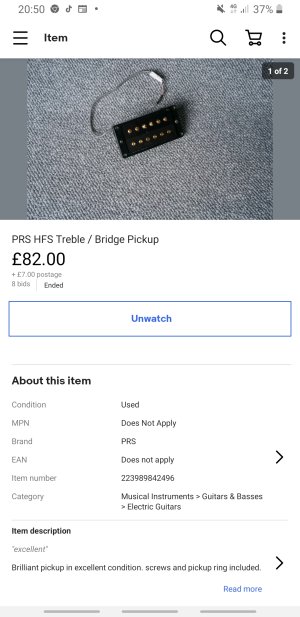
Weeks of work to go. Meanwhile I've acquired the bridge pickup. Got myself a gold PRS HFS at a good used price of £85. That's 15k so is very similar to the Tremonti in hotness but gives the coil split option. On the look out for the a gold PRS Vintage for the neck.
To begin with some new parts arrived, this include a 3 way switch (les Paul style) and the two full size concentric pots.
After testing the pots had similar variance in tolerance to the the smaller and the inner was just as rough, I guess that's the nature of the kind of pot until its been warn in.
Also because its larger, so are the knobs. They stand far more proud and I'm not sure I like it as much so I've re ordered the smaller again and ill see which works best when the rest of the hardware is on.
Unfortunately a freeway is out of the question, after reaming the hole for a switch I realise there's no where near enough room in the cavity for the freeway without some seriously routing.
My new (and what was actually the first plan) is to use the 3 way and hide the two mini toggles in the battery box with some 3d printed funsies.
This afternoon I started getting the body ready for grain fill.
A full sand at 120, then 180 and then 230 (front only) .
I love how smooth the front feels now even at only 230. Its also amazing how you can feel when you're done, and the moment you step up the paper catches like velcro, by the time you have it sanded at each stage it's like it's lubricated. I'm sure that's obvious to you experts but I had no idea. I've spent so long sanding with grain, holding against various lights etc to catch each of the little flaws from the sanding / paint removal.
It's super smooth now.
The hardest area is still around the horns but they're looking and feeling really smooth now.
The actual final look is starting to show and I love it.
Goal for oiling will be be to get everything to 230 with more visible flaws, single coat of Tru-oil to get the colour everywhere. Then I'm gonna use the filler / sealer to fill and sand until flat at 400 grit. Then it'll be tru oil layering and micro meshing until a glossy as glass.
Weeks of work to go. Meanwhile I've acquired the bridge pickup. Got myself a gold PRS HFS at a good used price of £85. That's 15k so is very similar to the Tremonti in hotness but gives the coil split option. On the look out for the a gold PRS Vintage for the neck.
Attachments
-
 Screenshot_20200501-205008_eBay.jpg703.3 KB · Views: 12
 -
 20200502_191808.jpg2.3 MB · Views: 13
 -
 20200502_191741.jpg2.3 MB · Views: 5
 -
 20200502_191722.jpg2.3 MB · Views: 7
 -
 20200502_163322.jpg3.7 MB · Views: 15
 -
 20200502_113137.jpg2.5 MB · Views: 15
 -
 20200502_113031.jpg2.5 MB · Views: 8
 -
 20200502_113043.jpg2.5 MB · Views: 15
Dazkeirle
Junior Member
- Messages
- 192
A really fun day today working on the body. Got very creative and I really think it paid off.
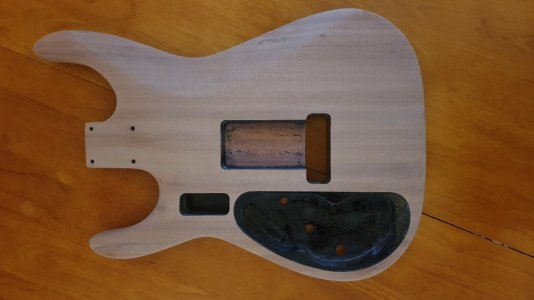
Anyway, goals for today were to get the body to 320 ready for first layer of oil. Before doing too much sanding thought it would be wise to get the cavity shielding done with the capacitive paint I had in the drawer.

I had planned this yesterday so had already sanded back the tremelo pocket because there's a chance that may be on show and Warmoth left if janky with overspray. The shielding paint went on well and cleanly. Tested it all with multimeter, works surprisingly well (not that you need full coverage for a faraday cage).


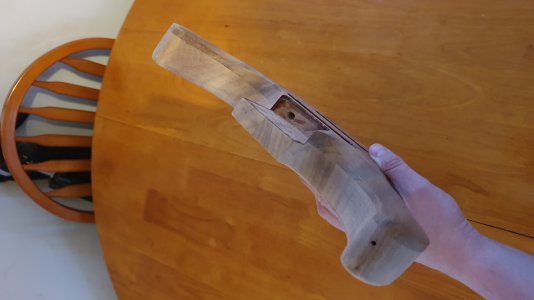
I've also added some clear acrylic behind the thinnest points of the neck pocket. Where it flairs up it's just so thin. If I'm not careful I'm gonna knock it so I added some acrylic nail vanish inside the pocket just to give the wood something hard to sit against.
After sheilding I had to stay in the house really but still wanted to work on guitar. Following on from the last few threads I'd kind of soft decided I still wanted coil split switches, but not on the front of the guitar.
That left the battery box as the perfect candidate.
For some reason I'd always only considered lever toggles but of course other buttons exists and after a bit of blue sky thining and measuring I realsied I could fit two of these lovely steel latched push to make switches into the body (the normal 20mm ones would be too big).

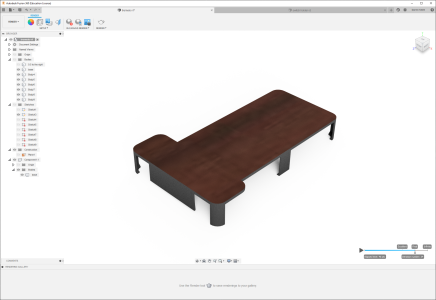
Now how to mount them? I took Warmoths route template and did a quick 3d print test print using those measurements to check, glad I did, was significantly smaller. With the correct measurements in hand I went into Fusion360 and started designing.
I had the schematics for the switches I was going to use so I drew up this design. It fits the switches flush with the top, plenty of room underneath for them, space cutout for the spanner to tighten nut. Hole incorporated that leads to cavity and also two stabilising legs with, if I don't say so myself, a very cool set of feet. (note the switch in the render is some generic one I resized for visualisation only, the real one is much longer).

You see right now I'm not sure how I want to mount covers. I was going to use magnets, but I don't like the idea of magnets near the strings, so then I thought Velcro, which would work well. However One thing I use almost every day for lots of things is Black Tac. It's like very sticky bluetac that when heated up goes really sticky, but then once it's set its very firm until you remove and heat again. Perfect for holding on covers.


So the feet have holes for magnets, have a little ledge for Velcro or of course you can use black tac (which would get purchase in the small holes but spread across the feet).
The print came out great and there's just enough clearance for a veneer. I also printed some shims that fit the pocket perfectly for the bottom just in case I need to go up 0.5mm (or increments of). I was actually blown away with how close I got it (I'm not actually all that good at 3d deisgn).


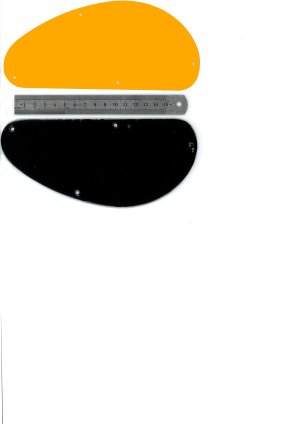
Talking of veneers, I found these on ebay which I hope will be to my liking. The grain appears similar and I'm hoping to use the same oil setup process to give them the same colour for this new panel, and the control cover which has has the same small holes added so it also can be used by magnets or black tac (not sure how I'd get the clearance for Velcro without routing or adding some tabs.

Anyway after doing all the printing and getting the parts working just great I did a bunch of sanding (everything to 320).
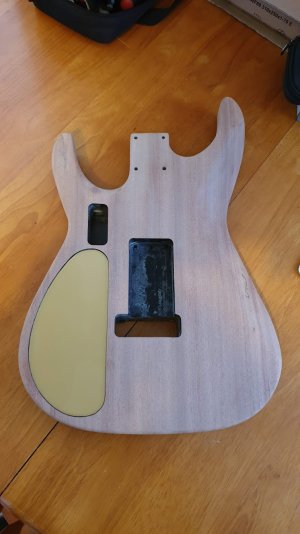
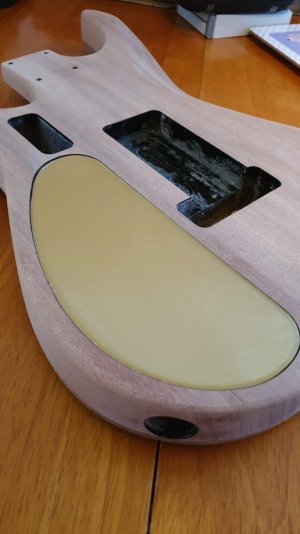
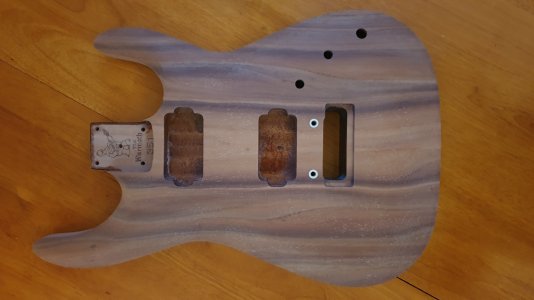
When I got back in I hit the body with some bioethanol to clear out the grain and see what I was working with. My goodness, I had no idea what this body will look like, and what it does right now not covered in dust. Check this out!
After sanding:
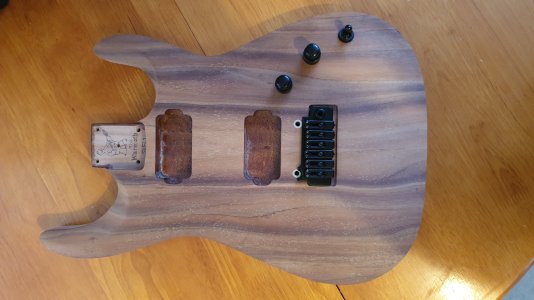
Half coated in bioethanol:


After thorough cleaning:

So yeah, exciting times, the switch panel I'm super super happy with. If anybody wants one you know where to come. I really think those little buttons are gonna make for an elegant solution when set to hog. A bit of an ugly print but that's the only white I had, it's been open 4 years and I printed it fast. Bite me.
As for the Tremelo, super interested in making an inset cover for it, but not the usual screw in rectangle, one that will fit the unique shape. Without screws like the control and switch panel the back will be totally screwless.
This does all hinge on the veneers not being terrible though, otherwise glossy black it is I guess. Whatever happens, this is exactly what I needed to get through the Coronavirus. I have 2 small kids, not enough rooms. This gives me an excuse to fiddle about and spend time in the garage for my sanity.
I'll end up with something beautiful I'm sure, I love everything about this thing right now. I've spent so much time with it I may just be in love with this piece of wood. I sure hope it sounds good now.

Anyway, goals for today were to get the body to 320 ready for first layer of oil. Before doing too much sanding thought it would be wise to get the cavity shielding done with the capacitive paint I had in the drawer.
I had planned this yesterday so had already sanded back the tremelo pocket because there's a chance that may be on show and Warmoth left if janky with overspray. The shielding paint went on well and cleanly. Tested it all with multimeter, works surprisingly well (not that you need full coverage for a faraday cage).
I've also added some clear acrylic behind the thinnest points of the neck pocket. Where it flairs up it's just so thin. If I'm not careful I'm gonna knock it so I added some acrylic nail vanish inside the pocket just to give the wood something hard to sit against.
After sheilding I had to stay in the house really but still wanted to work on guitar. Following on from the last few threads I'd kind of soft decided I still wanted coil split switches, but not on the front of the guitar.
That left the battery box as the perfect candidate.
For some reason I'd always only considered lever toggles but of course other buttons exists and after a bit of blue sky thining and measuring I realsied I could fit two of these lovely steel latched push to make switches into the body (the normal 20mm ones would be too big).
Now how to mount them? I took Warmoths route template and did a quick 3d print test print using those measurements to check, glad I did, was significantly smaller. With the correct measurements in hand I went into Fusion360 and started designing.
I had the schematics for the switches I was going to use so I drew up this design. It fits the switches flush with the top, plenty of room underneath for them, space cutout for the spanner to tighten nut. Hole incorporated that leads to cavity and also two stabilising legs with, if I don't say so myself, a very cool set of feet. (note the switch in the render is some generic one I resized for visualisation only, the real one is much longer).
You see right now I'm not sure how I want to mount covers. I was going to use magnets, but I don't like the idea of magnets near the strings, so then I thought Velcro, which would work well. However One thing I use almost every day for lots of things is Black Tac. It's like very sticky bluetac that when heated up goes really sticky, but then once it's set its very firm until you remove and heat again. Perfect for holding on covers.
So the feet have holes for magnets, have a little ledge for Velcro or of course you can use black tac (which would get purchase in the small holes but spread across the feet).
The print came out great and there's just enough clearance for a veneer. I also printed some shims that fit the pocket perfectly for the bottom just in case I need to go up 0.5mm (or increments of). I was actually blown away with how close I got it (I'm not actually all that good at 3d deisgn).
Talking of veneers, I found these on ebay which I hope will be to my liking. The grain appears similar and I'm hoping to use the same oil setup process to give them the same colour for this new panel, and the control cover which has has the same small holes added so it also can be used by magnets or black tac (not sure how I'd get the clearance for Velcro without routing or adding some tabs.
Anyway after doing all the printing and getting the parts working just great I did a bunch of sanding (everything to 320).
When I got back in I hit the body with some bioethanol to clear out the grain and see what I was working with. My goodness, I had no idea what this body will look like, and what it does right now not covered in dust. Check this out!
After sanding:
Half coated in bioethanol:
After thorough cleaning:
So yeah, exciting times, the switch panel I'm super super happy with. If anybody wants one you know where to come. I really think those little buttons are gonna make for an elegant solution when set to hog. A bit of an ugly print but that's the only white I had, it's been open 4 years and I printed it fast. Bite me.
As for the Tremelo, super interested in making an inset cover for it, but not the usual screw in rectangle, one that will fit the unique shape. Without screws like the control and switch panel the back will be totally screwless.
This does all hinge on the veneers not being terrible though, otherwise glossy black it is I guess. Whatever happens, this is exactly what I needed to get through the Coronavirus. I have 2 small kids, not enough rooms. This gives me an excuse to fiddle about and spend time in the garage for my sanity.
I'll end up with something beautiful I'm sure, I love everything about this thing right now. I've spent so much time with it I may just be in love with this piece of wood. I sure hope it sounds good now.
stratamania
Mythical Status
- Messages
- 12,393
That is looking very good so far.
Did you use any chemical paint stripper before doing all of the sanding?
Did you use any chemical paint stripper before doing all of the sanding?
Dazkeirle
Junior Member
- Messages
- 192
stratamania said:That is looking very good so far.
Did you use any chemical paint stripper before doing all of the sanding?
Nope, sanding alone.
Hendrix
Hero Member
- Messages
- 710
As you good at fusion 360 and 3D print , can look my Tremolo back cover , as I want to paint on the back , so I design and 3D print a cover flat with the body back .
https://www.unofficialwarmoth.com/index.php?topic=31561.0
I think you got product design background. Controls cover magnets will be better than velcro . Or something like 2 product battery door cover snap hook groove on straight line side , and one magnets on crave side .
https://www.unofficialwarmoth.com/index.php?topic=31561.0
I think you got product design background. Controls cover magnets will be better than velcro . Or something like 2 product battery door cover snap hook groove on straight line side , and one magnets on crave side .
Dazkeirle
Junior Member
- Messages
- 192
Hey man, I've literally just finished a fairly flush design but it has some tolerance built in.
The tester is currently printing but the size tests worked well.
Will happily work with you to get you something a little closer to what you want.
Mine is going to be semi-removable with blacktac and so the standoffs have been designed for that. The feet sit against the base of the pocket (the recessed bits are to provide grip to the blacktac), the large flat piece will sit flush to the bottom of the cavity (although isn't needed really, I just wanted an extra piece to help keep it true).
It also has tolerance for the veneer.
Bare in mind this is V1 for today so is likely to go through some iterations (for example the feet may not have perfect clearance for springs etc., won't really know until I see it in the flesh and put the springs in).
I like blacktac as it allows for a little flexibility, doesn't rattle and is non-permanent (but will hold this stuff forever if needed).
Haha thanks, definitely not. Just learned enough Fusion to solve functional problems. I'm an Identity Intelligence consultant by trade") There's plenty of ways to design the back covers, but I'm fairly sure I'll mix things up as time goes on so wanna keep things fairly fluid and reworkable.
There's plenty of ways to design the back covers, but I'm fairly sure I'll mix things up as time goes on so wanna keep things fairly fluid and reworkable.
The tester is currently printing but the size tests worked well.
Will happily work with you to get you something a little closer to what you want.
Mine is going to be semi-removable with blacktac and so the standoffs have been designed for that. The feet sit against the base of the pocket (the recessed bits are to provide grip to the blacktac), the large flat piece will sit flush to the bottom of the cavity (although isn't needed really, I just wanted an extra piece to help keep it true).
It also has tolerance for the veneer.
Bare in mind this is V1 for today so is likely to go through some iterations (for example the feet may not have perfect clearance for springs etc., won't really know until I see it in the flesh and put the springs in).
I like blacktac as it allows for a little flexibility, doesn't rattle and is non-permanent (but will hold this stuff forever if needed).
I think you got product design background. Controls cover magnets will be better than velcro . Or something like 2 product battery door cover snap hook groove on straight line side , and one magnets on crave side .
Haha thanks, definitely not. Just learned enough Fusion to solve functional problems. I'm an Identity Intelligence consultant by trade
There's plenty of ways to design the back covers, but I'm fairly sure I'll mix things up as time goes on so wanna keep things fairly fluid and reworkable.Attachments

stratamania
Mythical Status
- Messages
- 12,393
Dr Excess said:stratamania said:That is looking very good so far.
Did you use any chemical paint stripper before doing all of the sanding?
Nope, sanding alone.
Wow, that is a labour of love...
S
swarfrat
Guest
Dr Excess said:So this is where I am now, I gotta say I love how this body looks. When I hit it with ethanol
I think that's a common effect. J/k
Nice work - mahogany is like cherry - it's just beautiful by it's lonesome and it's a crime what people do to it to make it look like "itself"
Dazkeirle
Junior Member
- Messages
- 192
stratamania said:Dr Excess said:stratamania said:That is looking very good so far.
Did you use any chemical paint stripper before doing all of the sanding?
Nope, sanding alone.
Wow, that is a labour of love...
Oh for sure. I did attempt to use a heatgun and a scraper to begin with but the back wasn't the usual mix of paint and lacquer, it swas just some kind of hardcore paint that just wouldn't budge and started to get a bit nervous about gouging / burning.
After that I had got into the flow with the sander so just decided not to risk gouging out the front either.
With hindsight I could have saved a few hours going straight to the orbital but that still carries plenty of risks too.
Similar threads
- Replies
- 12
- Views
- 349
- Replies
- 9
- Views
- 496
- Replies
- 0
- Views
- 64