New to Warmoth and new JM build

Arcturus

Newbie
Messages
9
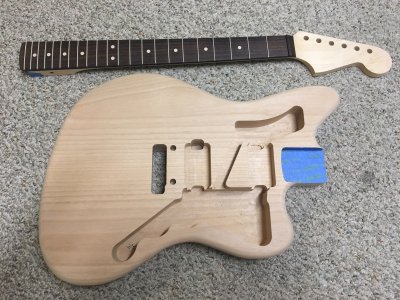
Hey folks, just got my first Warmoth shipment! Well, my first build, really.  Dreamed about this for a long time, finally doing it. The guitar will be a Alder Jazzmaster HH with a Wilkinson bridge, standard JM neck with stainless steel 6150 frets, Hipshot Gearlock Open Staggered tuners.  Not decided on pickups yet, but tend to like PAF style pickups and am seriously considering a set of Thornbuckers. I am going to be finishing the body and neck myself...a little nervous about that, but have done some woodworking, and after watching a ton of YouTube videos and practicing on some scraps, feel I’m ready to give it a shot!

I have two questions at this point.  One...does anyone know how far they sand the bodies before they send them out?  I was planning to start with 180 grit paper, but it kind of feels smoother than that out of the box. 

Secondly, I went with the side mount output jack, and the football jack plate is not as curved as the guitar body where it will mount.  I’m afraid the plate will not cinch down flush against the body just by screwing it down...I’m afraid I might strip the screw holes trying.  Should I try to curve the plate a bit more before mounting?  And if so, is there any risk the chrome plating will crack and start to peel off?  And any suggestions as to how?

Also the forum won’t allow me to upload a pic from my phone...says the file type is not right...any suggestions on that?

Thanks!
 
Welcome to the forum.

The body is already sanded finer than 180 grit. 220 I believe. You don't really need to sand it again. Unless you see something specific you want to address. If you sand too fine your finish may have difficulty adhering. Although depending on what type of finish you want to apply you might want to use a couple of finer grits but it would not need much.

Use something other than the phone to post your pics. Or upload them from the phone to a picture hosting site and then embed the image from there.

 
Welcome to the forum. Imgur is a good hosting service for photos to post. They even give you the proper code to insert into your post. Looking forward to seeing your progress.
 
Thanks, helpful info! 

As for the photos, just realized that Google Photos will probably work...will work on that later. 
 
Welcome to this cozy little forum.
If I remember correctly on my first build, a 7/8-Strat, the football plate didn’t curve with the body either. After thinking about it for a minute or two I just tried screwing it on and it worked without problems.

146386124507178700_resized.jpg


The same with my second build, except I didn’t spend two minutes thinking about it, I just screwed the plate down. Done!

156588606160097700_resized.jpg


I don’t think you’ll have any problems with it. In a worst case scenario you can just use slightly longer screws.

 
Arcturus said:
Thanks, helpful info! 

As for the photos, just realized that Google Photos will probably work...will work on that later.

It can but is not very straightforward to do.
 
Or upload them directly to the warmoth site.  My office won't let me look at pics from hosting websites.  I suppose it's to protect me.
 
Arcturus, click on your photo in Imgur and copy the BBCode to paste into your post. Alternatively, you can use the photo insertion icon above the post area here on the forum.

It should look like this:

Code:
[IMG]http:whateverphotoaddressyouhave[/IMG]
 
That works good. Thanks. Very nice neck and body. Looking forward to seeing your posts on it (and other things).
 
Thanks!

And thanks, Logrinn, for the reassurance on the football jack plate.  I had emailed Warmoth about it and they said the same thing.  Here I go,
 
I’m dyeing the body blue using Angelus Leather Dye.  It’s a little bizarre that it dries purple, but then once you start applying the clear coat, or even the sanding sealer, it returns to blue.  I’m planning to use wipe on poly for both the neck and body, but will use satin on the neck while trying to get a nice gloss on the body.
 

Attachments

  • image.jpg
    image.jpg
    1.9 MB · Views: 268
  • image.jpg
    image.jpg
    1.4 MB · Views: 241
I like that nice solid covering you get. Can't wait to see it with the clear on it.
 
Looking good. And I like the purple. If that’s the way the color will turn out, then I say you’ve got an awesome looking Jazzmaster.
I’m also intrigued by those amps in the picture. Are those some custom work?
 
Thanks!  Actually, I’m hoping to end up with a blue similar to the one in your pic, Logrinn.

As for the amps, yes, the two you can see are ones I built. I’m not an expert amp builder by any stretch, but can read a schematic, and had lots of help from the folks at the Wattkins Amp Forums. 

The maroon combo on the left is basically a Princeton without reverb, but with a Deluxe Reverb output transformer, full TMB tone stack, three-way selectable -ve feedback, bright switch and 12” Jensen C12K speaker. I call it a Prolux.

The green mini stack is a JCM SE...JCM preamp with a single ended output stage in the 8-10W range. I’ve added a number of tweaks to it...tight switch (it’s pretty flubby stock), three way bright switch to make it more pedal friendly, bypassable effects loop and -ve feedback on a switch.

While I love the Prolux, the JCM SE is not quite all I’d hoped it would be. Without the phase inverter tube, it doesn’t overdrive quite as much as I’d like...probably more like a plexi, which is okay in itself, but not quite what I hoped for. But it gets there with an OD pedal pushing it, and sounds pretty good like that. But I don’t use it much.  The amp sitting on top of the 2x12 cab right behind the Jazzmaster is a Marshall JVM, which is super versatile and sounds great, so that is my go-to amp for overdriven and heavier tones.
 
That sounds like you know quite a lot about amp building.
I'm sure you will get along perfectly with Mayfly here on the forum who also knows a lot about amps. Probably several others here as well come to think of it.
 
Well, I had some setbacks for a bit there, but after sanding back down to start over a couple times I finished up the clear coat today. I re-evaluated my clear coat options, and finally decided to go with the Spraymax 2K Clear Glamour.  I must say I’m quite pleased with the results. I will start to work on level sanding and polishing in a couple of days.
 

Attachments

  • image.jpg
    image.jpg
    1.8 MB · Views: 252
  • image.jpg
    image.jpg
    1.6 MB · Views: 226
Back
Top