Leaderboard

New Build - Carved Top Soloist Super-Blues-Strat

For that type of drilling, place a block of scrap wood at the back of the part to be drilled out. That way the drill does not go into thin air.
In retrospect, yeah, that’s what I should have done, but I didn’t have the scrap wood :confused:. What I was really intending to do was drill most of the way down, then turn the body over and drill from the other side until the full bore was complete, but it felt almost like the drill bit was pulling down, and I was through the back side before I could slow down. Another thing I might have tried was a stepped bit. Of course, the best option is a drill press, but I don’t have one, nor do I have the space for one :cry:. A local community college has a luthier program; maybe next time I’ll enroll there and have access to their shop…

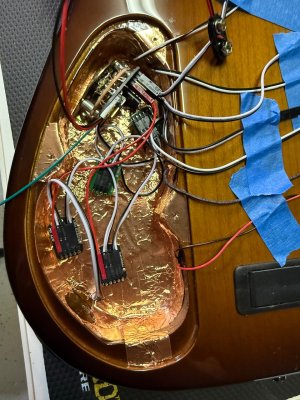
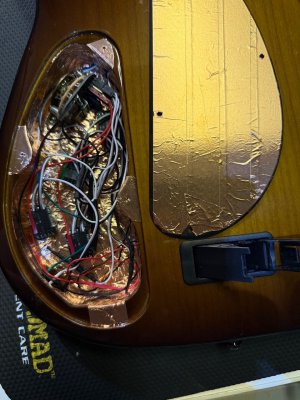
Anyway, highlights of today so far: got the battery box installed, and copper tape applied to the electronics cavity and its cover:
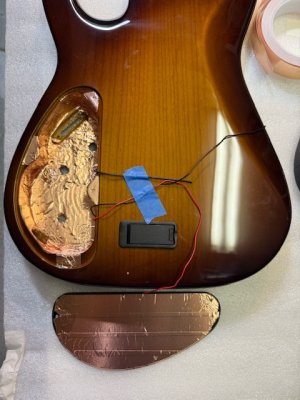
IMG_1646.jpeg
The battery box was a mild PITA: I didn’t sand the finish in the battery box compartment, so the whole thing fits kind of tight. I ended up doing a mild sanding of the tabs that lock the battery container part closed, and that got rid of just enough friction to let me open the battery compartment without needing tools to pry it open ;)

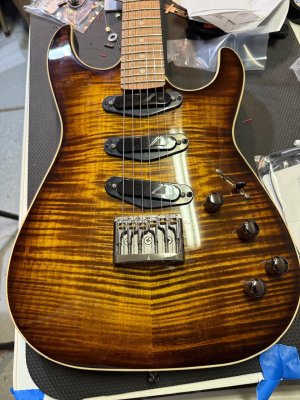
Next, I test fit the neck, bridge, and pickup rings:
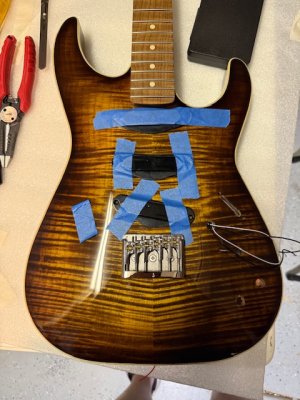
IMG_1647.jpeg
(Yes, I overlooked that bit of tape on the upper right corner of the bridge and had to fix it later :rolleyes:.) The pickup routes have tons of room, but the pickup rings I chose are a really tight fit with the Zexcoil pickups; I may have to redo this later to be able to raise the pickups to the recommended height. Here’s a pic with the neck and mid pickups screwed in (ignore where the 1st and 6th strings looks to be, the perspective is wrong):
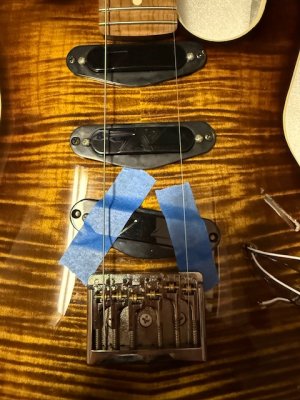
IMG_1653.jpeg
When I was doing a rough measurement of string height with a hand-tight 1st and 6th strings installed, I really had to jack up the bridge elements, so much so that I was afraid I’d run out of adjustment room, so I installed the Schaller spacer for this bridge:
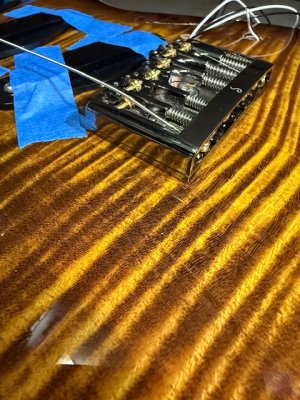
IMG_1648.jpeg
I might have to redo this when I get the neck fully strung, but it looks promising for now.

Next up: electronics hookup! Will at least start this tonight; I’ll see how far I get…
 
Local community College luthier class sounds awesome, I wish I wish I wish...
Well, to be honest, it was several years ago I checked into that class; it’s possible they don’t have it anymore. Around the same time I was looking into the luthier class, a coworker took the general woodworking class there, and loved it.

Final pic of the night:
IMG_1654.jpeg
This may look like some kind of abdominal surgery but it’s actually a nearly complete wiring job, using the EMG solderless system. Upper left is the 5-way switch; upper-right is the master volume (500k passive pot); middle is master tone (another 500k passive pot plus a .047 uF tone cap); lower left is EMG’s AB220 active clean boost; lower right is EMG’s SPC (“Strat Presence Control”) active mid-boost. The 500k pots are recommended by Zexcoil. The EMG clean boost and mid boost together are pretty similar to the Fender “Clapton” boost, but with the clean and mid boosts separate and the clean boost controllable (on the Fender system, you get the 12dB clean boost like it or not). The two boosts are in series.

It’s pretty intuitive to hook this stuff up. The only soldering is (a) connecting each pickup wire to a two-wire harness that plugs into the 5-way switch, and (b) soldering the EMG battery connector wires to the battery box wires. Hopefully it all works :unsure:

The biggest issue so far is that the standard short-shaft controls just BARELY provide enough length to fasten them securely, given the thickness of the top. I’m thinking about adding some Loctite to make sure everything is secure.

Should have the pictures of the final steps tomorrow! And at some point, I’ll see if I can upload some short sound samples to give people an idea of how the active controls sound, but it might take a while to make that happen.
 
Well, to be honest, it was several years ago I checked into that class; it’s possible they don’t have it anymore. Around the same time I was looking into the luthier class, a coworker took the general woodworking class there, and loved it.

Final pic of the night:
View attachment 65160
This may look like some kind of abdominal surgery but it’s actually a nearly complete wiring job, using the EMG solderless system. Upper left is the 5-way switch; upper-right is the master volume (500k passive pot); middle is master tone (another 500k passive pot plus a .047 uF tone cap); lower left is EMG’s AB220 active clean boost; lower right is EMG’s SPC (“Strat Presence Control”) active mid-boost. The 500k pots are recommended by Zexcoil. The EMG clean boost and mid boost together are pretty similar to the Fender “Clapton” boost, but with the clean and mid boosts separate and the clean boost controllable (on the Fender system, you get the 12dB clean boost like it or not). The two boosts are in series.

It’s pretty intuitive to hook this stuff up. The only soldering is (a) connecting each pickup wire to a two-wire harness that plugs into the 5-way switch, and (b) soldering the EMG battery connector wires to the battery box wires. Hopefully it all works :unsure:

The biggest issue so far is that the standard short-shaft controls just BARELY provide enough length to fasten them securely, given the thickness of the top. I’m thinking about adding some Loctite to make sure everything is secure.

Should have the pictures of the final steps tomorrow! And at some point, I’ll see if I can upload some short sound samples to give people an idea of how the active controls sound, but it might take a while to make that happen.
It actually seems well designed, and pretty straight forward to install. Good Kit!
 
What I was really intending to do was drill most of the way down, then turn the body over and drill from the other side until the full bore was complete, but it felt almost like the drill bit was pulling down, and I was through the back side before I could slow down.

You would need to be drilling thicker wood for that type of approach, as you have found out, those bits can run away with you. Also regarding using wood backing or a waste board is also used with a pillar drill (drill press), to prevent chip outs.

I assume and add for other readers that your Zexcoils are passive, and you are using the battery and EMG for the boost and SPC.
 
As is typical, the first time I plugged it in…dead silence :rolleyes:. So I worked back to the minimum viable configuration, the pickups, the 5-way switch, and the output jack. Still no sound. Triple-checked connections, sure looked just like the EMG instructions. Switched out the output jack, and got sound. Went back to the original jack, a really nice Pure Tone stereo jack (you need the ring connector to detect that a cable is plugged in and start providing power to the active boosts), but it’s slightly bigger than a more conventional jack, and…what do I see with my magnifying lenses…looks like the tip connection spade lug is bent down and grounding out! So I got that fixed, plugged into it, and…sound on all three pickups! I then built the signal chain back - first the string ground, then the master tone, then the two active tone controls, and everything worked! I will say that the about an hour I spent on this would’ve been triple that time without the EMG solderless system; works great!

Here’s the “ready to close it up” shot:
IMG_1655.jpeg
Looks like more of a rat’s nest than it is…

And here’s a “strung and ready to play” pic:
IMG_1656.jpeg
I love that Schaller bridge!
Of course, I haven’t finished the setup yet; the intonation is not too good, and I don’t have the relief where I want it yet, but I’ll mess with that stuff in the next few days.

A fun build, and I’m already liking the active controls a lot. Plus the burnished neck is fabulous!

I’ll take some glamor shots and post them in the next several days, but other than that, I think this build is pretty much wrapped up. Please feel free to comment in this thread anytime, ask questions, etc. I really appreciate the community’s engagement, enthusiasm, and suggestions!
 
After playing the guitar a few days, a few tweaks:
  • Adjusted the neck relief to 0.010 at the 6th fret, just where I like it.
  • I was having problems bringing the pickup heights up (the Zexcoils like to be pretty close to the strings, and due to their unique construction, this can be done without fear of Strat-itis). Turns out the shape of the pickups at the ends are slightly less rounded than the Vintage Forge black pickup rings, so the rings were too tight to allow full travel. To be fair, Scott Lawing, the Zexcoil designer, notes on the Zexcoil website that some pickguards may need slight rework of the pickup openings to fully accommodate the Zexcoils. That seems to be a risk with Strat pickup rings too; I tried a few different ones and the original Vintage Forge rings were the closest to a good fit, but still not there. So I whipped out the file set and slightly reshaped the ends of the pickup cutouts - probably less than 5 thousandths all told - and it’s still a tight fit, but height adjustment works fine as long as you keep the two sides close.
  • The guitar has more string grounding noise than I’d like, so I’m going to rework the bridge grounding scheme a bit. That’s a “tomorrow” job though.
  • And finally, I need to take the spacer out of the bridge so that I can get the action down a bit more. Initially, the Schaller bridge looked like it would be unable to adjust the saddles up enough to get my preferred action - 3/32” on the low E and slightly lower on the high E - so I installed the spacer that Schaller provided. Unfortunately, with the spacer installed and the neck relief where I want it, the action is still about 1/16” too high even with the saddles flat; not terrible but dang it, not what I want either. Since I have to pull the bridge to redo the bridge ground wire anyway I’ll just pull the spacer at the same time and adjust the saddles. That’s a “tomorrow” job too.
Otherwise, I love the guitar, and the combination of the moderately hot pickups and the active boosts makes this a tone monster for tasty overdrive with Fender tweed amps, and the black panel ‘65 Deluxe sounds great too. And terrific cleans too. Plays very well with the burnished neck; my teacher said it was one of the best necks he’s ever played. I think this is shaping up to be a fantastic guitar!
I have admired that particular bridge from afar for quite a while, but never bit. Let us know how the reset goes.
 
I revamped the bridge grounding, including taking the spacer off and adding many more copper wire strands under the bridge. End result - dead silent without my hands touching strings, bridge, etc. As quiet as my Suhr, which has their proprietary noise canceling system.

Anyway, I got the bridge sorted (I like being able to adjust the roller saddles lateral position), action set to my standard 3/32” (still had plenty of saddle adjustment left), intonation dialed in, pickup heights set. Plugged it in, sounded fabulous on all three pickups…happy happy joy joy!
 
Wow! That looks amazing! 🔥🐯

Did you do a "burst over" from the tobacco burst onto the top? It kind of looks like it which looks fantastic. What keeps me from ordering a tigers eye dye is that the burst overs seem so wildly inconsistent. I'd want a subtle and gradual burst and sometimes they look really stark which I don't like. I'd hate to pay a ton for a burst I didn't like.
 
Now that I have a couple of months in with this guitar, it’s very good - plays very smoothly, stays in tune really well, balances really well, the burnished neck is a thing of beauty, lots of tonal options with the active clean boost and active mid boost - but I want it to be great, not just very good. And what’s keeping it from great are the EMG passive volume and tone controls.

I love the EMG solderless system, especially the 5-way switch, and I love the extreme simplicity of how you connect the switch, the volume pot, the tone pot, the active controls, and the output jack, and I commend EMG for creating such a straightforward interconnect system. But…EMG’s passive volume and tone pots suck as actual volume and tone pots. The volume pot has a usable range from 10 to maybe 8, then the volume falls off a cliff to almost inaudible by 7; an incredibly steep audio (aka logarithmic) profile. The tone pot is also an audio (logarithmic) pot, but because of how tone pots work, it’s the opposite of the volume pot - very little change from 10 to maybe 4, then instantly the treble and most midrange frequencies die and you have extreme “woman tone”. Also, the tone capacitor is set to 0.047uF, and you can’t change it -it’s wired into EMG’s little circuit card that sits on the back of the pot; I’d much prefer a 0.015uF tone control capacitor. I’ve measured these pots with a multimeter and the steepness of the resistance curves is easily seen from my measurements; these are not smooth logarithmic curves. Basically, these are just crappy bottom-of-the-barrel pots, probably 20-30% quality control variability.

So, what am I gonna do about it? I’m not scrapping the EMG solderless system; instead, I’m acquiring what should be much higher quality pots and retrofitting them with the 0.1 inch pitch Molex/Du Pont style connectors that EMG uses. I found a $30 kit on Amazon that has all of the components I need, including the crimping tool. I have a Mojotone built-by-CTS 30% audio taper with 10% quality control variability in transit for the volume pot, and a CTS 10% audio taper and 10% quality control variability pot on my desk, along with a 0.015uF orange drop capacitor for the tone control. I’ve schemed out what interconnect cables I need to build with my $30 Molex kit to hook these up to the EMG solderless wiring system, and it’s pretty straightforward - one 4-connector male cable, one 2-connector male cable, and one 2-connector female cable should do it. I won’t be tackling this for a few days but once I start, I’ll take pictures and add to this build thread.
 
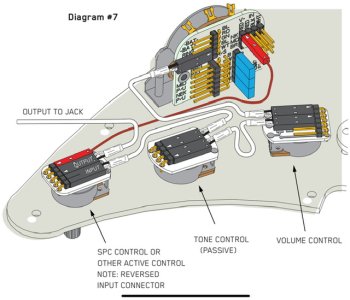
Here’s a wiring diagram, directly off of EMG’s website, showing how I’ve hooked up this guitar (black is ground, speckled white is hot, red is +9V):
IMG_0436.jpeg
Mine is currently just like this except I have an additional active control, but those hook up serially and the last one in the chain outputs to the output jack. The. 5-way switch and how the pickups connect to it is fabulous (and I’m not even using the send/return capability of the switch).

Here’s a picture of the back of the volume pot so you can see how the connectors hook up to the pot:
IMG_1665.jpeg
Those posts are on 0.1 inch centers. The whole connector setup is called DuPont connectors, although the connectors as shown on the back of the pot are often called Molex connectors. The job I have in front of me is to create some cables with the right DuPont connectors to not have to break into any existing wiring, but just pull the current volume and tone pots and have the right connectors on each of the new ones to plug into the existing wiring.
 
Last edited:
After scheming out the wiring diagram I need, I will need four connectors:
  • One two-connector male DuPont connector that goes to the existing two-wire female connector from the switch; the hot and ground ends of the male connector wires will be soldered to the volume pot input lug and ground, respectively.
  • One two-connector male DuPont connector that connects the output of the volume pot to the input of the first active tone pot, and connects the active pot ground to the volume pot ground (the bare ends will be soldered to the volume pot middle lug and volume pot ground, respectively).
  • One two-connector male DuPont connector that form one-half of the connection from the signal from the switch to the input and ground of the tone pot.
  • One two-connector female DuPont connector that is soldered to the tone pot input and ground, that connects to the above male connector.
To do this, I needed to learn how to build connector cables using the DuPont connectors. I bought a $30 kit, which had very poor instructions but did include a decent connector crimper. I found a lot of good instructional videos by searching for “how to crimp DuPont connectors”.
 
Nex step…build some connectors!

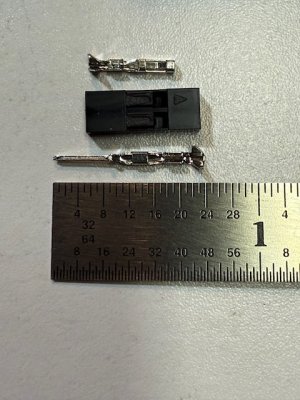
Here’s what the parts look like:
IMG_1668.jpeg
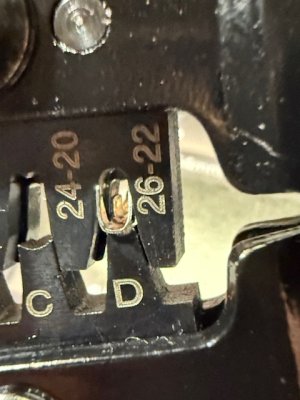
It’s hard to take good pictures of these things; you can find better pics online. The top one is female and the bottom one male. The V-shaped bit on the male right side and the female left side wrap around the wire insulation and form the strain relief. You strip the wire (I’m using 24 AWG stranded, which is the same size as EMG appears to use (I measured the diameter) about 3/16” or so. You then take the connector, hold it in the appropriate gap of the crimper, then squeeze the crimper one or two clicks, and it looks like this:
IMG_1673.jpeg
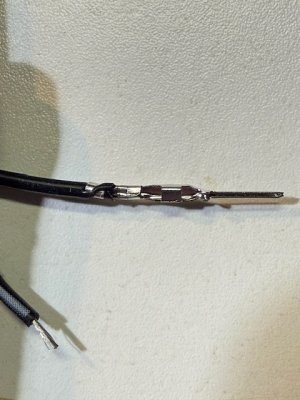
By pre-crimping the “wings”, you can more easily hold the connector in the crimper. Then insert the wire until the insulation runs into the flanges that when crimped are the actual wire connection, then squeeze the crimper until it clicks and releases. Here’s a lousy picture of the result (if all goes well):
IMG_1676.jpeg
Again, you can find much better pics online, but the key things are that (1) the V-shaped wings are well wrapped around the wire insulation to form a good strain relief, and (2) the wires are well secured in the middle part where the flanges have been crimped over the wires. My success rate at making good crimps was about 75% after a little practice.

The last part is to push the connectors into the housing:
IMG_1677.jpeg
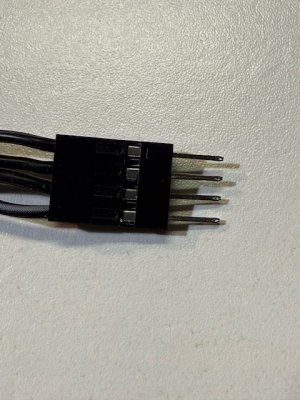
The key thing here is to make sure the connectors “snap” into the housing. (On this one, I combined two of the 2-wire connectors into one 4-wire connector for packaging reasons.)

That’s enough for tonight…
 
I should say on all of this stuff, kudos to EMG for using standard parts; makes it easy to adapt non-EMG parts to this setup.

Next steps are to wire the pots to the new wiring harnesses; probably won’t tackle that until the weekend, since I’ll have to break out the soldering station. Then install and (hopefully) enjoy!
 
Back
Top