Korinablaster: HSH Black Korina Tele

Honestly, I think the best ones you have posted are with pickguards. Those without look somewhat unfinished to me without the pickguard to tie it together.

Of course, this does not apply to this body but one way to avoid the gap is to order a body from scratch that is routed for a humbucker rather than being routed after the fact on a body that was already routed for a Tele bridge pickup.


I like the one in the lower right corner best.

Also, remember, you're not going to get stranded on a deserted island with whatever you end up with. You might build another instrument, if the one you put together now isn't the be-all end-all. Maybe not this year, but next year or the year after. Wait and see what it's like. As Gen. Patton said: "No battle plan survives first contact with the enemy" :laughing7:
 
Of the ones without a pickguard, I agree with Kevin about the one with all black hardware. If it were mine, I'd probably put a pickguard on it. Maybe a La Cabronita style, modified to work with the control plate, or more accurately stated, a Tele style cut down to one side like a La Cabronita.
 
stratamania said:
Honestly, I think the best ones you have posted are with pickguards. Those without look somewhat unfinished to me without the pickguard to tie it together.
As as traditional kind of guy, I feel the same way. It's like a headstock without a decal, to me it just looks like something's missing.

That said, it's your guitar, and I'm wholly in favor of whatever make you happy!
 
BigSteve22 said:
stratamania said:
Honestly, I think the best ones you have posted are with pickguards. Those without look somewhat unfinished to me without the pickguard to tie it together.
As as traditional kind of guy, I feel the same way. It's like a headstock without a decal, to me it just looks like something's missing.

That said, it's your guitar, and I'm wholly in favor of whatever make you happy!

Right.

Although I thought it was his daughter's guitar in which case what does she think which might be more important.
 
My daughter has spoken: Black hardware and no pickguard. She is a rebel  :headbang4: .

The body arrived yesterday. It looked darn near exact to the Warmoth pics with a bit less yellow, which I appreciated. There were two small clear coat surface scratches which I can't photograph, and a small raised glob of finish in the neck pocket which I'll sand down. Everything else was perfect. One thing that did surprise me, is the Korina has a bit of depth to it. Under the right light, some of the streaks are figured like you sometimes see in nice mahogany. I can't capture it in the pic, but it's pretty cool. 

JzN6xvZl.jpg

bGbrnXgl.png


Now for a few lessons learned.

This is more for folks that stumble into this thread with the idea of converting a showcase Tele to a humbucker bridge route. I'm confirming there will be a gap in the route, and a pickup ring will not cover it. If you want to build a custom pickup ring plan on expanding the bevel by 4.6mm to cover the entire thing.

1wsDdyI.png

rTfn8Zbl.jpg


The raised glob of finish. Not a big deal, but a reminder to check your neck pocket before installing your neck. The finish is hard and my neck will not sit flush until I clean it up.

RdAwrpq.png

6Keh08h.png


This was my first time installing string ferrules. It sucked. The ferrules do not fit due to finish inside the holes. I opted to try the soldering iron method of installing them. While I was able to get them seated, I still needed to hammer them home. Do not make the same mistake I made and attempt to press them in with your finger after seating them with the soldering iron! Complete brain lapse that literally burned a reminder into both my brain and thumb  :doh:

2i0fsJPl.jpg


A few more observations.

For the life of me I can not run the neck pickup wires through the channel to the control cavity. It appears the channel was drilled with a less than 90* elbow rather than a straight line from the pickup cavity to the controls. It's also drilled very tight to the point I may need to strip the outer wire casing to snake everything through. I tried for an hour to pass through different gauges of wire, a small piece of thin cable, even a fishing line, and I was unable to navigate the bend. I might need to redrill the run. Any tips would be appreciated.

Thank god this is my kid's guitar and not mine. The gloss black, and black hardware, are absolute fingerprint magnets. If you're OCD like me, stay away from dark gloss colors or expect a full-blown anxiety attack. How I survived this long in life is a mystery, but those darn fingerprints almost took me out. This guitar will be banished to the basement and out of sight :) .
 
Sorry about your thumb. But, for future reference, if you have a drill press, here's a safe, effective way to install string ferrules.

Also, a ways back in that thread, there's some shots of a black Tele that's finished in Warmoth's black satin. Stuff does not take smudges/fingerprints/etc. Far superior to most satin finishes I've seen. Really nice material, whatever it is.
 
Bummer about the thumb. It's easy to have a momentary lapse of thought, though. At least it'll heal and you will most likely remember to not do that again. Kevin's drill press method of installing the ferrules works good. If you don't have a drill press, it helps to clean the finish out of the rim of the hole with sandpaper or a fine die grinder burr twisted by hand with little or no pressure, not in a die grinder. I slipped three 1/4" grommets on the burr as a grip of sorts.

zh3o8S1.jpg
 
People don't just sand the ferrule holes before installinating? I mostly play trems so this isn't a bfd for me, but shirly there is a way to make it #easier.
 
BroccoliRob said:
People don't just sand the ferrule holes before installinating? I mostly play trems so this isn't a bfd for me, but shirly there is a way to make it #easier.
You don't need to. Read the bit on how I do it at the link a few posts back, where I clearly demonstrate the pointlessness of such activity. Also, StewMac is now selling this tool...

iu

... which is basically just another way of doing the same thing, only you get to spend another $15 getting another tool to do the same thing. Only difference is you could arguably use the StewMac tool without a drill press, although I don't know how much hammering those centering posts will take before failure.

The only real problem with hammering those things in without assistance is there's some risk they won't go in square, or you might miss and hit your thumb or the body, both of which will cause the invention of many new cuss words...
 
yeah I don't have a drill press, tho, so if I ever do a Tele I'll just sand the holes and push them in with a screwdriver or something, def not using a hammer rofl

I do like how you can see the old Tele routs inside the humbucker routs, lol. now i kinda want a tele
 
Any guidance on how to tackle running the neck pup wires? After an hour of trying to fish them through, I finally gave up. I have no idea how the channel was drilled, but I'm pretty sure there's a 90* bend which I haven't been able to navigate. Keep fighting it? Drill a new channel?
 
If you think about it, there's no way to drill a hole that angles mid-route, so what's going on? Well, how that wire goes depends on several things. Sometimes, you can route a channel however you want if there's a top going to be glued on after that fact. Or, there may be a lotta voids in the body because it's "chambered" that amount to the same thing, and are also covered up by a glued on top. Or, the hole may have been drilled from two different directions, creating an angled route. In any case, the wire isn't going to wanna feed straight. It's flexible, and it can hang up and bend at any opportunity.

One thing that can help is to not use a wire, per se. Head for the closet, and grab one of the dreaded leftover clothes hangers tangled up in there. Cut it, and more or less straighten it, and see if you can feed that through. May take some finagling, but it's not going to wanna bend over mid-route and prevent any further feeding.

If that fails, you can get an aircraft bit, which is basically just a standard twist drill but it's 12" long. Start from the neck pocket, aim for the control cavity, and drill your little heart out. Now you KNOW you have a straight route to your destination. Feed the clothes hanger through, attach whatever wires you want to the hanger wire at the other end of the hole, and pull them back through the hole. That always works, and the hole is hidden.
 
I am an idiot. Well, half an idiot. The neck humbucker cavity has TWO wire channels.

One channel is clearly obvious. However, it runs perpendicular to the control cavity and goes nowhere. The frustrating part is the channel is long enough to make you think it should be the one, but turns out it's a dead end.

The second channel is tucked about a centimeter deep into the first channel, and is angled UP just a bit. As such it was hiding underneath a little lip and I simply didn't see it. I turned the body around, and looking at it from a different perspective, I found the missing channel.

I swear this is was like looking at those old 3D pictures where if you cross your eyes you can see dinosaurs and palm trees. However, I was clearly off and after branding my thumb on the darn ferrule I think my brain went to mush. 

This was my initial view.

onbMD41.png


Turned the body a few degrees and voila, two channels. I need less coffee and more sleep...

Sw2o3k6.png


Anyway, here's a rough assembly. Nothings bolted down, I need to make the wiring harness, and still waiting on a few parts. However, I did steal a trick from Rgand's recent build. Tough to see in the pics but I installed a set of black open face humbucker covers. I like how they looked on his guitar, and really like how they fill gaps between the bridge and pickup ring. They add a nice clean touch.

deimQOV.png


I played around with the idea of using pearl topped knobs. My daughter hasn't see this yet, but I'm 99.9999% sure she'll want all black.

xjP87R3.png

 
Circling back to wiring. I've been chatting with the great folks at Suhr, and they provided another cool wiring idea. Basically, a totally hum free combo of series, parallel, and split tones. I have a pile of parts ready to go, but trying to decide between the following. I know a lot of folks don't like all the various options, but I'm gonna have fun with this one. I'm leaning towards the series/parallel/split, but the auto split (I like the middle option) is pretty darn nice too.

What say you?

jF53Anf.png


SYtdB19.png


How is the switching done, with these options?

I suppose with the first one it is a combination of super switch and some other switch for the middle position.


Other than that I say time to make a decision.
 
stratamania said:
How is the switching done, with these options?

I suppose with the first one it is a combination of super switch and some other switch for the middle position.


Other than that I say time to make a decision.

Option 1 is a super switch and two push-pulls to independently control series/parallel for each humbucker. I assume I could use an on/on/on toggle to get parallel/split/series, but I'm not 100% sure if the auto split function would still work. I don't see why not, but that's a ton of wiring in a small space.

Option 2 is a super switch and one push-pull which acts as a master coil-split.
 
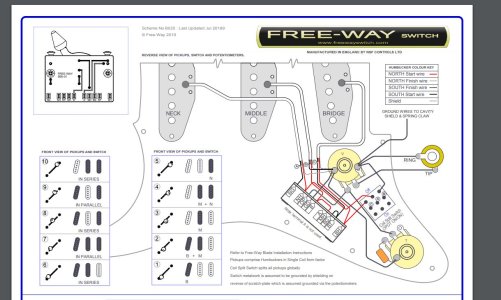
here's a 20 option switch that does what you want:
The series options are awesome for leads, and very hot. 
It's scheme 5b5-01 B025
 

Attachments

  • 20 option freeway switch 3 humbuckers.JPG
    20 option freeway switch 3 humbuckers.JPG
    141.9 KB · Views: 13
Back
Top