First DIY re-spray. Questions about clear-coating.

Ladies and gentlemen, we have orange peel!


Unfortunately we also have a run:


It's not as bad as it looks, I've already sanded and re-painted the area. This week has been good actually, I've just about got the feel for the limits of how close you can get with the lacquer, I just pushed it a smidge too far trying to get good coverage inside and around the lower bout there. But the rest of the body is looking pretty good now, and hopefully will have enough of a layer (once I've done several coats on the repaired area) to mean I can start wet sanding in a few weeks.
 
orange peel is not bad.  Runs are hard especially if they melted into the color coat.  you may be able to sand most of that out depending on the number of coats you had.

I have found that multiple thin coats are those hard to hit area works well and helps avoid runs.
 
Yes, I got the other bout perfect but my over-confidence led to overspraying. I am very much learning on the job with this!

I was almost glad to see the orange peel, because it suggests good coverage. I was able to spot repair the area with the run, so it's still progressing ok I think.
 
Most runs respond to scraping really well. The coarseness of paper you'd be tempted to use on THAT @#$%&*# RUN - will be homicidal for the rest of the beast. The "correct" way to do it is to take a single-edged razor blade and wrap tape over the corners on it - the thickness of the tape wrap(s) regulates the height of the center part above the blob. I have a sort-of wide 6" stainless steel ruler that just seems to be there at the right time. The biggest warning/terror/error etc. is trying to scrape a still-wet blob, you'll start peeling up a lot more than you want. The good news is, a moist blob will be ruinous trying to sand too! :icon_thumright: And as Cagey sez, with a spray can you can't get inside of the paint and fiddle with drying times. Wait, wait, wait... you want to be scraping powder off of it in tiny little levels, not trying to samurai a big slimy paint zit.

 
Thanks Stubhead. Saw your advice too late but actually I managed to correct it just by waiting until it was dry and gradually sanding it back. I've now got the measure of how much spraying I can get away with - for wetter coverage I get a bit closer, but don't gun the nozzle (which is what I did when I got that bad run). Instead I spray in bursts, and that means I can check as I go. Seems to be working ok now, I've got quite a decent protective layer now which feels smooth, and there don't seem to be many flaws.

The main thing I seem to be learning from this actually is a bit of patience!
 
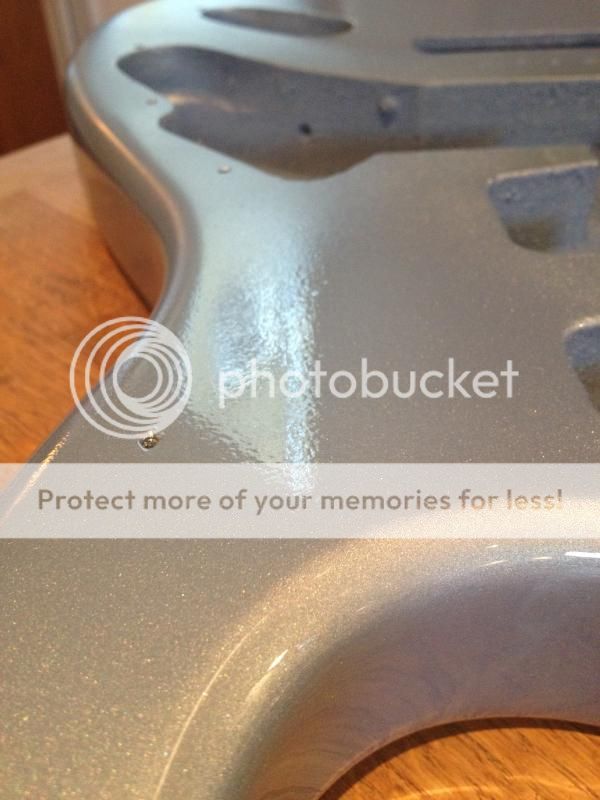
Not to take it all out on you, there are (hopefully?) lurkers sniffing these here parts & annotating the witticisms, if nothing else... when you DO get a big wet slimy paint zit (I didn't say if...) it needs to be corrected, it WILL be corrected, so to get all willful & "pro-active* the best thing you may temporarily do is mess it up to speed the drying. Spike it with a needle, flatten it out, even maybe scoop some pus out with a toothpick/paper towel apparatus, you're just hurrying it's date with doomsday.

And of course anytime with sharp pointy things or scraping away, you'll have the best result if you support the scraper tip with as many fingers as possible. Make sure the bodies (you AND the git's) are more-or-less stable where they are and manufacture a temporary little wood-plane body out of a few thumbs and two or four fingertips. Another one of those little things where consistency-in-movement is far more important than sheer "efficiency". World's best practice? - Drop-filling neck dings with superglue + scrapy-scrapy. Neck dings make me a little PSYCHO... and it's all good practice for thinking/seeing in hundredths of mm's and thousandths of "'s.

And, of course  :icon_thumright: it's another one of those things where, the best results come from supporting the scraper with as much meat as possible which, kind-of runs smack-dab into the fact that people are big oily bags of grease leaking all over their intended and you should really never ever even touch your guitar - for "best results." Hey, I don't write these plots, just read 'em. Come back as an earthworm next time, where all you have to worry about is... rainstorms, and kittens, and lawnmowers, and magnifying-glass wielding evil little childr... well o.k. never mind. I almost landed the next one as "fat yellow housecat" but the only placement open was with a yappy little black... thing, still checking "poodle recipes."

You CAN now buy big bags of super-cheap white cotton gloves made out of t-shirt stuff, or sew/tape/fold your very own "mask" out of T-shirts(!) a little hole in the middle to spelunk through, or thin cardboard with a hole wrapped in t-shirt rags etc. I found an egg spatula in the kitchen with a round, slotted, plastic flipper part. Which is more fattening? - Eggs? Or rock 'n' roll?

*(don'...do...d.d.d...) :help:
 
Ok, I'm walking away from the rattle cans for two weeks now, as I think I've got this as good as it can be for now. I've spent the last few days chasing away tiny blemishes, and adding layer after layer of lacquer. It's now at the point where it's relatively blemish free, and I can only make it worse!


I took those in fairly dull light, but this shows the metallic paint better:


I'm pretty happy with it, but now I need to just LEAVE IT ALONE for a couple of weeks or more. After that I'll decide if the orange peel bothers me or not.
 
Thanks Cagey! I've certainly learned a lot doing this, and I'm keen to try it again on a Squier Jazz Bass I've got.
 
A good finish is a lotta work, but it's a very satisfying thing when it comes out well. Makes you wanna do it again. Reminds me of something...  :icon_biggrin:
 
Just about anywhere that keeps it out of harm's way will do. Dust/insects won't bother it. You're going to sand and clean some more anyway.
 
I emptied out one of my drawers at home in the end. Hopefully that should be pretty secure. The main danger is me fiddling with it!
 
I'd rather see it hanging. Until the finish is completely hardened, it's liable to take impressions from anything it rests on.
 
Oh don't worry, it's not resting on anything. I've got a wooden block in the trem cavity keeping it off the base of the drawer by about an inch.

 
Back
Top