Buffing Minwax Spray Poly

Mr. Neutron

Junior Member
Messages
85
Hey, All!

I apologize if this has been covered before here. I did indeed do some searching in the DIY Finishing forum, but couldn't find a sorta "Buffing Spray Poly For Total Boneheads" detailed type of post. It may be here; I just couldn't find it. I've been watching videos and looking at articles I googled. Sigh..... Lots of kinda conflicting info out there. Kinda like bung holes, everybody has their own opinions......  ???  :icon_scratch:  :dontknow: To further confuse me, it seems like not a lot of folks use the rattle can version of Minwax's polyurethane, but I hoped a lot of the process for buffing those finishes would be applicable to the spray on stuff......

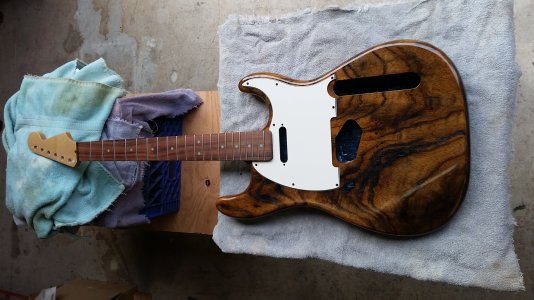
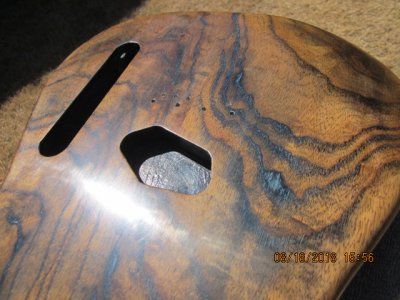
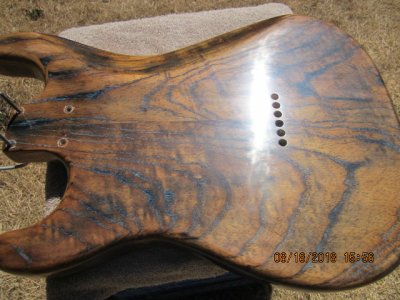
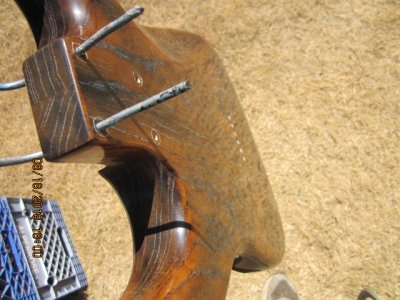
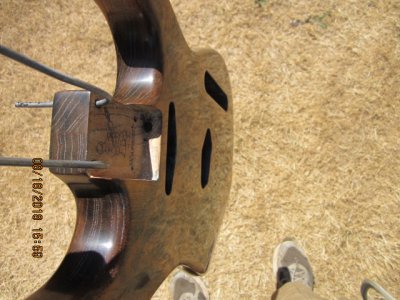
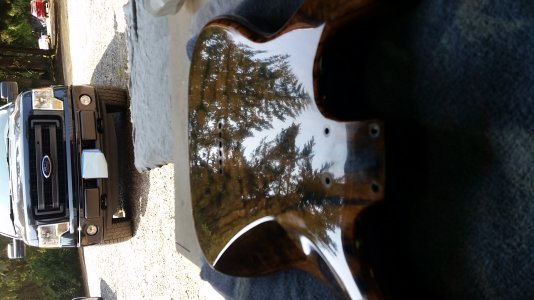
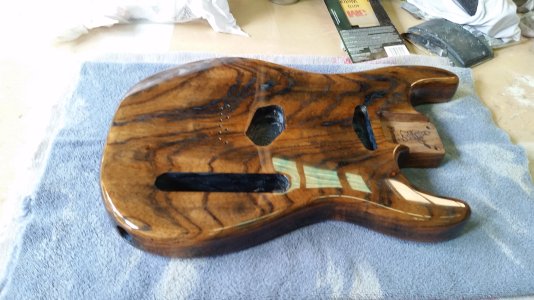
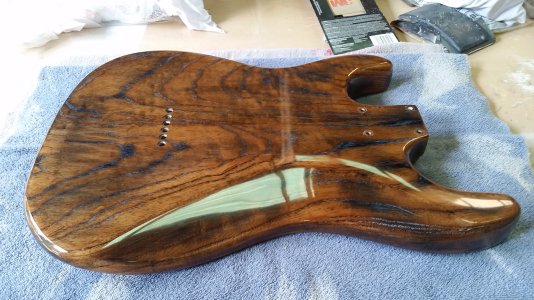
I have around 7 kinda light coats of Minwax clear gloss spray on poly on my guitar body. I have actually sprayed a tiny bit more on all side edges, corners, and curved portions of the guitar, in an effort to prevent buffing through the topcoat. I had planned on waiting for a minimum of 4 weeks curing time before I even look at the body again. But then I read a helpful post in an old thread (October, 2011) entitled "Poly vs Nitro". In this thread, DMRACO said in post #7:

I will say this, concerning the ease of poly.  While NOT instrument grade, I have used MINWAX spray poly on three builds, nitro on the other three.  My very 1st warmoth build, a maple tele is over 15 years old and I used 5-6 coats of minwax spray poly.  Looks FANTASTIC!!!!.  Held up well too.

The only issue is it is a bitch to rapair if it does get messed up.  On a recent build I sanded thru when finish sanding.  As much as I tried to blend, I ended up refinishing the entire side of the guitar!!!

My Zebra strat I used satin poly spray, looking and feels like a natural wood finish. 

My next build will be a double cut gibson replica...nitro all the way.

I have to ask if you are spraying your self?  Another difference is CURE time.  Poly is good to go in about 72 hours depending on how many coats and humidity.  If you wait longer, you will have a finish that is hard as nails and almost impossible to buff.  Nitro can take weeks to full gas/cure.  Sand to soon and you will gum the finish.

Next, I read this article ( https://baileylineroad.com/flawlessly-finish-wood-with-correct-sanding-power-tool/ ) where the guy recommends buffing after 24 hours.

So, maybe I better get on this a little sooner than I thought?

Can anyone please possibly detail their procedure for this?

How do you deal with the tight spots around & inside the "horns"? Done by hand? Any pointers for that?

I had figured on hitting the body with a little 0000 steel wool in a few days to get rid of a little bit of the airborne dust that inevitably settle on it as it dries.
And then waiting a long while before very lightly level wet sanding the flat surfaces with, say, 800 or 1000 grit .
After that, I had planned on lightly wet sanding with 1500 grit, and then 2000 grit.
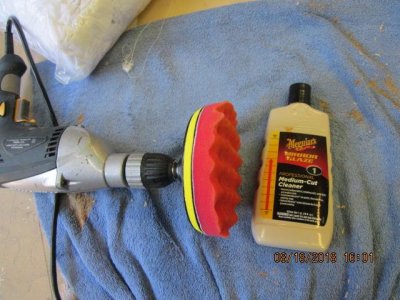
I figured next I would try a "medium grade" of fine rubbing compound with a sponge pad using my drill (don't have a random orbital sander).
Follow that by something finer on another sponge pad, and then finally some polishing compound.

Is this a decent "process"? If not, what should a person do differently? And when to even begin it?

Again, I apologize for the long post, and so many questions. It just seems the more I read and watch, the tougher time I have of figuring out a course of action for myself. My background (machinist) tends to be from a metalworking perspective, so my experiences to draw from may not  be very relevant for wood stuff. I did prep and paint a 510 Datsun 35 yrs. ago, so I have a slight grasp of body work principles. But again, not much experience with wood. My attempts at Brush on poly sucked badly. My Tru Oil finishes weren't near as great as what I've seen others do; ditto for my wipe on poly. So advice and help are definitely welcomed here.

Thanks!
 
Seems like a reasonable process, but I would skip the steel wool. (Not a fan of steel wool)


The reason you don't see a lotta discussion about spraying poly is that for a variety of reasons it's difficult for the average DIY guy to do, and definitely not with rattle cans. Rattle can poly is for the occasional woodworker who wants to put a durable finish on some candlesticks or a picture frame or something. It's not for "show" finishes like you want on a guitar. It's too bad, because it really is the best finish for instruments. But, for the DIY guy, lacquer is the way to go.

Part of the problem is you have to shoot it right on the first go-round. That's almost impossible with rattle cans, so you're in trouble right off the bat. You end up with a highly durable finish that looks amateurish at best and gets worse from there, and is all but impossible to repair or make further progress with. If you're set up with the right spray/support equipment, then the nice thing is you shoot it and forget it, it's done. It's why OEMs love it so much. Can't do that with lacquer. Takes a long time and a lotta labor no matter what. But, at least you can do it.

Unless there's some overwhelming reason to shoot canned poly, and I can't imagine what that would be, I'd strongly recommend against it.

 
Cagey is right, nitro is much easier.  After more guitars than I can remember, I use nitro when I want a shiny gloss finish, poly for satin.

If you must use gloss poly, I let it dry for at least a week after final coats.  I usually do 3-4 coats, dry for 48 hours, sand smooth with some 400 grit, then my finish coats. 

Sanding and buffing is similar to nitro.  I start wet sanding with 800 and go to usually 2000.  Then buff.  Take your time.

IF the poly is not cured it will gum with heat from sanding or polishing.

The one drawback to poly for me is lacquer is so much easier to add color and tint.  I have not mastered tinting poly.    I know Eastwood makes some decent urethane finishes too.  However I have never worked with them.
 
Hmmm, well, Heck!!!

Been over 3 days since I applied the last coat, so I began wet sanding the dust particles and orange peel. Sorry guys, I had already began sanding before I got to read the replies here. Anyway.....

That stuff is already a pretty tough (hard) finish! We have had really nice weather lately here in western Oregon, with high temps in the upper 70s to low 90s for the last week or two, with low humidity. So the rattle can poly finish, if not completely cured, is definitely cooked enough to wet sand with no problems. I don't think I could have gotten away with working it this soon during our wet, soggy winters.

First, I took Stratmania's good advice, and used some of 3M's ScotchBrite in a grade close to 000 steel wool. It did basically nothing; barely dulled any parts I tried to scuff inside the horns. Gonna have to figure out something a bit more "aggressive but controllable" for the horns, and curves on the sides. Probably use the fine sandpaper wrapped round my foam I have left over from wrapping/insulating my copper water pipes.

So, I began wet sanding the front and back with 1000 grit. Got it to the point where it was mostly dull, but you can still see a small amount of the shiny orange peel texture "in the valleys"......

Next, I scuffed for a bit with the 1500 grit wet paper. You can still see a lesser amount of "shine" where the "high peaks" of the orange peel are dull, leaving the lower shiny part slightly evident. It feels really nice and smooth, and it actually is kinda beginning to show a little dull luster/gloss when you hold it at the correct angle in the light. I'm kinda anxious to see what some even finer paper will polish up.......

I'm going slowly, and stopping and wiping everything down often, and inspecting what I've done. I'm slowly learning to go slowly. But I still messed up anyway, and wet sanded through 3 tiny little areas where the forearm contour blends/radiuses into the front.  :sad1:  :tard:

Still, so far, it actually doesn't look too bad........


Attachments

  • 20180816_131544.jpg
    20180816_131544.jpg
    2.2 MB · Views: 454
Keep going and get rid of all those valleys.  Once you get it completely flat, move to the buffing.  I would highly recommend some type of mechanical buffer.  Buffing poly by hand is not something I would recommend.
 
Cool, thanks DMRACO!!!

I appreciate the help, from all of y'all!

Cool to know about sanding all the way to flat. Thanks for that! I wasn't sure if a small amount of orange peel got taken care of during buffing or not. I kinda thought that IF I didn't sand away all of the "peaks", it would likely show up really well after buffing.

Yeah, for buffing, I have sponge pads and some Meguiar's buffing compound.  The pads attach to an arbor I can use with my drill.

Any advice for sanding and buffing the tight areas around the horns? Any way to buff those mechanically, or is that better done (somehow?) by hand?

Thanks again!
 
Unfortunately unless you have special attachments (they make some good ones to use to buff wheels) by hand is usually what I do.  They make some smaller diameter sponges that will fit in tight spaces for your drill

IF you decide to go by hand,  I will take a buffing rag, double fold, and with the guitar between my legs use a back a fourth almost like I was trying to saw the horn off :eek:
 
Okay. Wound up having some "free time" after completing one wedding task. Here are some pics after "rough" buffing with Meguiar's M0116 "Medium Cut" buffing stuff. I only used my pad and drill on the front and back, and a tiny bit on the bottom end where the strap pin will get screwed in.  The areas around the horns, sides, and tummy cut were sanded then buffed by hand. All sanding was done by hand.

Some observations: It's really important to have a LOT of CLEAN towels to lay the guitar on, especially while buffing. The compound tends to get flung around a bit. Any "extra junk" laying around on a towel can leave a small scratch when the guitar scoots round on it while working the opposite side. Clean and change these frequently. Mine are all in the washing machine as we speak.

Have a bunch of (clean) cotton t-shirt wiping rags on hand when sanding & buffing. I got a sack of these from Home Depot.

I tend to be really, really Anal and detail oriented already. I built aircraft parts for a living, and believe you MUST have that attitude for that job. I like to fly without worry, ya know? It carries over into other stuff I do, unfortunately, sometimes when it ain't necessary. So I worked really hard to get every last "peak" of any orange peel texture sanded flush that I could get to. After wet sanding with 2000 grit, practically none of the orange peel high spots remained on the back and front. Very little was left on the ends, sides, and horn areas. This degree of sanding wasn't totally necessary on the front and back. The Meguiar's  medium cut buffing compound was more aggressive than I thought it would be. It took care of any remaining orange peel, and then some. That stuff works very well.

I'm attaching some pics. I used my Canon Powershot point & shoot for these pics. I suck at photography. Between my ability as a photographer and my camera, I dunno how much these will show. I tried to get angles that showed both flaws and nice spots. My wife is a photographer, but she ain't here at the moment. Which is another reason why I was working on the guitar........

Personally, I'm super happy with how well it's "glossing" after "Stage 1" of buffing. I have 2 more levels of buffing still left to do. Some of the pics show the reflection of the towel the body is resting on. The pics show my contrasting grain fill pretty well, and where I kinda sucked at it, or accidentally sanded more of it off than I wanted to. Grain fill used blue paint, silver acrylic craft paint, black dye, and black stain. Then was sanded down to bare wood. It got 2 coats of shellac, then spray on poly. This whole guitar body is one unfortunate mishap after another that I call "My Learning Experience". It was intended to be a "Player" anyway, not really a work of art......
 

Attachments

  • IMG_0893.JPG
    IMG_0893.JPG
    140.2 KB · Views: 416
  • IMG_0894.JPG
    IMG_0894.JPG
    145.2 KB · Views: 531
  • IMG_0905.JPG
    IMG_0905.JPG
    138.6 KB · Views: 380
  • IMG_0904.JPG
    IMG_0904.JPG
    140.7 KB · Views: 419
  • IMG_0906.JPG
    IMG_0906.JPG
    59.3 KB · Views: 424
That's really coming along nicely! Based on how well it has come out so far, I think you're going to be very pleased with the results after the next two stages of buffing.
 
Thanks for the encouragement, Fellas!!!  :yourock:

DMRACO, your advice to "saw the horn off" actually worked pretty well! I wrapped some of my round foam pipe insulation with a clean cotton rag, slathered it with buffing compound, and went to town on the horns, sides, contour cuts, and the end. Thanks for passin' that tip on!

I did find an area where the forearm contour radiates/blends into the front that got buffed through. You have to look hard to see it, but it's there.  :sad1: I think the mottled body color does a decent job of hiding it. I guess this is where my "amateurish" skill set  really shines (or actually, DOESN'T shine, hee hee......  :laughing7: ). I thought briefly about trying to carefully smear some thinned down wipe on poly on the spot, but figured it probably wouldn't work too well. I could see myself buffing through the surrounding area attempting to fix the little area of no coverage........  :-\

I gaining a WORLD of Respect for those that finish these things professionally. Sorta..... The finish on my "bought brand new" 2 years ago Standard MIM Telecaster came with a noticeable run on the front of the body at the end near where the strap pin is bolted on. I guess if Fender isn't perfect, I won't cry if I'm not either.......  :toothy12:
 
After buffing with Meguiar's "Fine Cut" M0216, then polishing with their "Clear Plastic Cleaner" pics.

You can can see some nice reflections of the big fir trees at the end of my driveway. This thing really shines, way more than I'd thought it would......

My "Big Head" '70s Strat headstock neck got here, so I played "dolls" with the pickguard, bridge, control thingie, and etc. This pic was taken before final 2 stages of buffing.......
 

Attachments

  • 20180819_150202.jpg
    20180819_150202.jpg
    1.6 MB · Views: 411
  • 20180819_150229.jpg
    20180819_150229.jpg
    1.8 MB · Views: 392
  • 20180819_150337.jpg
    20180819_150337.jpg
    1.6 MB · Views: 664
  • 20180819_150317.jpg
    20180819_150317.jpg
    2.1 MB · Views: 1,113
  • 20180818_182412.jpg
    20180818_182412.jpg
    1.6 MB · Views: 468
Nice work.  That clear plastic cleaner....did that help with some of the micro scratches left after polishing?
 
Thanks, Rgand!!!! Ya know, I really like that guitar in your avatar. Is there a build thread about it anywhere here?

Heck, I like EVERYBODY'S guitars here; especially the Guitars of the Month(s). There are some genuinely talented folks here.......

DMRACO said:
Nice work.  That clear plastic cleaner....did that help with some of the micro scratches left after polishing?

Yeah, I think it does help a little. I guess I laid the thing on a kind of "scratchy" towel after I was done taking pics, and noticed I had put some minor scuff marks on it. I just dampened a cotton rag with a little water, squirted some of that cleaner/polish on it and those little boogers rubbed right out. But they were pretty minor scuffs,like I said. This may become my "go-to" polish.

 
Mr. Neutron said:
Thanks, Rgand!!!! Ya know, I really like that guitar in your avatar. Is there a build thread about it anywhere here?

Heck, I like EVERYBODY'S guitars here; especially the Guitars of the Month(s). There are some genuinely talented folks here.......

DMRACO said:
Nice work.  That clear plastic cleaner....did that help with some of the micro scratches left after polishing?

Yeah, I think it does help a little. I guess I laid the thing on a kind of "scratchy" towel after I was done taking pics, and noticed I had put some minor scuff marks on it. I just dampened a cotton rag with a little water, squirted some of that cleaner/polish on it and those little boogers rubbed right out. But they were pretty minor scuffs,like I said. This may become my "go-to" polish.

Good tip. 

This may sound weird but I would let it it a bit.  IF you are getting scratches from a towel, it still may need to cure a bit.  Hang it for a week.
 
Back
Top