i wish i could find a job that was so lenient i could do my own projects. no i actually bought an old milling machine made by induma, apparently it is italian nice rigid machine. i am considering buying non backlash lead-screw nuts but most are plastic and might not be the best solution for a milling machine. may be better for an edm or something.


You are using an out of date browser. It may not display this or other websites correctly.
You should upgrade or use an alternative browser.
You should upgrade or use an alternative browser.
Aluminum "Acoustic Looking" strat bridge....the work begins
- Thread starter scartozi
- Start date
S
swarfrat
Guest
I was in the process of converting a round column mill/drill when I moved after a stretch of being out of work. I decided - if I had it to do over again, I wouldn't get a round column machine, so why not do it over again? Sold it, planning on converting something the size of the largest stand mounted machines grizzly sells.
oh yeah.....well I have a hand file, band saw, rotary file, drill press......and sandpaper. :icon_biggrin: :icon_biggrin: I have the rough width cut, need to take another 32nd or so off with the rotary file, hand file and polish with sandpaper. Saturday I'll cut the down taper....on the sides from top to bottom....finalize by hand then the fun part.....filing out the router marks inside the cutout. I'll try to get some updated pics by sunday.
while it would be nice to know someone with a cnc machine, plug in some numbers, push a button and walah.....nothing beats a little elbow grease and the satisfaction of making something by hand. Now would I want to make a few more by hand.....HELL NO! PLUS, it gives me an excuse to drink some Guiness and smoke cigars in the garage now that it's getting warmer ccasion14:
while it would be nice to know someone with a cnc machine, plug in some numbers, push a button and walah.....nothing beats a little elbow grease and the satisfaction of making something by hand. Now would I want to make a few more by hand.....HELL NO! PLUS, it gives me an excuse to drink some Guiness and smoke cigars in the garage now that it's getting warmer
ccasion14:DangerousR6
Mythical Status
- Messages
- 15,478
I'm saving up my beans for one of these..... :laughing7:

dangerous are you going into the neckplate buisness full time now? is that the plan? :laughing7:
i didnt know smithy had a cnc model. i have seen there miil/lathe combo machines but that's the first cnc i have seen from them. how much does something like that go for?
i didnt know smithy had a cnc model. i have seen there miil/lathe combo machines but that's the first cnc i have seen from them. how much does something like that go for?
DangerousR6
Mythical Status
- Messages
- 15,478
Neckplates, and a host of other things... :laughing7:Dan025 said:dangerous are you going into the neckplate buisness full time now? is that the plan? :laughing7:
i didnt know smithy had a cnc model. i have seen there miil/lathe combo machines but that's the first cnc i have seen from them. how much does something like that go for?
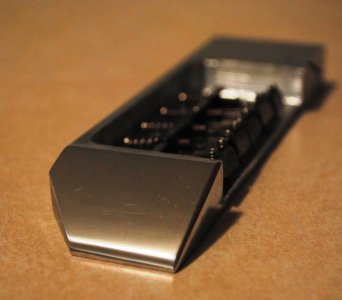
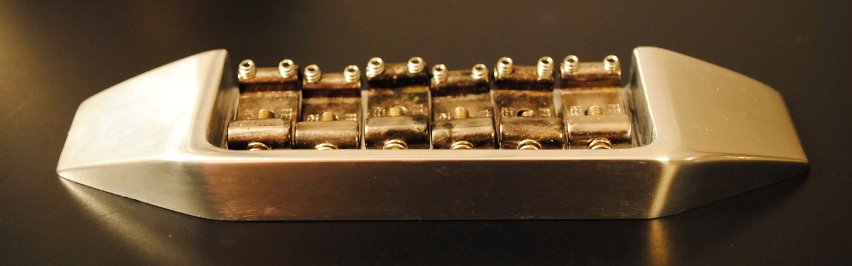
finally had some free time this evening and decided to do some work on the aluminum bridge. You'll notice from one of the pics where I started to cut the down angle on a band saw and broke the blade...ooops. So, I broke out the old file and went to town. There is still A LOT of work to do and can't wait to get the other side filed down and begin the final shaping.
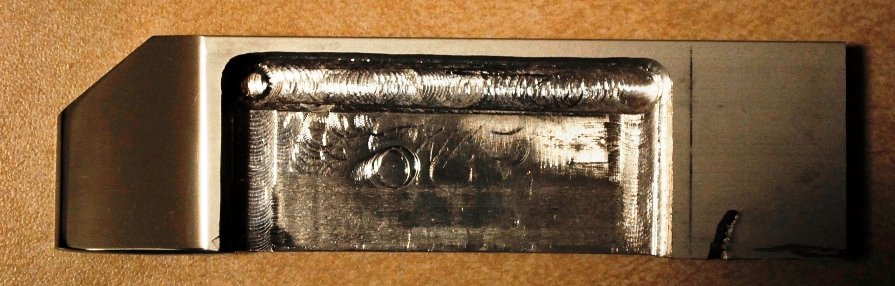
What I did to shape the side. Marked the down angle I wanted and started to file. Marked off the small 45ish angle and filed it down and rounded some of the corners. Took 180 grit sandpaper and smoothed out the file marks followed by 220 then wet 600. A little Mother's Billet Polish and buffed it out with a dremel. From start to finish around 2 1/2 hours.....not to bad.
What I did to shape the side. Marked the down angle I wanted and started to file. Marked off the small 45ish angle and filed it down and rounded some of the corners. Took 180 grit sandpaper and smoothed out the file marks followed by 220 then wet 600. A little Mother's Billet Polish and buffed it out with a dremel. From start to finish around 2 1/2 hours.....not to bad.
Attachments
DangerousR6
Mythical Status
- Messages
- 15,478
Looks good from the finished side, how's it gonna mount? :icon_scratch:
Thanks!
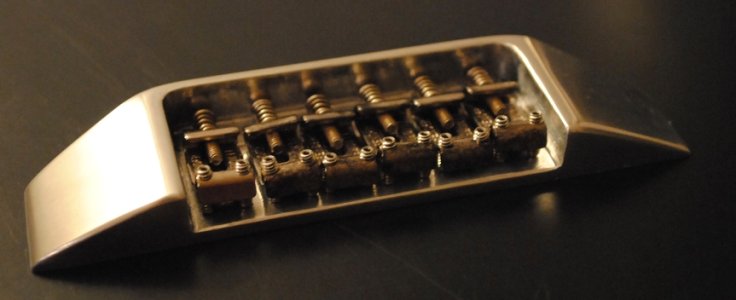
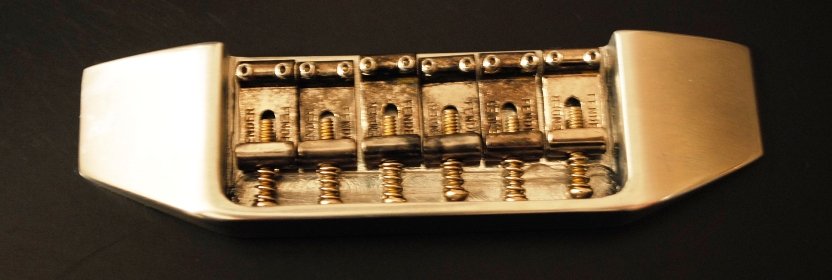
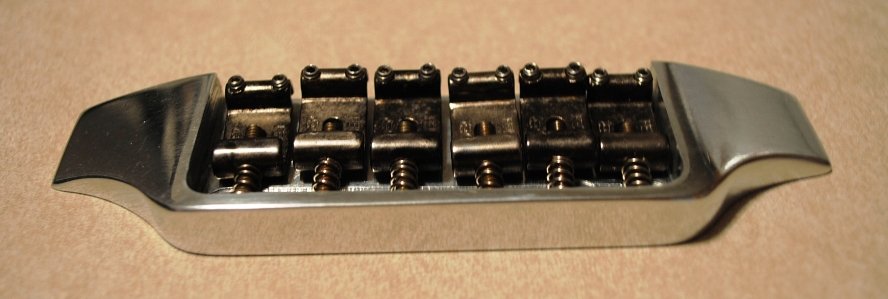
it'll have graph tech ghost saddles when I get the guitar it's going on finished.....just had those saddles laying around. It will be attached to the body like a standard hardtail strat. I think I may up the string spacing to 2 3/8" to better suite my paying style and give my fingers some room. Since the guitar will have graph tech ghost saddles only the wider string spacing at the bridge should be ok but we'll see. It's been a fun project, can't wait to get it done and annodized.
it'll have graph tech ghost saddles when I get the guitar it's going on finished.....just had those saddles laying around. It will be attached to the body like a standard hardtail strat. I think I may up the string spacing to 2 3/8" to better suite my paying style and give my fingers some room. Since the guitar will have graph tech ghost saddles only the wider string spacing at the bridge should be ok but we'll see. It's been a fun project, can't wait to get it done and annodized.
DangerousR6
Mythical Status
- Messages
- 15,478
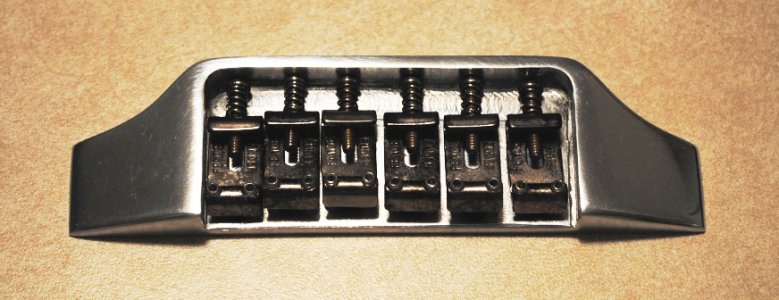
Nice work....How you gonna adjust the saddles....needs some holes in the back end... :dontknow:
One of the other reasons I'm building this bridge is if I want to change the look of the guitar I can switch the bridge out. I plan on making two more of these bridges in Madagascar Ebony and Ziricote.....sooooooo if I want a different look for a while I can switch them out. I'll probably inlay a square piece of 1/16 or 3/32 brass plate for the bottom (for saddle height screws). Ridiculous......maybe.....but its fun. At least I can use a normal router for the wood bridges. :hello2:
Firebird211
Hero Member
- Messages
- 734
Man, that is nice. I like the shape you made the bridge. With the three bridges you are making, other than looks, they will prob sound a little different too. People doubt the sustain and tone of aluminum, but even Graphtech NVS bridges must have some significant amount of aluminum in their alloy. :dontknow: Their bridge is so light, and sustain and tone are their name and game. :rock-on:
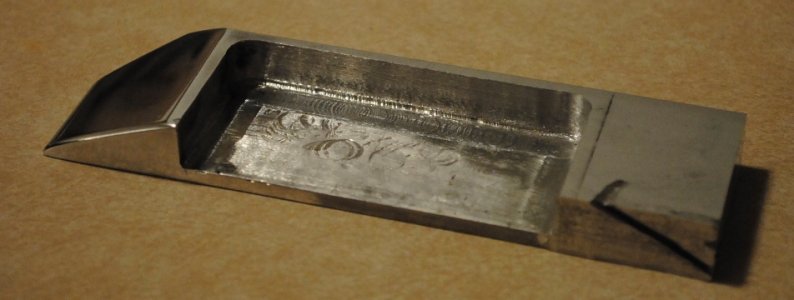
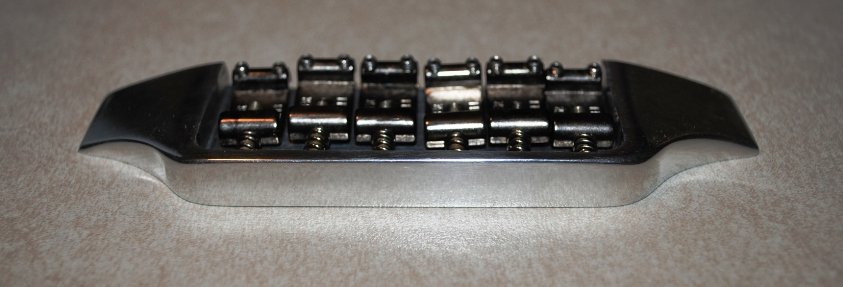
After looking at the bridge for a while I decided that the 1/2" was to tall and took it down an 1/8". Then reshaped and rounded the sides. As of now this is the final shape of the bridge. I still have to clean up the cut out area where the saddles sit, drill my holes and off to get anodized. I'm really happy with the way it turned out and almost hate to get it anodized but maybe I'll leave my next one shinny. This project would have went A LOT faster if we would have had 1/2 x3/8 bar stock.....maybe next time.
Attachments
Firebird211
Hero Member
- Messages
- 734
scartozi said:After looking at the bridge for a while I decided that the 1/2" was to tall and took it down an 1/8". Then reshaped and rounded the sides. As of now this is the final shape of the bridge. I still have to clean up the cut out area where the saddles sit, drill my holes and off to get anodized. I'm really happy with the way it turned out and almost hate to get it anodized but maybe I'll leave my next one shinny. This project would have went A LOT faster if we would have had 1/2 x3/8 bar stock.....maybe next time.
It does look really sexy as is.
DangerousR6
Mythical Status
- Messages
- 15,478
Looks sharp, I like the renditions.... :headbang:
Similar threads
- Replies
- 30
- Views
- 7K
- Replies
- 16
- Views
- 8K