Wet sand between coats - how to clean?

dratini357

Newbie
Messages
21
So I know some prefer to wet sand between clear coats. How do you completely remove debris and water from the area to continue with further layers of nitrocellulose lacquer?

Since you're applying water, I guess you can just wipe or even rinse with water and then dry?
 
Nobody should be wet sanding between coats of nitro.

Nitro melts into itself when applying additional coats which are being added to build up the finish.

So the only sanding that would be needed is if there was a run or something that is not going to go away on its own. That would be done dry. Introducing water between coats of nitro is a recipe for disaster and is verboten. If any dry sanding of a run for example is done in between a quick wipe with a tack cloth is all that should be needed to remove any dust etc.

Here is a finishing schedule.

https://www.stewmac.com/video-and-ideas/online-resources/learn-about-instrument-finishing-and-finish-repair/nitrocellulose-finishing-schedule/

If wet sanding is done at all it is done after all finishing is complete and prior to buffing.

https://www.stewmac.com/video-and-ideas/online-resources/learn-about-instrument-finishing-and-finish-repair/wet-sand-before-buffing/

And from Warmoth's Warranty Page.
We'd like to offer a word of caution about wet sanding:

DON'T DO IT!

Only after there are several coats of hard finish on the body should you even consider wet sanding. Water will swell the wood and create all kinds of other problems. Be careful not to get water in the body holes and cavities. The end grain here is not well sealed and the glue lines will open very easily if they absorb water. We do not wet sand nor do we recommend this process. Ref https://warmoth.com/index.php/warranty

Did I mention nobody should be wet sanding between coats of nitro.
 
Thanks for the tip.

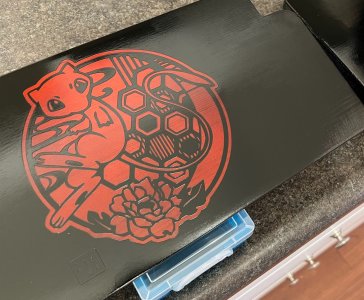
How would you clear coat something like the following? This is an experiment I'm doing on a wooden stool but I plan to replicate similar steps on my guitar.

The base coat was red. Then I masked it and overcoated with black. Removed the masking tape, and now applying clear coat. I can still feel to the touch that the black area is higher than the red, and because the red area is pretty sizable, I don't think it'll come to a complete flat surface without polishing it down. Will I ever get enough build up of clear that I won't feel the gap?
 

Attachments

  • mew.JPG
    mew.JPG
    418.2 KB · Views: 91
I'd shoot 3 coats of clear lacquer and then lightly sand between coats with 320. This would have to be repeated several times to get enough build to get it level but it could be done. Lots of labor and care not to burn through the clear to color coat would be involved much like when racing stripes are done on the old Fender guitars. 
 
Tonar8353 said:
I'd shoot 3 coats of clear lacquer and then lightly sand between coats with 320. This would have to be repeated several times to get enough build to get it level but it could be done. Lots of labor and care not to burn through the clear to color coat would be involved much like when racing stripes are done on the old Fender guitars.

Racing stripes are exactly what I had in mind. Are the stripe areas on those guitars completely flush?
 
I'm facing this with shellac which is similar as far as burning in coats and shouldn't have to. 
 
It’ll take the same number of coats to level regardless of how long you wait to sand. I expect you need to spray at least 12 coats of clear.

How many coats of black did you spray?

Most of the time, like Fenders old racing stripes, there is no effort to level. But if you out the effort in, a flat surface really makes the graphic look better.
 
DuckBaloo said:
How many coats of black did you spray?

Barely enough make the undercoat opaque, plus a bit. Probably somewhere around 2 coats but I think I do light passes.

After using half of stewmac clear coat rattlecan against a surface area equivalent of a guitar body front, I'm getting a pretty glassy/glossy finish. Sticky to the touch, just like a clear gloss nitro finish.

I can still feel the gap between the undercoat and black though. Makes me feel I might burn around these edges as I sand and therefore need more clear coat.
 
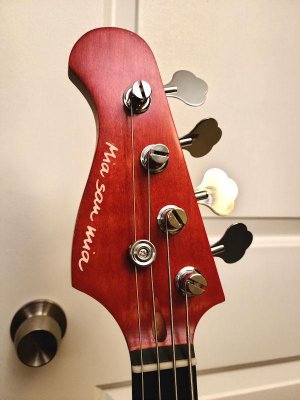
This is an example of what I did a year ago. The motto of FC Bayern Munich was cut from Cricut vinyl, so it's pretty thick. After I applied it, I coated the headstock with a lot of lacquer. I think for the headstock alone, I went through almost an entire rattle can.  If not the whole can, then a significant portion of it.

After probably about 5-6 coats, I'd gently sand down the coating on top of the vinyl itself, and I did wet-sand with 400. This was probably my 4th build, so my supply and equipment inventory wasn't as fully stocked as it is now.  I wiped down with water to clean off debris and dried thoroughly and completely.

Then repeat with more lacquer, so that it would melt down and fill into the low spots (especially the voids inside the lettering).  I kept this up until the build-up started to feel smooth to the touch.  By the time I was near done, I could barely tell there was a raised surface there from the vinyl.  But it was a lot of lacquer.


Attachments

  • 003.jpg
    003.jpg
    50.5 KB · Views: 97
Racing stripes are exactly what I had in mind. Are the stripe areas on those guitars completely flush?
Yes they are. I shoot the base color over a perfectly level sealer coat, level sand the color coat and tape off the stripes with very thin low tac tape. Next I spray the top color coat and pull the tape before starting to shoot the clear coats. It is very labor intensive due to the thin mil build of lacquer but eventually it can be leveled after a bunch of coats. I'm removing finish from the entire surface with each between coat sanding but leaving finish in the stripe area as my sanding block bridges the low spots until the finish fills them in.
 
NedRyerson said:
This is an example of what I did a year ago. The motto of FC Bayern Munich was cut from Cricut vinyl, so it's pretty thick. After I applied it, I coated the headstock with a lot of lacquer. I think for the headstock alone, I went through almost an entire rattle can.  If not the whole can, then a significant portion of it.

After probably about 5-6 coats, I'd gently sand down the coating on top of the vinyl itself, and I did wet-sand with 400. This was probably my 4th build, so my supply and equipment inventory wasn't as fully stocked as it is now.  I wiped down with water to clean off debris and dried thoroughly and completely.

Then repeat with more lacquer, so that it would melt down and fill into the low spots (especially the voids inside the lettering).  I kept this up until the build-up started to feel smooth to the touch.  By the time I was near done, I could barely tell there was a raised surface there from the vinyl.  But it was a lot of lacquer.

Nice. Cricut vinyl is exactly what I used too, except I just used it as a stencil.
 
Back
Top